
Post by Jean B. on Apr 21, 2022 11:23:55 GMT -5
MAY 2016
Do I need professional help when I start a new model not having finished the last one? However, here we go:
Rare model, but the proportions are awful! The front and rear fenders are much too long, the ease of the original car is not really recognizable:

The original car:

The tail has to be removed:

Fenders are already shortened, tail is covered with solder:


Shaping:


Rare model, but the proportions are awful! The front and rear fenders are much too long, the ease of the original car is not really recognizable:

The original car:

The tail has to be removed:

Fenders are already shortened, tail is covered with solder:


Shaping:


Thanks for that picture, I've never seen that before! Well, I wondered which version I should make, but the photo reveals that the "Flying Banana" had very different front and rear fenders, as well as completely different hood, grille and headlights. What I'm doing now is crazy enough - the Flying Banana I suppose is easier to be completely scratchbuilt :mrgreen:
Wo
Great subject Jean, but seriously, wouldn't it be easier to just make this model from scratch rather than using the (very) basic Mikanusue as a base?
....the Flying Banana I suppose is easier to be completely scratchbuilt :mrgreen:
Great subject Jean, but seriously, wouldn't it be easier to just make this model from scratch rather than using the (very) basic Mikanusue as a base?
Of course you're right, but I think I have a kind of "helper syndrome" (do you say so?). There's an old and ugly model car crossing my way, looking at me, meowing and saying: I'm an enchanted beauty, kiss me and I'll grant you three wishes. And then I'm doing everything to turn the old and poor little model car into something beautiful... O.k., the thing with the three wishes hasn't worked yet, but you never know...

...Michelangelo of car modelling... What an honour :oops: Will try to meet your expectations! 
After melting pounds of solder, the Aston bodywork has slightly changed, hope it can be seen on the photos.
Before:

...and after:

Front and rear fenders have been shortened, tail has been shortened and "lifted" - and some other little enhancements...
After melting pounds of solder, the Aston bodywork has slightly changed, hope it can be seen on the photos.
Before:

...and after:

Front and rear fenders have been shortened, tail has been shortened and "lifted" - and some other little enhancements...
The main works on the body have been completed, now only the slight irregularities have to be covered with putty step by step. Fenders got a new shape, tail is shortened, details are removed:


Together with the base plate you can see how much shorter the whole car became:


Together with the base plate you can see how much shorter the whole car became:

Believe me, the works on this Aston are quite cruel! It's - for me - very difficult to solder a white-metal model, because all material - solder and body - must have the same temperature, but you can imagine what happens if a white-metal model comes up to 300 °C... :shock: So you have to work very quick, heating the body until 5 degrees before the melting point and then immediately applying the solder drop by drop, not too much, otherwise the body first gets big holes and then passes away...
Finally, however, worst works were made, and here you can see the newly shaped base-plate:
before...

...and after

Finally, however, worst works were made, and here you can see the newly shaped base-plate:
before...

...and after

Wheels are fitted into the body:

Template for the grille, cutting out the hole will be the next step:


Template for the grille, cutting out the hole will be the next step:

Printed the design of the grille on paper and glued onto the body. Then milled out to the contures:

Another template printed on foil helps controlling the lines. Stainless steel mesh curved:

Mesh cut out to the desired shape (the frame will be photo-etched and placed onto):

Marking the lines of the bonnet:

Designed the shape on the PC, printed and glued onto 0.5mm polystyrol, bent and glued onto the body, scribed the lines with a steel needle:

Voilà:

(nose has been shaped concave to achieve the look of an ant-eater)
(trunk hood has been made as well, photos will follow tomorrow )

Another template printed on foil helps controlling the lines. Stainless steel mesh curved:

Mesh cut out to the desired shape (the frame will be photo-etched and placed onto):

Marking the lines of the bonnet:

Designed the shape on the PC, printed and glued onto 0.5mm polystyrol, bent and glued onto the body, scribed the lines with a steel needle:

Voilà:

(nose has been shaped concave to achieve the look of an ant-eater)
(trunk hood has been made as well, photos will follow tomorrow
)We had a first really hot summer day in Berlin, and I was allowed to leave my dungeon, so I haven't worked that much...
Body looks awful due to the filler, but it's necessary to get a smooth surface step by step. Lines for the trunk hood were cut successfully:

Really delicate: cutting the vent holes in tear-drop shape in a way that the steel mesh properly fits into so that finally a photo-etched frame can be glued onto:

Looking forward to seeing what colour you paint this Jean. The dark green one you showed above looks great, but the colour hides some of the fine detail like the teardrop vents you just added.
You won't be surprised when I tell you that this is a difficult question for me since beginning this model... The colour when I received the car was black (shown on the first photos), and when I stripped it, it revealed that it had formerly been built and painted an intensive green. I tend to follow the nowadays version with the licence plate "LMF 385" which seems to be the original for the Mikansue model. That with dark green paint all the details will disappear is exactly what I fear! Therefore I think about leaving all the details in bare nickel-silver resp. "chromed". This way the details would stand out well, and to be honest: That the car nowadays is painted all-over seems to me like a "modernistic" interpretation and not necessarily original.
I think I've said it before, but I don't think keeping the 'Mikansue' stamp on the baseplate reflects how much effort you put into your creations. I think you should fill in the Mikansue stamp with solder.
I tried hard to keep the Mikansue writing when rebuilding the base-plate
 ! Imagine that in one hundred and fifty years some archeaologists compare this model with the remaining other three of this type and wonder, how this goes together :lol:
 Jean,
IMHO - Keeping the 'Mikansue' stamp on the baseplate really illustrates your accomplishment. Sometimes, like this one, it would be nice to have an original on hand just to show the difference when illustrating the before and after.
A model maker I know always etches his work with his trademark Buzz (for Buzz Lockwood) and the month and year, ex: 9/89 on every model he builds. I have started doing that with the Brooklins that I "enhance" with my stewil and the date modified though my work is nothing like yours.
I so enjoy watching how you "fix" these little models Jean.
Here is one of mine if anyone is interested, but without a pic of the baseplate.
www.scale143.com/viewtopic.php?f=47&t=8824
I've already seen your thread and was fascinated how even and glossy your painting is made, compliments! Tell me more about the details (type of airbrush, paint and so on)! And meanwhile I keep the original prints on the baseplate, but add a personal photo-etched sign with year and number (of my collection
).Those vents are a work of art. Very neatly done.
Thank you! I don't think that it is a work of art, I think it's more a work of a nerd!

Not an entire new start, but I found a top shot of the C-Type in the www and realized that I forgot the perspective distortion when comparing the usual pictures and my model :twisted: The tail must be made significantly longer, the endings of the rear fenders rounder. So I unpacked my soldering station once again and shaped the tail once more. It's very difficult to create proportions which roughly meet the original ones, but I think this time it should be o.k:

Furthermore lots of holes were drilled for all the tiny details and the shape of the doors is scribed into the body:

Thin wire was added to resemble the seams between fenders and body:


Furthermore lots of holes were drilled for all the tiny details and the shape of the doors is scribed into the body:

Thin wire was added to resemble the seams between fenders and body:

Jean, I was wondering why you use solder and not automotive body filler for example ? I appreciate the solder is probably easier to work and shape, but I'd be worried about its long durability ?
I guess I've chosen the hard way all my life... :? But really, I am so fascinated about modelling with metal that I always try to solve any problem with various metals. And if it is possible to change a white-metal body with the same material - as solder is - then I choose this material to stay "authentic". But I have to admit, after this torture I really intend to use metal putty the next time...
A first coat of primer has been applied to see the remaining irregularities:

After retouching and a second layer it looks like this:

(rough surface has to be sanded, of course)
The next step will be to design new seats, as the original ones by Mikansue seem to have the scale 1/60 rather than 1/43. As the proportions of the car are still very difficult, at first I lifted up the seat shell by a 1.0mm sheet of nickel silver:

Couldn't resist to try the colour, "British Racing Green" by Humbrol. So a first coating is sprayed on, next steps in painting will take a couple of days as the enamel lacquer needs to dry quite a long time... 


Jean,
You saidA wonderful bit of extra detailing - Kudos!
Now I wonder if you will paint them the typical black. That would be a real challenge.
This project is your #1 to me, and keeping with the solder (lead) was typical of historic body work of that time period,
therefore you are fixing the model in an archeological manner. More Kudos to you.
You said
Thin wire was added to resemble the seams between fenders and body:
Now I wonder if you will paint them the typical black. That would be a real challenge.
This project is your #1 to me, and keeping with the solder (lead) was typical of historic body work of that time period,
therefore you are fixing the model in an archeological manner. More Kudos to you.

...wish you had told me earlier! I must admit that I haven't seen this detail - the photos of the different cars from different periods show both versions: black and painted. I think now I will leave them painted, but it would have been no very difficult work to place the black painted wire after painting the body... well, maybe next time
And yes, I love to work with with classic materials, therefore I only collect white metal cars and try to work with this material as much as possible! They will never show the detailing and the "correctness" of modern resine models, but really: I love this odd charme! Meanwhile a second layer of painting has been sprayed, and the result looks this way:


I guess a third layer has to follow, as this colour doesn't cover very well...
@stewil: Thanks for your pictures! Very nice detailing and really masterly finished paintings! Guess I will have to make lots of experiments to achieve that "realistic" touch your models show 
The plumber is coming and I have to leave the basement for a couple of days :evil: At least I could finish first templates for the headlights and the seats which will be casted in white metal:

So it's the best time to start with designing the photo-etch parts, guess it will take a while:


The plumber is coming and I have to leave the basement for a couple of days :evil: At least I could finish first templates for the headlights and the seats which will be casted in white metal:

So it's the best time to start with designing the photo-etch parts, guess it will take a while:

Jean - did you ever post a step by step photo guide to photo-etching?
Thanks
Thanks
Of course I did
scale143.com/viewtopic.php?f=47&t=10535Silicone moulds were made from the polystyrol patterns for seats and headlights and casted with white-metal:


Patterns and ready parts:

Plus rear lights which were turned from aluminium wire:

Marker lights were drilled out and filled with clear resin:

Fuel caps were polished and glued into body, plus door hinges (hardly visible because painted):


Patterns and ready parts:

Plus rear lights which were turned from aluminium wire:

Marker lights were drilled out and filled with clear resin:

Fuel caps were polished and glued into body, plus door hinges (hardly visible because painted):

Finally, the photo etching film is designed:

Always a difficult work to make all the radii of windows etc. matching the coachwork. At last only with the ready-made parts it turns out if everything fits :?

Always a difficult work to make all the radii of windows etc. matching the coachwork. At last only with the ready-made parts it turns out if everything fits :?
...et voilà:

And I can already reveal: Window frames fit very well

And I can already reveal: Window frames fit very well

Baseplate and interior sprayed black:

And some of the details:


And some of the details:

I hesitated all the time if I should leave the painting as it was or if I should polish it... Finally, I was courageous and made it :twisted: :


I really have to say that it was worth it! The surfaces are much more even, the wet gloss is eliminated so that the "scale effect" turns out. Some retouches still have to be made, but generally I'm very happy with the result !
!
The wheels are now painted black:


I really have to say that it was worth it! The surfaces are much more even, the wet gloss is eliminated so that the "scale effect" turns out. Some retouches still have to be made, but generally I'm very happy with the result
!The wheels are now painted black:

reeft1: You're welcome! 
Radiator intake and the mesh for the grille is glued in:

Gear lever, handbrake and pedalry are glued in:

Headlights on their place:

Dashboard:

...and I guess we won't see that much of the headlights :roll: :

Radiator intake and the mesh for the grille is glued in:

Gear lever, handbrake and pedalry are glued in:

Headlights on their place:

Dashboard:

...and I guess we won't see that much of the headlights :roll: :

Love the grill, very nicely made! Shame that those nice headlights are pretty much invisible...
I think really is the true measure of Jean's passion - going the extra yard to accurately reproduce parts even when they are barely visible. I'm looking forward to seeing the next set of pictures and hope we'll see it sitting on its wheels.
In Germany we say: "to do something for fun at the joy"
But this time it was the first time to make headlights completely by my own, and the Aston is a fine object to try this without the danger of failing I promise, there'll be many cars in future which will show self-made headlights like these in their full beauty Dashboard is now completed with all switches and steering column:

Side vents with frames, bonnet strap, bonnet fastenings and marker lights are attached:

And - to thrill you one more night - the rear wheels in their final layout:

Going on and on: The "wedding" took place, base and body are finally united , wheels are rolling:

Seats and steering wheel complete the interior:


Rivets for the persenning are made of 0.2mm steel wire:

And a roll bar has been installed:

, wheels are rolling:
Seats and steering wheel complete the interior:


Rivets for the persenning are made of 0.2mm steel wire:

And a roll bar has been installed:

Wow. Your wire wheels are second to none.
To be honest: That's because I didn't make them by myself :oops: . I had one set of Tin Wizard wheels left and they fit perfectly, so that I was too lazy to design the wheels by photo-etching...
The making of a true masterpiece - this could be the definition of 'museum quality'. And all based on a heavy-handed Mikansue kit!
Regarding those semi-visible headlights, I'd say their understatement is the very trick for the careful observer who spots them - the 'a-ha effect'. Brilliant.
Regarding those semi-visible headlights, I'd say their understatement is the very trick for the careful observer who spots them - the 'a-ha effect'. Brilliant.
Museum quality? You're so very kind, thank you! I always regard this as a nerd's tinkering... Anyway, that's the way I am
Very nice Jean. It looks very true to the original you posted back on page 1 of this thread. Not my favourite Aston Martin by any means, but a truely original piece for your collection. I know it's not for sale, but I wonder what price it would fetch on eBay ? ? ?
Not my favourite one, too - but the only pre-war Aston ever made in white-metal. And you know, these are the criteria of my collection: white-metal, 1930 - 39, luxury brands and coachbuilt, preferrably streamlined. And I'm not sure if there is a market on ebay for those kind of hand-builts. I think most people are searching for "virgin" factory builts or for high-detailed resin models. So the only problem I have is to decide who will inherit these cars once
But, back to our topic:
Frame for radiator grille, Aston logo, support for licence plate:

Fuel caps, hinges for trunk lid (sorry for the blurry photo):

Rear end fully equipped:

So now only the windscreen is still missing, as it seems...

So now only the windscreen is still missing, as it seems...
Wow! Love the fishtail exhaust, nice detail.
...and one of the very few parts remaining from the original model!
Seems as if the waiting comes to an end. Just fixed the last details, and so I'll like to give the usual sneak preview:
Windscreen this time as a "sandwich", two layers of photo-etched frame with a fine groove all around on the rear side to take the glass and hold it:


With additional wind deflectors on each side:

Wipers and rear mirror:

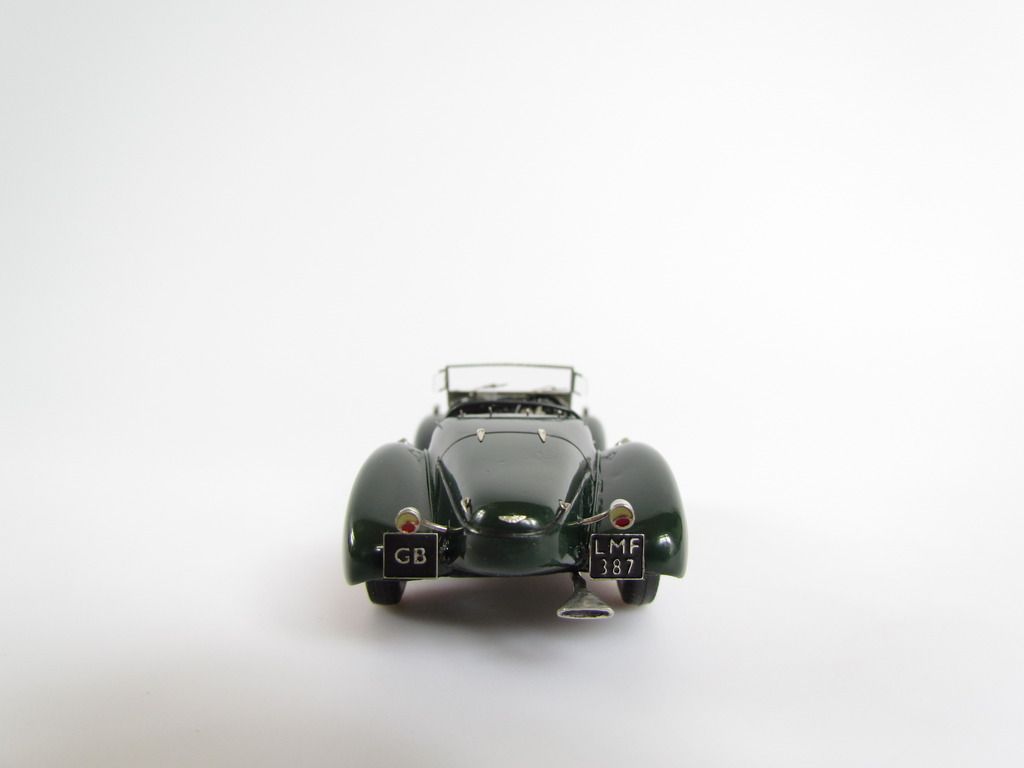
Licence plate:

Now all the glue has to dry hard over night, and I hope I can touch the car in any way to transport, otherwise I'll have to declare my dungeon as my museum! After a careful cleaning I'll take some nice pictures tomorrow and will show you
Finally the photos of the completed car. Unfortunately only with white background, the weather in Berlin is so terrible that I simply don't get enough daylight for taking some diorama shots which I had planned Well, perhaps within the next days, if you like
Before...:

...and after:


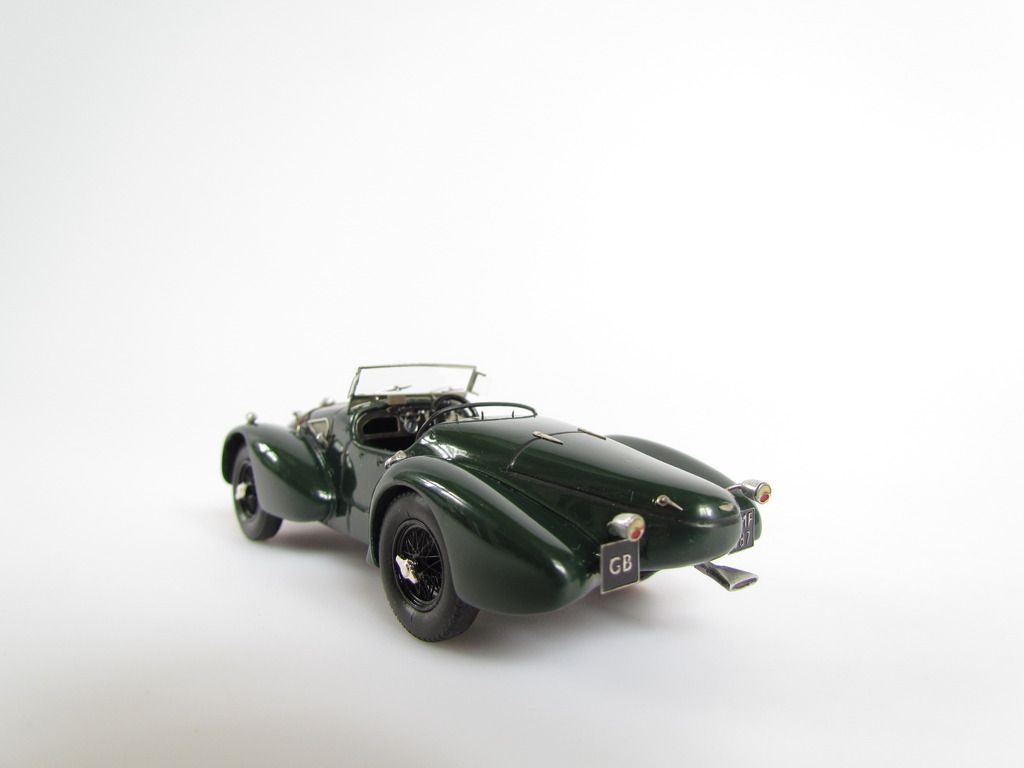


The recessed headlights:


It was some hard work to build this model, as it simply was very, very badly made... Nevertheless: For the first time I tried to change the original shape of a model car by soldering, and it was the second car which I have airbrushed with gloss paint - I have to admit that I'll have to make lots of further tests So I think that I acquired some more skills for starting the next project which will require a similar treatment...
Well, perhaps within the next days, if you like Before...:

...and after:


The recessed headlights:


It was some hard work to build this model, as it simply was very, very badly made... Nevertheless: For the first time I tried to change the original shape of a model car by soldering, and it was the second car which I have airbrushed with gloss paint - I have to admit that I'll have to make lots of further tests
So I think that I acquired some more skills for starting the next project which will require a similar treatment...Amazing to think your fist post regarding this model was only on the 7th May and you have transformed this is just a little over a month. I couldn't do that if I had a whole year.
And that was already a long time
! But beside joking, just start your project and you will see, if you don't count the hours and days, you'll finish sooner than you'd thought! Counting the cars in my collection, I guess I'll be 86 and a half year old when finishing the last one... :lol: Spectacular end result! Another one to be very proud of.
Thank you! And yes, I am proud of! Although I always see the irregularities and the not-so-good details, in general it's a nice feeling to look at the result
And now, as promised, some "diorama" shots:


And teamed up with its Italian brother in mind:


And of course I'd like to invite you to my new thread, starting today
Very atmospheric pics. Is the Italian a Stanguellini?
It's a Lancia Astura Mille Miglia, 1940. I grabbed this White-Box model for € 4 - it already underwent a slight treatment...