
Post by Jean B. on Apr 22, 2022 11:01:56 GMT -5
MARCH 2016
This thread has been transferred from S1/43. Due to technical reasons possibly not all comments of members are visible. I'd like to apology for this. The photos, hosted by photobucket, will be deleted in near future. They will be replaced by new versions from flickr, but this will take some time. For any questions, please contact Jean B. Thank you!
Ready for a new handbuild? I'm going ahead with the lavish Flying Star by Carrozzeria Touring, built on a long-wheelbase chassis of an Isotta Fraschini 8A, 1931. This style was build on several chassis, mostly from Alfa Romeo. On Isotta chassis, there were two made, one with a short, the other with a long-wheelbase. Unfortunately I forgot to take some photos of the original model car, but as professionals you know how factory-built Western Models look like... :?
Here we have the already detached model car:

Beautiful, isn't it...:

Here we have the already detached model car:

Beautiful, isn't it...:

...and the underside of the front wing cleaned up:

The fugues are always much too thin at all Western Models and usually disappear under the heavy lacquer:

Here I have already deepened them:

This was the original condition of the rear screw hole:

I made a new fixing with metal putty:

The way to turn "full-bodied" headlights into "real" ones:


The fugues are always much too thin at all Western Models and usually disappear under the heavy lacquer:

Here I have already deepened them:

This was the original condition of the rear screw hole:

I made a new fixing with metal putty:

The way to turn "full-bodied" headlights into "real" ones:

It's really embarrassing, but I have to admit that the radiator of the Isotta is irretrievably lost. When I tried to improve it, all my thoroughness didn't help. After 22 hours on the roof top my psychiatrist succeeded in convincing me that there will still be some life to live, and I started to making a radiator by myself. First I had to get a sheet of 3mm nickel silver. I cut out an appropriate piece with a small jeweller's saw and finished it with several files and sanding paper. This way I was able to bevel the sides to match the bonnet - this was not the way with the original radiator. Finally I milled out the center rectangle and painted it black, a photo-etched grille will follow later:


And now for something completely different: If anybody is wondering why my modelling proceeds so slowly, here's the reason. At the moment I am restoring an old secretary's desk, inherited from my grandparents many years ago. It was covered with an ugly dark brown varnish, and it needed some litres of acetone to get rid of it! By the way, did you ever see sounds or hear colours :mrgreen: ?


But now I am almost ready, and already continued with the Isotta Fraschini. Here are the latest results:
The bumpers were made of "full metal". I tried to open the gaps between upper and lower rods, but this was not satisfying. So I made complete new ones of steel wire and a photo-etched metal strip. This is quite close to the original bumper:

The base-plate was somewhat "naked", the propeller shaft was not simulated by WM, so I made one of steel wire and had to cut a slot into the plate:


This is the first test of assembling all the parts, and it seems that the driver of the Flying Star has to be at least 2.50m tall to reach the pedals. So I shifted all parts backwards, designing also a tunnel as a cover for the propeller shaft:

The pedalry has been eliminated, I will made a new one photo-etched, and I think that Isottas were right-hand driven, weren't they???


As the whole www bursts from kitten videos and photos, we should join:

That's a beautiful wood emerging from underneath the varnish.
...and now it's ready! To be honest, I'm quite proud to have done this :oops: Working with wood is not my specialty. The small "temple" with the two pillars on top is a reconstruction as it was lost.


Knowing about your skills, I presume the cat is carved from marble... 

Actually it's woven from mice's whiskers

Well, nothing to keep me away from the real important things anymore, and here are the news about the Isotta. The Flying Star was build on two wheelbases - short and long - and as the lwb shows a small step on the right-hand side behind the door, I suppose that it should had a dickie seat, which was common even for elegant roadsters of that time:
before:

making a template:

...and after:

As I am repeatedly unsatisfied with ready-made wheels and tyres, I am now starting to make both by my own. The wire wheels I've already shown in my photo-etching thread, meanwhile I designed my own tyres and casted them in black resin. Perhaps resin might be a little bit unusual, but it shows several advantages: You can determine the exact size of the tyre (rubber tyres always change their size when pulled over the rim), they will never get "flat" even if the model car stands on the same place for 100 years
, and if white-wall tyres are required, the hard resin is easily to be painted resp. air-brushed. The first result:
(ready-made wheel on the left, the self-made tyres, and the first sample in the center)
The rear bumper half-way:

...and completed (original bumper is already cut off):

Exhaust pipe (there was none by WM):


...and completed (original bumper is already cut off):

Exhaust pipe (there was none by WM):

The marker lights were drilled out and filled with clear resin:

Dashboard before:

...and after:

(will serve only as support for the photo-etched one )
)
Hard to see anything, but I spent a couple of hours to solder the front ends of the springs (there were gaps for a horizontal rod which I removed):

When I received the Isotta, the pillar was glued, yet broken. And of course this is a very delicate case for a repair... :
:

First I have fixed it onto a marble plate with UV-glue:

And after soldering it looked like this:

After having relocated the holes in the bodywork (the pillars did not fit very well...) and having polished the pillars, it looks like this:


And for finishing this day's labor, the steering wheel before...:

...and after:


Dashboard before:

...and after:

(will serve only as support for the photo-etched one
 )
)Hard to see anything, but I spent a couple of hours to solder the front ends of the springs (there were gaps for a horizontal rod which I removed):

When I received the Isotta, the pillar was glued, yet broken. And of course this is a very delicate case for a repair...
 :
:
First I have fixed it onto a marble plate with UV-glue:

And after soldering it looked like this:

After having relocated the holes in the bodywork (the pillars did not fit very well...) and having polished the pillars, it looks like this:


And for finishing this day's labor, the steering wheel before...:

...and after:

Meanwhile I've decided to remove the WM running board strips: All Flying Stars by Touring show a certain type of running board, a plain dark rectangle with some strips on top. The type made by WM I have only found on one single other Isotta, a completely different type of car. As the original strips of the model also were too crude, I will make new photo-etched running boards:

Now all works on the original pars are completed, the coming time I will spend designing the photo-etched parts

Now all works on the original pars are completed, the coming time I will spend designing the photo-etched parts

And here are the first results in designing the photo-etched parts:
Door panels with pockets, spoke wheels:

Dashboard, IF-logo hanging between the headlights, licence plates and pedalry:

Running boards, radiator mask and window pattern:

Door panels with pockets, spoke wheels:

Dashboard, IF-logo hanging between the headlights, licence plates and pedalry:

Running boards, radiator mask and window pattern:

I've removed the small "wings" behind the front wheels, I think WM made them only for stabilizing the base plate:


The film pockets for photo-etching are completed, by the end of the week I will start with etching:


The film pockets for photo-etching are completed, by the end of the week I will start with etching:

Etching has been done, but not all parts are really satisfying, especially the wheel spokes have to be made again... :?
Here we have the template for the windscreen (still don't know how to cut this shape from glass...):

The radiator mask:

Dozens of rings forming the wheel rims:

Interior door panel with pocket:

Completed licence plates (kind of fantasy...):

Topping for the dickie seat step:

Parts for dashboard:

... and a first impression of it:

First layer of primer:


Baseplate and minor parts painted black:

Second layer of primer (not that difference, but some honing was necessary and therefore a second layer of primer):

The exhaust pipe with self-made muffler (probably the wrong position, but there's no other space...):

And - tadaaa! - the first completely self-made wheel exactly matching the measurement of the Isotta Fraschini 8A:


(looking much better with a little distance :oops: )
The grille is completed, with radiator cap, mask and IF-badge:

And the completed dashboard:

Tomorrow I will hopefully have first results of the painting tests I have made today...

And the completed dashboard:

Tomorrow I will hopefully have first results of the painting tests I have made today...
The bench with piping, interior door panels with handles, gear lever, steering wheel and spare-wheel persenning:

And the first layer of painting. It's the first time that I'm doing the paintwork with glossy enamel lacquer and airbrush This first layer seems to be quite satisfying, of course it does now need quite a long time to dry hard, intermediate sanding and a second layer...


And the first layer of painting. It's the first time that I'm doing the paintwork with glossy enamel lacquer and airbrush
 This first layer seems to be quite satisfying, of course it does now need quite a long time to dry hard, intermediate sanding and a second layer...
I propose that we give Jean a FREE lifetime membership of S143
You're so cute :oops: ! Would that mean that I won't have to put a coin into my typewriter everytime I push the "post reply" button?
Well, I planned to do so many things on the Isotta today, but I was busy nearly all the day only with the wheels... Takes a lot of time to build them from photo-etched parts!
Lower and upper halves with the center hub and completed rim behind:

Resin-casted tyres:

...and milled out nearly to the desired size:

And the completed spare wheel:

And now altogether, wheels are completed:

Running boards made of "lemonwood":

And the second layer of ivory lacquer:


Running boards made of "lemonwood":

And the second layer of ivory lacquer:


It took the complete day and a waste of several square metres of glass sheets - but finally it is done: The heart-shaped windshield:

Well, I think a bottle of Bourbon and a dozen tranquilizers will do for this night

Well, I think a bottle of Bourbon and a dozen tranquilizers will do for this night
 Wow. Now you can never touch it again...
Don't worry, it was only put into position for the photo
At the moment not very much is happening, as all tiny parts are already done and the painting has to dry hard, which needs some days...
So - no great difference - I post this photos with the third and final layer of paint. I think the next days I will try to go ahead...


To pass the time, please visit my new thread, dealing with the recently bought Aston Martin C Type. See you later!
The first summer weekend in Berlin made it hard to work in the basement So for today I only made some minor things like attaching the wheels and fixing gear lever and pedalry:


So for today I only made some minor things like attaching the wheels and fixing gear lever and pedalry:

Finally back at work, and here are the latest results:
BMF chroming is ready:

Marker lights were mounted:

Dashboard and interior door panels are on their places:

So, let's see how far I'll get tomorrow...
BMF chroming is ready:

Marker lights were mounted:

Dashboard and interior door panels are on their places:

So, let's see how far I'll get tomorrow...
Looking great as expected.
Surprised to see though that it's right-hand-drive......I thought it would have been left-hand drive ?
Surprised to see though that it's right-hand-drive......I thought it would have been left-hand drive ?
I was not sure and checked lots of photos on the www, as the long wheelbase Flying Star seems to exist in only one - bad - photograph. The Isotta Fraschini 8A (and I do not mean the white Flying Star mock-up in Australia!) were usually right-hand driven, and that was also common for luxury cars in all Europe throughout the 1930s. Only German cars were strictly left-hand-driven - Bugatti, Talbot, Hispano, even Austrian cars until 1938 ("Anschluß ans Reich") - they all were rhd. So I felt free to move it to the "wrong side"
Final countdown, as it seems...
window pillars covered with BMF:

bodywork and chassis "married":

steering wheel:

lenses for headlights:

grille and headlights attached:

window pillars covered with BMF:

bodywork and chassis "married":

steering wheel:

lenses for headlights:

grille and headlights attached:

Dear friends, I guess I'm ready - at least with assembling. Here we have the sneak preview, as usual:


Tomorrow, when the glue has dried hard, I'll give the car a gentle cleansing, and then I will take some nice photos. So stay tuned, until tomorrow!


Tomorrow, when the glue has dried hard, I'll give the car a gentle cleansing, and then I will take some nice photos. So stay tuned, until tomorrow!
Lovely work as always Jean. However I wonder if on this occasion you made the wheels just a fraction too small.....should they be ~10% larger to fill more of the wings ?
In fact the Isotta had such small wheels. I researched data, compared with the measurement of the model car (which is really exactly 1/43) and also on the vintage photo it is recognizable that the wheels are comparatively small. But consider, it was a huge car!
It's indeed a difference between the short and the long wheelbase version, and there were furthermore two sizes of wheels for the 8A chassis (895 mm first, then 839 mm outside diameter). The last series - of which the lwb Flying Star is - had the smaller ones. The only (?) available photo of the car shows the "tiny" wheels:


Weather in Berlin is lousy, the Eisheilige ("saints of the cold"? ) are at work, and so I could concentrate on the photo-shooting. Please enjoy!


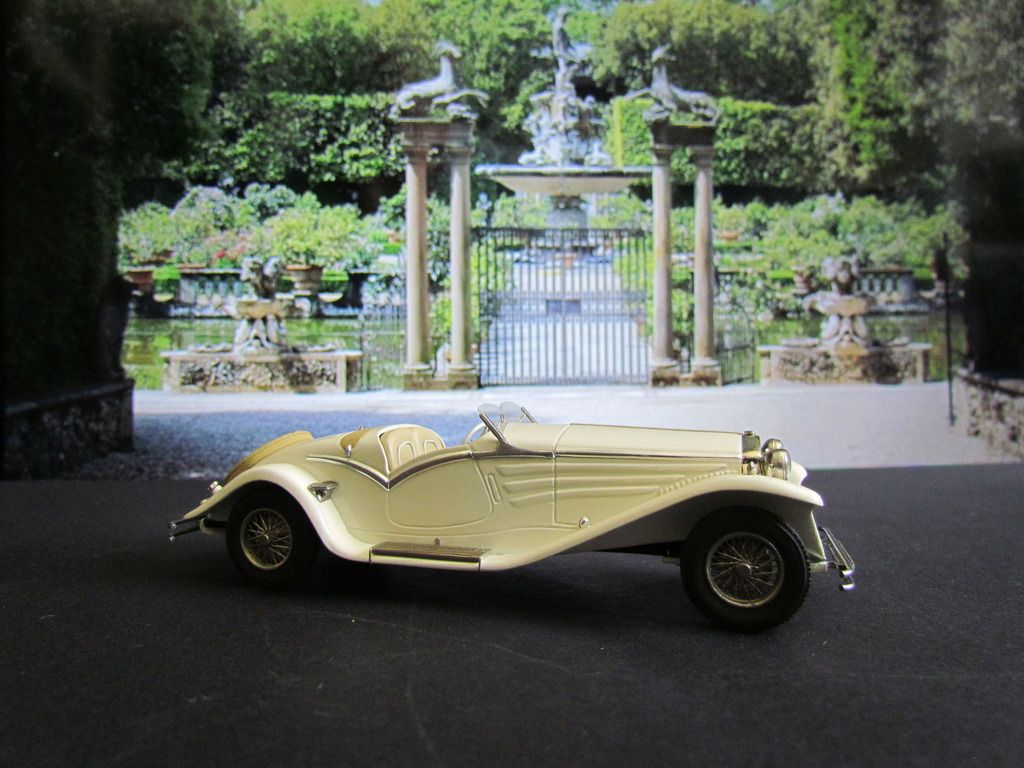
A coincidental meeting with its successor:


And having found its new home:

Thanks for joining, and don't forget to follow my "Aston Martin" thread, thank you!
) are at work, and so I could concentrate on the photo-shooting. Please enjoy!


A coincidental meeting with its successor:


And having found its new home:

Thanks for joining, and don't forget to follow my "Aston Martin" thread, thank you!
