
Post by Jean B. on Apr 22, 2022 11:30:10 GMT -5
JUNE 2016
This thread has been transferred from S1/43. Due to technical reasons possibly not all comments of members are visible. I'd like to apology for this. The photos, hosted by photobucket, will be deleted in near future. They will be replaced by new versions from flickr, but this will take some time. For any questions, please contact Jean B. Thank you!
Life goes on, and the next model car is waiting for my treatment. This Daimler model is certainly well-known, especially for its gigantic wheels, which are almost as big as the ones of the Bugatti Royale :shock: The story is reported several times, although there seem to be some gaps - in my opinion. Experts assume that there was only one lowered and shortened chassis of the Daimler Double Six 50 built, but usually at least two "sisters" were built of most luxury cars. So it remains a little unclear, if the (only) same chassis carried three bodys successively or if there were two chassis with one resp. two bodies. Anyway, here we have the three types:
1st, built in 1929:

2nd, built around 1930:

3rd, built around 1931:
 This photo is described as "June 1961" and seems to be the oldest photograph of this third body. Therefore I am studying all the details which are recognizable. The wheels are painted, as it was the case with almost all two-door Double Sixes. The hood is "light-tanned" and maybe the original one, regarding the fact that the car was then only 30 years old. The two-tone painting is surely not original, as the design does not implement such as there is no "clean" line between the areas below and over the belt-line. Furthermore two-tone paintings were not the standard with sporty roadsters as this was one. And - finally: The predecessor showed a plain "light" painting and obviously many details of the third car were taken from the second one, which was damaged in a roll-over accident.
The original factory-built model car looked like this:


Disassembling:

Stripping:

Typical Western Models :roll: :

Well, within the next days I will post the steps I've already made this weekend. Unfortunately I have to pause a couple of days as I severely hurt my right hand :cry: Not as you may think by bathing in hot solder or drilling through my finger tip, but when longing in a candy jar and cutting at its broken edge :oops:
So it's true that sweets are bad for you... 

...and worst for my hands...!!!
Get well soon, Jean!
Looks good, doctor said he could save possibly up to three fingers of my right hand :mrgreen:
you'll surely make me not liking mine ever again! 

...or inspire you to deeply dive into model car building...

On mine I snipped off the hideous radiator ornament. I show it to you just in case, heaven forbid, you wanted to cheat with parts!
Well, wait for my suggestion for the radiator ornament, which actually is a thermometer. I think I'll make it anyhow in 1/43...

The rear fenders had to be taken off the body, as there is simply not enough space for the massive wheels. The chassis bars had to be doubled so that I could remove the material near the wheels:


Fender before:

...covered with solder:

... and after milling and polishing (note the smoothly rounded inner edge
 ):
):
Jean, I had already thought of a rad. thermometer but can't find one in the spares box!
I know this problem. Meanwhile I suppose that you only find those parts in the box which you have put into before...
But - please have some patience and let's see how my thermometer will turn out The chassis part was brutally mashed into the lower body part, as it was too wide, too long and distorted :evil: :

After cleaning, straightening and cutting off surplus material, it looks like this:

Still the rear screw hole does not meet the center line, perhaps the WM model maker was a little boss-eyed :geek:
I think I like it better with the roof down than with the roof up. Interesting to see what you do with this one Jean and how you top your previous efforts.......real canvas for the hood ?
Foldable
 ! But really: I had especially waited for the closed version, as I like this one better. Meanwhile I learned that the WM KIT came with both, the closed and the opened roof - now available at Auto Jaune for € 15 :? Well, perhaps a foldable roof would really be the best solution, wouldn't it?
 Very cool, so far!
Wait for what I'll be doing with the upper body
Meanwhile I have photo-etched the rims, already glueing lower and upper halves together:

The template for the tyres has already moulded in silicone and the resin is waiting for hardening:

Just had a late glimpse into the thread and I am overwhelmed once more
Thank you, good night!
Thank you, good night!
Welcome back! Sometimes I'm overwhelmed, too, regarding the fact that I was always told to be unable for crafting :cry:
So, what happened today? The hole for the rear screw disturbed me so much that I changed its place:


Much better
!By the way, when straightening the chassis, one of the springs broke off. It was impossible to fix it, so I made a completely new one by soldering:

Still cannot decide to buy a lathe, so I meanwhile take my hand drilling machine for that purpose:

This way the spare tyre was made:

(It was necessary to make a separate one as the gap for it is much smaller than the "real" tyres on the wheels are...)
The rim halves were glued and meanwhile primed and painted brown, here already with the first coat of clear gloss:

It's the fact that you cast or photo-etch your own parts that impresses so much and adds so much to the end result. It gives your models a realism and detail that few kits ever achieve, simply because they would be too complicated or fragile. The improvement over the originals, in overall shape and in detail, is astonishing. My hat is off to you!
Thank you :oops: ! I can only recommend a photo-etching device for the advanced (or also the not-so-advanced) model builder. It doesn't cost a fortune, approximately the equivalent of two Brooklin models, and even with no experience in CAD or screen designing (as I don't have at all!) you're able to make the finest details.
Sometimes you have to invent very creative helpers, this time for glueing the center tube into the rims so that the wheels roll straightly:

The rims:

...and the first completed wheel (yet without center hubs):

I'm surprised you "cheated" with the smaller spare wheel Jean. Your standards must be slipping 
In Germany we call this "Altersmilde"
And believe me, I have contemplated quite a long while what is best to do with the spare wheel. With every model I try to make something more and better than with the previous ones, but in this case I've got no idea how to make this really proper. The raised edge of the surrounding is very difficult to create. I guess there's still a lot of time before painting , so if I should get a brain wave (in German: Geistesblitz) I'll make a new spare wheel, just to meet your expectations, o.k.? Meanwhile all tyres are ready, and thus the four wheels:

At least the rear axle is placed and fixed:


Most of the time today I had to spend for balancing the bodywork, as the old white metal models usually have two completely different sides, left and right... :?
Those wheels are amazing.
They will finally consist of not less than 17 single parts each
The front axle is installed, now the Daimler is able to stand on its own feet, resp. wheels:

The front bench is too wide for the planned interior:
... filling up one side with solder:

.... removing one slice:

.... and modifying the quite dangerous angle:


Jean, one more time I bow to your exceptional skills.
You surely know Gerald Wingrove - you will follow in the steps of him in our scale.
You surely know Gerald Wingrove - you will follow in the steps of him in our scale.
Much too much honour :oops: Wingrove in fact built real cars in 1/15, a trained squirrel could drive them if you would fill up fuel
I'm only interpreting nice old model cars. Either way, it's fun, fun, fun Amazing skills, indeed!
Well, lock away a schizophrenic in a cellar and forget to block his ebay account - I'm the result :mrgreen:
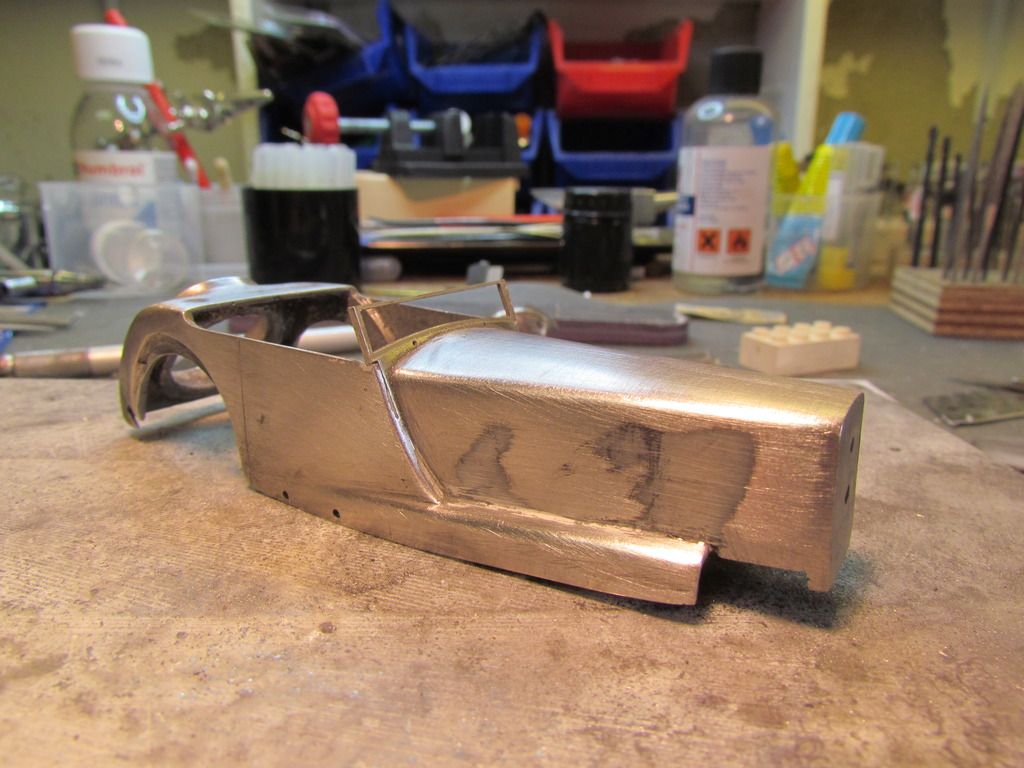
Slowly the real work on this car begins! For the first, the tail has got new proportions, matching the original car better. The line was lowered, the plateau extended, so that the hood will have to be shortened a little bit:
original:

lowered:

extended:


That's some serious surgery!
Like most of the students of pathology I fainted and needed today some recovering time...
At least I have already designed the new dashboard/window frame unit which is essentially for the progress of the work:
Tomorrow it will be etched, and perhaps I'll fix it promptly into the bodywork...
Nice. Those heavy cast white metal parts look much better when they're remade in etched metal.
... and furthermore you can resize them to better matching the original car!
Dashboard photo-etched:

Two "slices" glued together (necessary to achieve more "thickness" where it is required):


...and soldered into the bodywork:

First coat of putty to get even lines and areas:

The hood is too wide and too high:

A slot cut into to make it narrower:

soldering together:

first sanding:

(of course all the necessary details will be added later again
)Hi guys, thanks for your encouragement and sympathy Really, this wasn't that hard as it seems, I'm surprised by myself :shock: Perhaps because I'm awake all night long thinking about how every single step has to be made :lol:
So the bonnet is now lower and narrower, and there is the "step" between dashboard and bonnet:


Furthermore the lower part of the radiator is narrowed, as it originally was. Western Models made a straight rectangle which looked a little bit clumsy:

Now several stages of filling and smoothing are necessary to get clean surfaces...
Really, this wasn't that hard as it seems, I'm surprised by myself :shock: Perhaps because I'm awake all night long thinking about how every single step has to be made :lol: So the bonnet is now lower and narrower, and there is the "step" between dashboard and bonnet:


Furthermore the lower part of the radiator is narrowed, as it originally was. Western Models made a straight rectangle which looked a little bit clumsy:

Now several stages of filling and smoothing are necessary to get clean surfaces...
Dear friends, you're so cute  ! But I'm not sure... a singer is not necessarily a good composer, an actor no director. Of course I'm contemplating how a "master" for a completely new model could be made, but that's not so easy... Let me build a dozen more old model cars, and perhaps then I'll feel able to get started with the next level
Meanwhile the lines for doors and hood are scribed into the metal, hope that they will come out properly when primed...:


The original hood has almost the right proportions and measurement, but still needs some treatment:

Looks much better now:

To have the hood detachable, I soldered two sticks into, fitting into two holes:


Seems as if I have forgotten the rear window... well, tomorrow is another day
! But I'm not sure... a singer is not necessarily a good composer, an actor no director. Of course I'm contemplating how a "master" for a completely new model could be made, but that's not so easy... Let me build a dozen more old model cars, and perhaps then I'll feel able to get started with the next level Meanwhile the lines for doors and hood are scribed into the metal, hope that they will come out properly when primed...:


The original hood has almost the right proportions and measurement, but still needs some treatment:

Looks much better now:

To have the hood detachable, I soldered two sticks into, fitting into two holes:


Seems as if I have forgotten the rear window... well, tomorrow is another day
Jean, I'm very interested to see how you will finish the roof to replicate the canvas effect. Watching with interest.
To be honest, I would have simply painted it matte :oops: But I don't want to disappoint you again (remembering the spare wheel...) and scratched a structure into the hood. Let's see how it turns out after painting:

A template helps positioning all the small details on the bonnet:


Obey the wire between hood and bodywork:

Not sure how you scratched the roof but that must have taken hours
Not that much, in fact only ten minutes :oops: , but to be recognized as a martyr, please don't tell anyone
Jean, I admire your patience - I would be a candidate for the straitjacket after that work...
Not necessary, I prefer strong neuroleptics, then you have your hands free for model building
Ok, now I feel guilty for asking the question. Looks like a lot of work, but hopefully it wil be worth it in the end.
Love others feeling guilty :mrgreen: But please don't worry, it's a kind of incentive to go farther...
I love seeing the progrsession in your builds, so much to see and learn.
Well, now I'm curious when you will throw your models into aceton and start pimping them
Today we had a wonderful summer day in Berlin, so the deck chair won the battle with my dungeon, but at least the headlights are now ready. Original condition, with much to thick rod which was also too short as I had to reposition the front fenders:

The headlights milled out and polished, cut off, soldered onto a thinner brass wire, nickle-plated, equipped with closures on top, smaller holes in the fenders:

Lower headlight unit in original condition:

...milled out, production rod removed:

finally:

Today I have finally received my 4.00mm brass sheet (nickle-silver is unfortunately not available in this thickness, so I'll have to galvanize it). Promptly I cut out the radiator:

... and have given it its allover shape:

And the exhaust pipes have also been replaced by plated brass tubes:

(nickle-silver is unfortunately not available in this thickness, so I'll have to galvanize it). Promptly I cut out the radiator:
... and have given it its allover shape:

And the exhaust pipes have also been replaced by plated brass tubes:

You make it sound so easy Jean, but I can imagine shaping the radiator was nothing you did in few minutes.
Nope, this indeed took more than half a day... You have to shape the radiator step by step, always looking if it nearly fits to the bonnet. And furthermore trying to make it symmetric anyhow... :?
I have done that, and I have built several white metal and resin kits. However, I will not compare my work with yours.
Not comparing, I'm sure you did an excellent job, I'm just curious to see what you're doing
Today I decided to make the radiator 0.3mm thinner, so that it shows the same thickness as the original one by WM. For that reason I used the milling machine. Then I cut in the "wrinkles" on top of the radiator. I have to admit that there are some irregularities which require some tricks when photographing this part :oops: However, I'm happy that I've done it at all:


Now the works on the "big parts" are finished and I'll start designing the photo-etched parts...
Apparently Daimler calls it 'fluting'.
...that's of course more elegant than suggesting a botox injection
Sorry for my long absence, at least I meanwhile have made the films for photo-etching, which should take place tomorrow:

And if everything turns out right, some bigger steps will be made soon
... and the photo-etched parts! It's always an uplifting moment to see the finely etched parts - until you realize that you have forgotten some parts and have to start another turn... :?

A template helps placing the side vents:


A template helps placing the side vents:


Lovely work Jean, but are the vents not a bit overscale. Maybe its just a trick of the camera ?
Unfortunately the car seems to have been overdone many times, and there are no photos of the original condition. I suppose that the vents could have been made in the style I now have made for the model. Furthermore I simply lack the skills and the tools to make certain details even smaller
 - otherwise this way there is still some "air upward"
 Let's have a look at the radiator grille:
Nickle-plated and an etched cut-out for the mesh:

The photo-etched mesh (with 0.15mm-holes
):
Completed:

...and compared to the original one:

Ain't that nice: I've discovered the "autograph" of the WM-model-maker Richard Hutchins, 1976:

Ready for priming:

...and done so:

Wow, the difference between the original radiator shell and your remade part is like... well, a Flintstones car versus a Bugatti Veyron. Fantastic job.
Thank you
! Flintstones car? Nice idea, should make a walk through the garden and pick up some sticks and stones to build one :lol: And the Veyron will ever be a very special memory for me, as I was involved in the marketing for this car for a couple of years... Always remembering my first (and only ) driving this car... sniff :roll: Looks good painted up. The size of the vents is less obvious from a distance....I think the close up picture previously just magnified the sizing. Once all the other details go on I doubt you'll notice them.
That's the point! I'm regularly despairing about all the irregularities, but once the car is finished, most of these issues disappear magnificently...
For today there are no really spectacular works to be demonstrated, mostly "intermediate" steps. The parts were overdone and primed once again:

The belt line will be painted brown:

Dashboard on its way:

The steering wheel made completely by photo-etching for the first time:

And the hood thermometer, couldn't wait:


Your mastery of the PE process is a large part of the success, it's responsible for the very realistic small details. Looking forward to seeing all those parts fitted.
Me, too! Though, still lots of work to do... :roll:
Chassis part painted black and metallized:

Dashboard and gauges completed:

Rear unit with licence plate and taillights, headlights and foglights:

The headlights are equipped with a metal "triangle" according to the original:

Coachwork is painted in matte light-brown, its not the final painting, but the foundation for the gloss lacquer:

Thanks!
Important moment today, the first layer of painting has been sprayed on! I decided for a kind of stone-gray, something between gray and beige. I tried to catch the character of the beige-brown shades the car showed for decades, but without the "sixties/seventies-touch". The photo of the predecessor (the "second" car) also showed a medium-tanned body and dark wheels, so perhaps I'm on the right way...


The interior and the hood are painted light beige, I assume that this was the original colour, not long after the war. The car seem to have had two different hoods, one higher in beige, one lower in black, but the black one doesn't go together very well with the car anyway...

Superb as always
Thanks! Always trying my best...
A very attractive colour scheme.
Personally its not my favourite colour, but it does appear historically accurate so I respect that.
Nice to have the full range of personal taste
Anyhow I love those "mud" shades on cars, although I normally prefer bright colours, don't know why :roll: I've just noticed that I had used this colour scheme a couple of years ago for another car, obviously it's written in my DNA...Here a first impression of the colour scheme:

Second layer is sprayed on:

And the interior:

Thanks for the pictures! What I try with my version is to recreate a condition which the car could possibly have had in 1931. The beige/brown version of the 1960s shows many later modifications like the taillights, side vents and so on. The current - black - version is unfortunately a "fantasy bug" as it does not match neither the first bodywork nor the third one, but tries to combine some details of this, some of that, adding many completely new details, like the running boards or the interior.
Meanwhile I polished the painting, being quite satisfied , made some retouches, and already glued in the interior door panels:


Tomorrow the assembly is going to start, won't sleep this night...
Meanwhile I polished the painting, being quite satisfied
, made some retouches, and already glued in the interior door panels:


Tomorrow the assembly is going to start, won't sleep this night...
Hi guys, thanks for your many kind replies, always a pleasure to share the work with you !
Final countdown, all the tiny details get at their places slowly, but one after the other:
rear fenders are mounted:

Dashboard, steering wheel and pedalry:

First two wheels:

Making the windshield:


Right-hand side completed:

Details:

Left-hand side and spare wheel:

Guess tomorrow will be the day
!Final countdown, all the tiny details get at their places slowly, but one after the other:
rear fenders are mounted:

Dashboard, steering wheel and pedalry:

First two wheels:

Making the windshield:


Right-hand side completed:

Details:

Left-hand side and spare wheel:

Guess tomorrow will be the day
Looks fantastic already, looking forward to the final product!
Give me another couple of days to take a fresh breath of air and to prepare a nice photo session
Coming together nicely Jean. I'd like to see it alongside some other models when its finished to get a sense of the scale and proportion.
Will be a pleasure for me, I think I have a matching partner in mind...
Beautiful
Thank you! I'm surprised by myself as I didn't know at the beginning if I would accomplish the thing with the bonnet... :roll:
Well, Jean, this is as usual another fine example of your extraordinary skills,
but the interior detail makes me speechless: Daimler emblem on the pedals :shock:
I am a humble admirer...
but the interior detail makes me speechless: Daimler emblem on the pedals :shock:
I am a humble admirer...
ooh-la-lah
Those pedals, stunning!
Those pedals, stunning!
Ooops, was this a little bit too much :oops: ? I think that on a chassis sketch in "Profile Publications" this detail is recognizable and that it would add some extravaganza...
That's looking fabulous! 

Thank you! Meanwhile I wrote a kind of essay in which I explicate all the conclusions why I made certain modifications compared to the cars on the original photographs. Doctor, I think he's getting delirious again!
Works are completed
! Here are the last steps:Fixing the windshield:

Radiator:

And the preview:


Well, dear friends, Wednesday I'll make some fine photography showing all the details - stay tuned!
Thanks for your kind replies! Now I can relax and present my final photos of the Daimler, hope you will enjoy:


That's all folks, at least for the moment ! I guess I won't keep away from my workshop very long, to be honest, I already hold the next model car in my hands... :roll: Hope you enjoyed this topic and got some ideas how to improve an old "paperweight"


That's all folks, at least for the moment
! I guess I won't keep away from my workshop very long, to be honest, I already hold the next model car in my hands... :roll: Hope you enjoyed this topic and got some ideas how to improve an old "paperweight" Thank you so much for your kind comments, I'm overwhelmed :oops: ! It's a real pleasure to share the work with a kind audience as you are and I'm sure we will have more fun like this ! - And yes, even when I'm mostly doing the building for my own pleasure, I accept orders for making it for customers, especially when I already have made a type and have the experience and the according photo-etch films. Also if you need single parts like hood ornaments, licence plates and so on - don't hesitate to asking me, we'll see what I can do for you!
! - And yes, even when I'm mostly doing the building for my own pleasure, I accept orders for making it for customers, especially when I already have made a type and have the experience and the according photo-etch films. Also if you need single parts like hood ornaments, licence plates and so on - don't hesitate to asking me, we'll see what I can do for you!