
Post by Jean B. on Apr 23, 2022 7:47:03 GMT -5
MAY 2015
This thread has been transferred from S1/43. Due to technical reasons possibly not all comments of members are visible. I'd like to apology for this. The photos, hosted by photobucket, will be deleted in near future. They will be replaced by new versions from flickr, but this will take some time. For any questions, please contact Jean B. Thank you!
Time to go ahead! This time I have selected a pair of Duesenbergs, made by RIO. RIO made quite nice die-cast models - of course with very much plastic parts, but so accurate and fine detailed, including complete chassis, transmission and engine, that one have to look for something similar  Unfortunately, all of these details are poorly processed and urgently need cleaning, grinding, sanding, painting and so on... As RIO made two Duesenbergs - the Dual Cowl Phaeton by Weymann-LaGrande and the the Fishtail Speedster by Weymann - some of the parts are the same, and furthermore I will change the dual cowl phaeton according to the period pics of the car which are showing the typical disc wheels by Weymann. So I can use the ones of the Speedster as a template to be reproduced in resin.
And - as if all this is not enough - I have decided to start with photo-etching, as the window frames, side louvers and mascots are not really convincing. So, if you want to, join this thread and follow my very little and very slow steps...
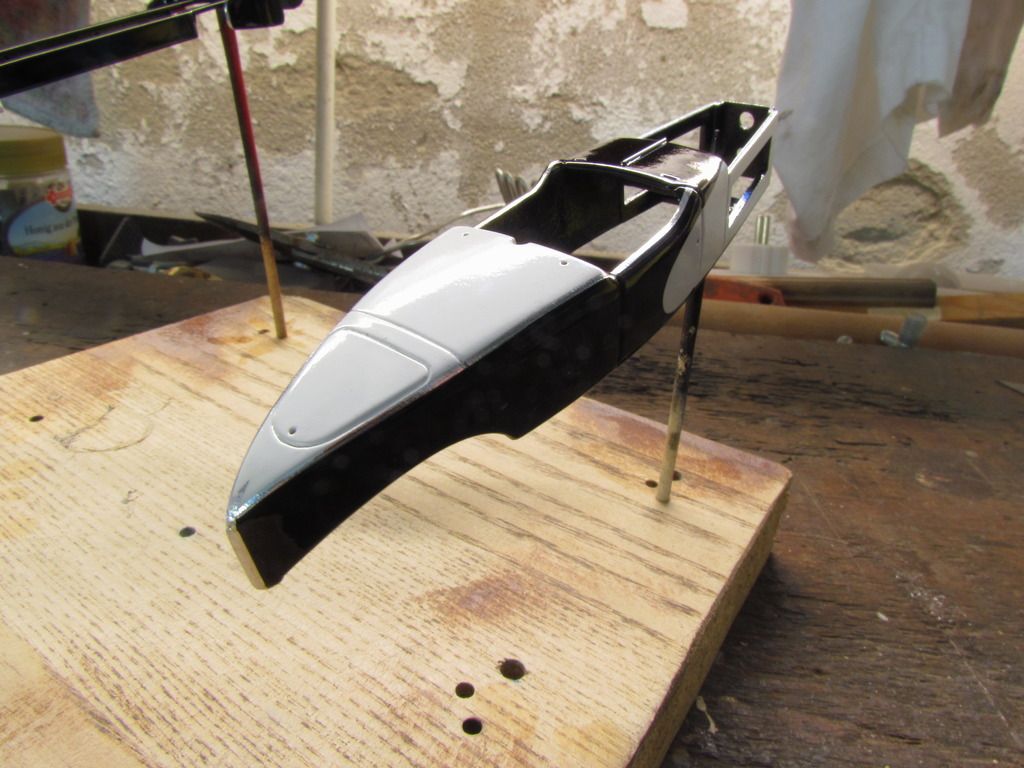
Starting with the Speedster in its original condition:


Hood is too thick for rest of coachwork:
... flexed to fit:

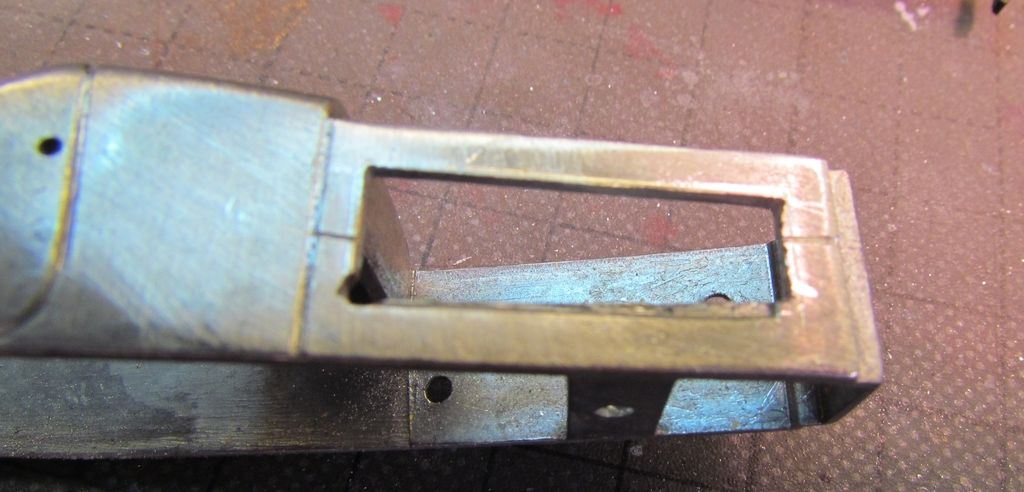
rear end is flat, but wave-lined at the original car:

... and changed:

cut-out at front fender for compressor tubes is much too wide and has to be closed:
polyester putty smoothened on plasticine:
... and the result:
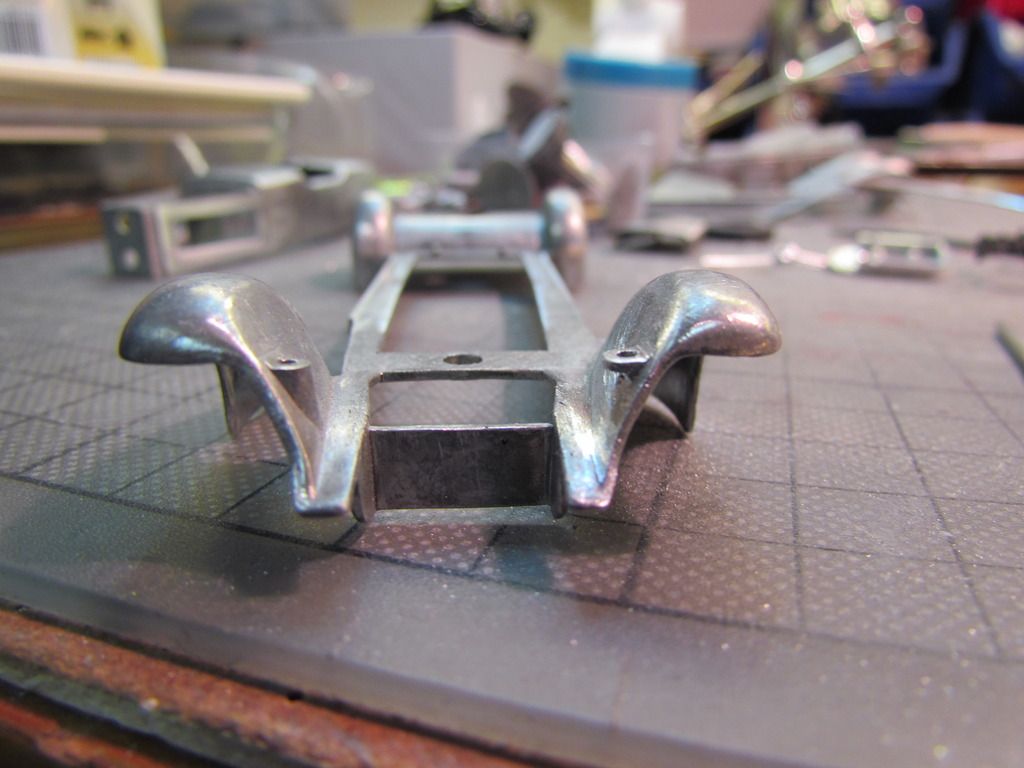
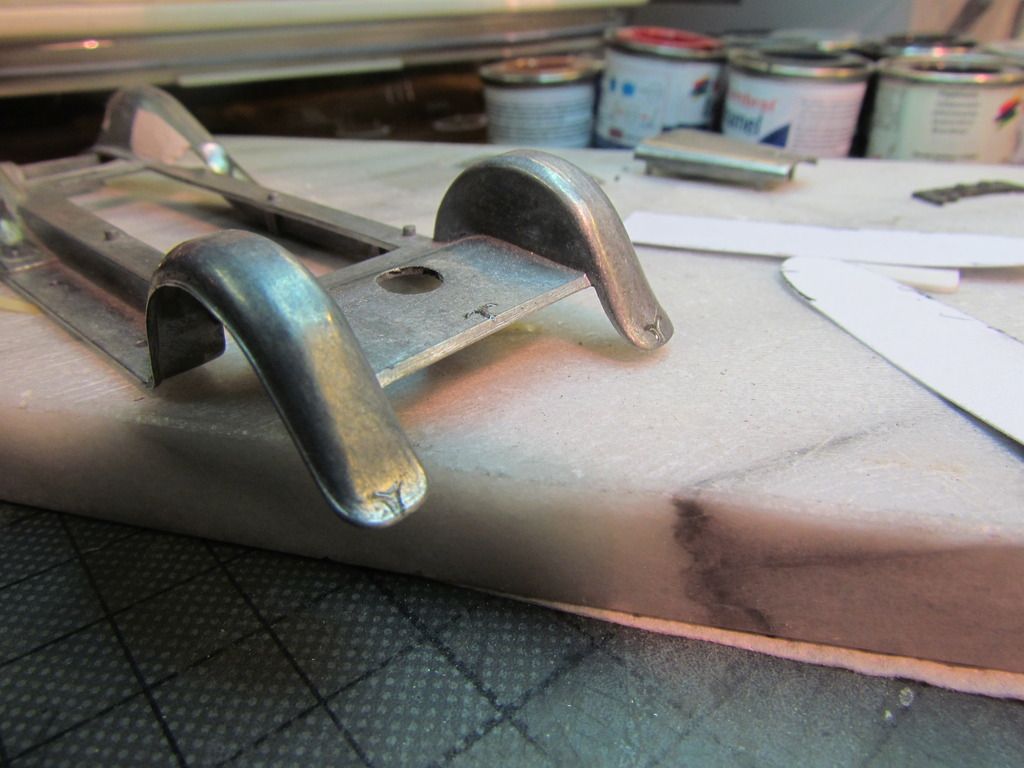
massive tube for holding the headlights on the left, milled and "cleaned" on the right:
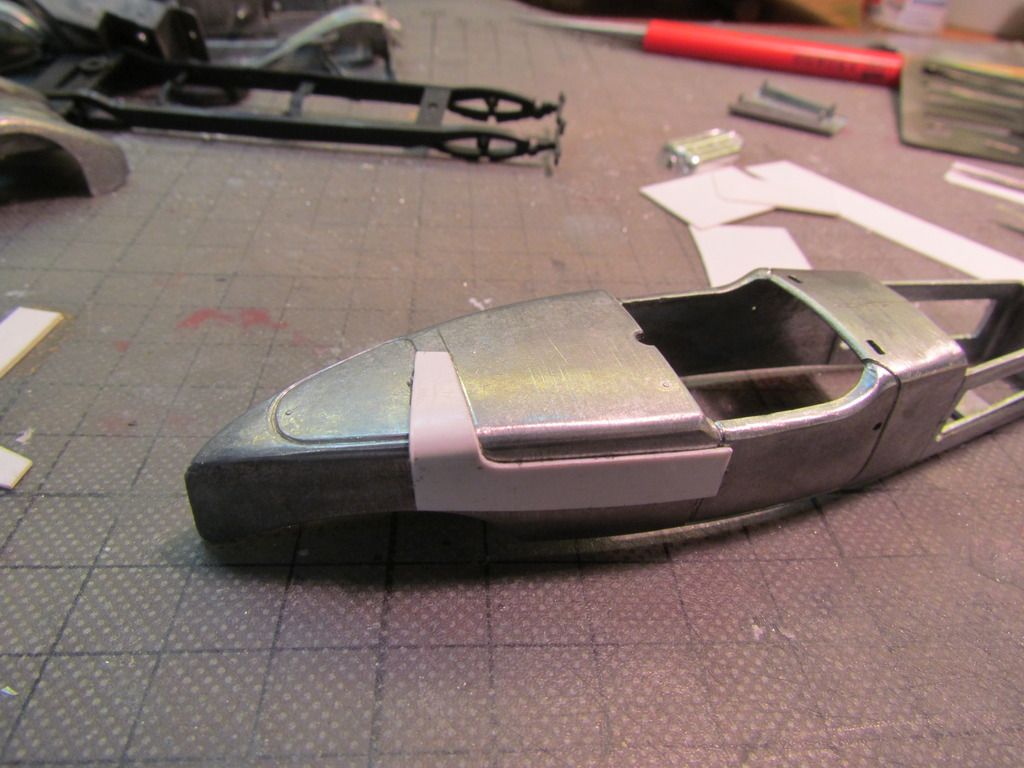
Rear hood was not created by RIO, so I have to do it by taping a template (polystyrol) onto the body and engraving the lines carefully (die-cast is very hard and very slippery!):
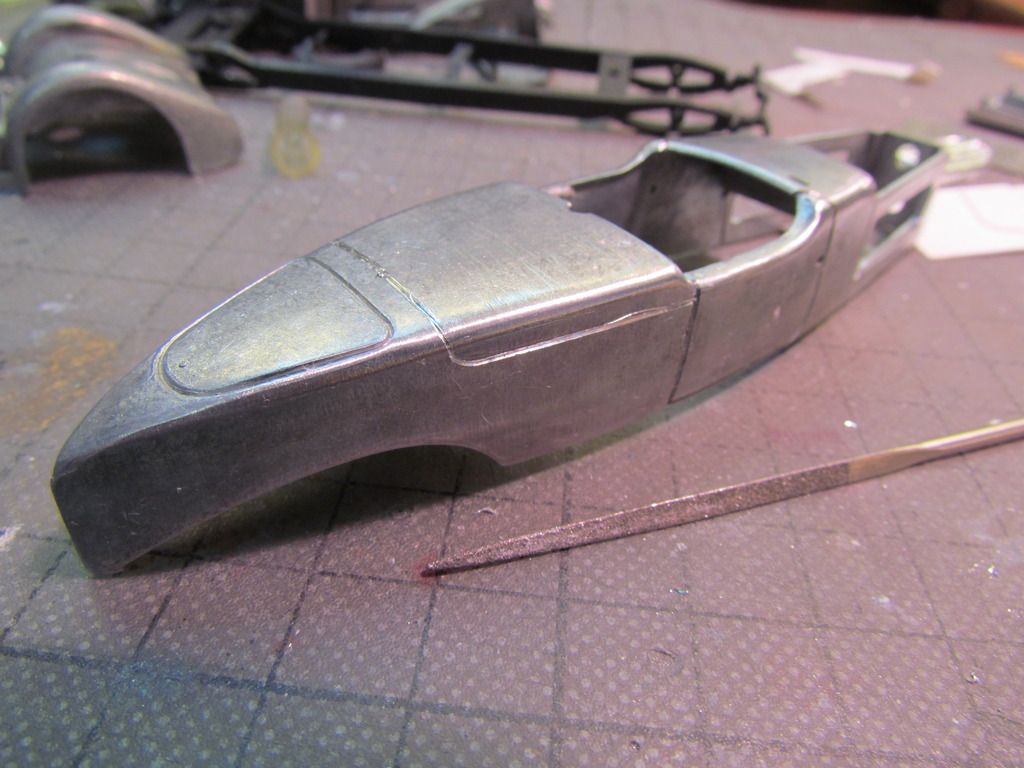
... the result:
Enough for today, but I'll be back again!
 Unfortunately, all of these details are poorly processed and urgently need cleaning, grinding, sanding, painting and so on... As RIO made two Duesenbergs - the Dual Cowl Phaeton by Weymann-LaGrande and the the Fishtail Speedster by Weymann - some of the parts are the same, and furthermore I will change the dual cowl phaeton according to the period pics of the car which are showing the typical disc wheels by Weymann. So I can use the ones of the Speedster as a template to be reproduced in resin.
 And - as if all this is not enough - I have decided to start with photo-etching, as the window frames, side louvers and mascots are not really convincing. So, if you want to, join this thread and follow my very little and very slow steps...
Starting with the Speedster in its original condition:


Hood is too thick for rest of coachwork:

... flexed to fit:

rear end is flat, but wave-lined at the original car:

... and changed:

cut-out at front fender for compressor tubes is much too wide and has to be closed:

polyester putty smoothened on plasticine:

... and the result:

massive tube for holding the headlights on the left, milled and "cleaned" on the right:

Rear hood was not created by RIO, so I have to do it by taping a template (polystyrol) onto the body and engraving the lines carefully (die-cast is very hard and very slippery!):

... the result:

Enough for today, but I'll be back again!

The Dual Cowl is quite often to find, with top as well as without. The Fishtail is very rare, indeed. I have to admit, I found it - absolutely complete - for 3 Euros! :shock: I'd rather like to have the Speedster made in white-metal by Precision Miniatures, but - also very rare - whenever it is to find, it sells for a fortune! The one by RIO instead has the complete engine, a quantum of solace 

Some more impressions: Cut out of the side vents, making new edges with some polyester putty and trying the pattern for the new louvers, which will hopefully be made by photo-etching (sometimes... :?).
original:

cut out roughly:
filled up with polyester putty:

aluminium wire:

...twirled with silver wire:

...gives nice compressor pipes:

original:

cut out roughly:

filled up with polyester putty:

aluminium wire:

...twirled with silver wire:

...gives nice compressor pipes:

Today's work:
First wheels and headlights have been moulded/casted. The original headlights have definitely the wrong shape (much too short). So I took the headlights of the Ixo/Altaya Mercedes Autobahnkurier and copied them. They fit quite well in shape and size:

The grille lost its vertical rods, cause it was quite impossible to redo them in place, furthermore they were a little bit twisted and - only three on each side (instead of seven at the original car). They will be replaced by metal wire:


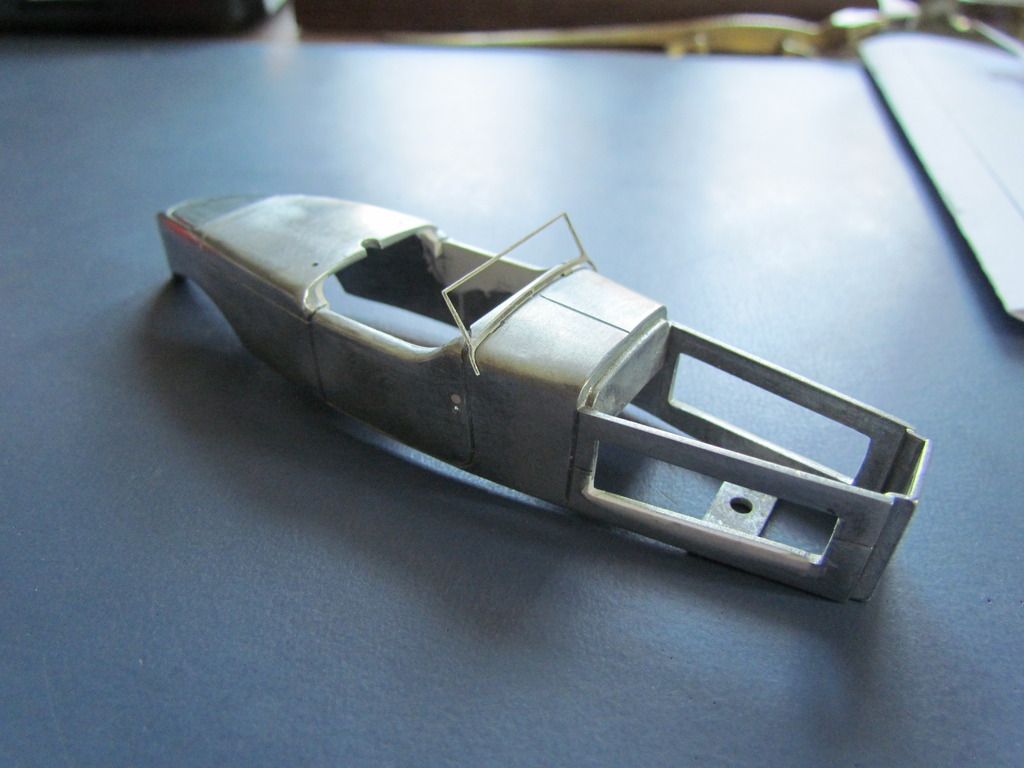
The "seat-shell" lost its side panels, as I will shape all the lines and edges of interior door panels and coachwork newly. When I studied the photos and blueprints of the Duesy, I found that it has a quite delicate architecture of all the lines, curves etc. around the doors, and I will try to catch this as exactly as possible at the model (more of that matter tomorrow :


First wheels and headlights have been moulded/casted. The original headlights have definitely the wrong shape (much too short). So I took the headlights of the Ixo/Altaya Mercedes Autobahnkurier and copied them. They fit quite well in shape and size:

The grille lost its vertical rods, cause it was quite impossible to redo them in place, furthermore they were a little bit twisted and - only three on each side (instead of seven at the original car). They will be replaced by metal wire:


The "seat-shell" lost its side panels, as I will shape all the lines and edges of interior door panels and coachwork newly. When I studied the photos and blueprints of the Duesy, I found that it has a quite delicate architecture of all the lines, curves etc. around the doors, and I will try to catch this as exactly as possible at the model (more of that matter tomorrow
:

... yes, it has. I will make it as shown on the photo you've attached, black/white with red undersides and black interior. For a while I was uncertain to paint it in brown/white, as the original owner commented the car on receiving it with "looks like a Holstein cow", and Holstein cows can also be brown/white. When I researched the specifications of the other Duesenbergs owned by George Whittell, it seems likely that he preferred the classic colours black, white, red and aluminium. But: at the moment it is hard thinking of this matter, as so many other details have to be dealt with 

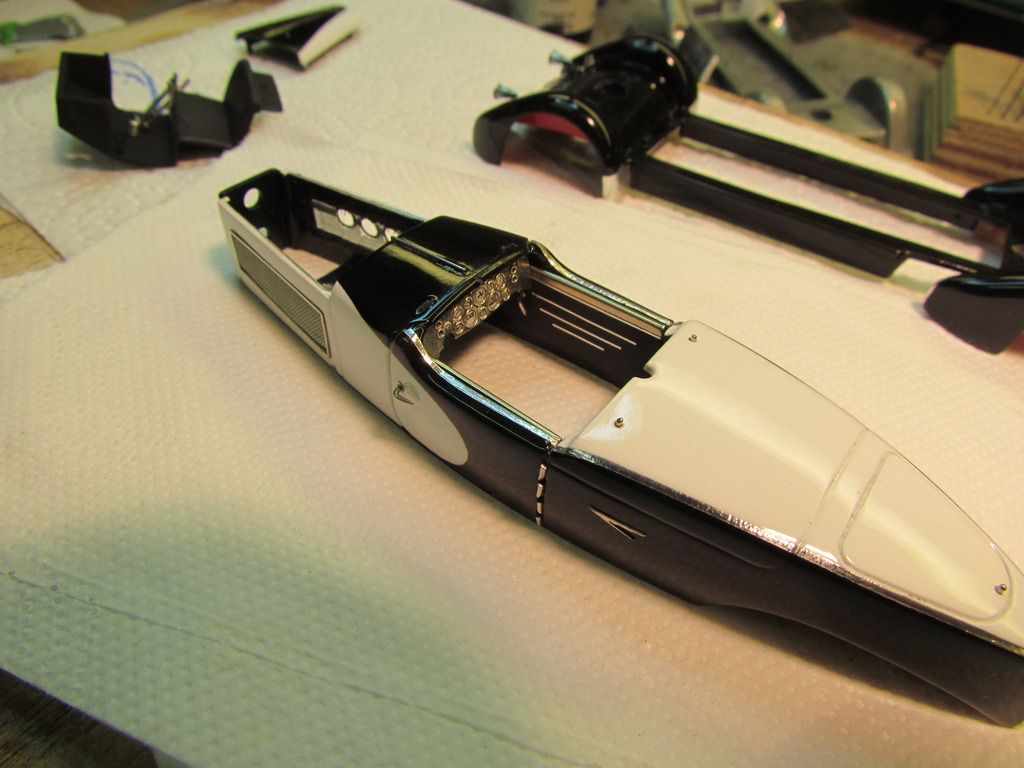
The rounded corners of the interior shell have been modified. Now they are widened and thus make the doors resp. the body a little bit leaner. Backwards the corners meet the future interior panels to build up one line. The inner edges of the doors are now straight and not curved anymore. It's only hard to be seen on the photos, so I tried to show it more clearly with the arrows. The whole thing now looks less "quirky" than before...


Today's effort is not so very exciting, but you mustn't think I wouldn't do as much as I can
So all tiny chrome-plated parts are now honed, polished and cleaned from the chromium, which is a really terrible work, as the parts are so very small and hard to hold. Now sticked on tooth-picks they wait for priming, painting and chrome-painting with Al-Clad.

The headlights got a wire onto the top, I think the real car has a kind of "line" there:

...was worth a trial I'm back again with following results:
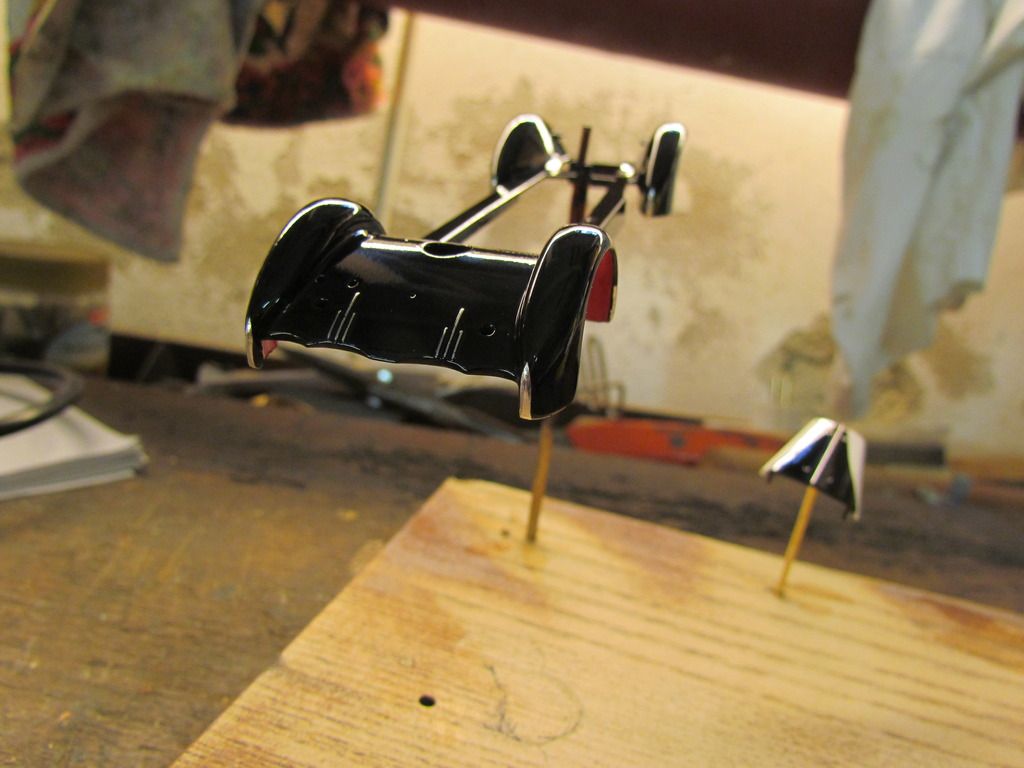
As I said, I am copying the disc wheels of the speedster for the Dual Cowl, this has now been done. The Dual Cowl also has covered spare wheels, and for that reason I poured some black resine into a small plastic cup to get a raw disc. Fixed onto the motor-drill I turned a "covered spare wheel" (still with its center) to copy this one again to get two identic parts:

looks like rubber, but it is hard black resine:

with wheel in front:

The small chrome parts were finished, sprayed black and chromed with Al-Clad:


I have to admit, the parts do not show absolutely high-gloss finish, but at least all the plastic lines and excesses are removed.
The front part of the chassis got a small rod behind the bumper, I have forgotten this and had to fix it after already having sprayed the chassis black :evil: :

I'm back again with following results:As I said, I am copying the disc wheels of the speedster for the Dual Cowl, this has now been done. The Dual Cowl also has covered spare wheels, and for that reason I poured some black resine into a small plastic cup to get a raw disc. Fixed onto the motor-drill I turned a "covered spare wheel" (still with its center) to copy this one again to get two identic parts:

looks like rubber, but it is hard black resine:

with wheel in front:

The small chrome parts were finished, sprayed black and chromed with Al-Clad:


I have to admit, the parts do not show absolutely high-gloss finish, but at least all the plastic lines and excesses are removed.
The front part of the chassis got a small rod behind the bumper, I have forgotten this and had to fix it after already having sprayed the chassis black :evil: :

Hard times... Two sleepless nights later I decided to repeat the chrome-painting :? I found the surface much to matte, and today I have redone the grille and the rear bumper, and the results are now much better:

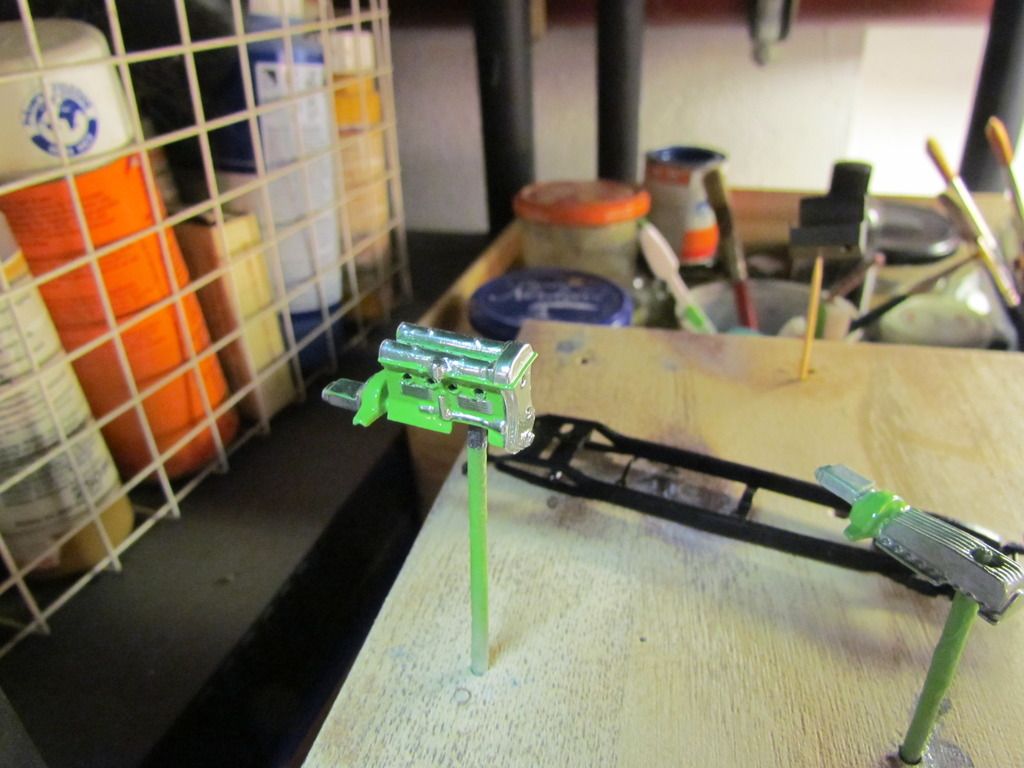
And that's not the only mess: The engine got the typical green painting, but the paint does not dry :evil: :evil: :evil: Don't know why (I suppose the paint was too old, but I've never got a result like this...):

But - at least - I've found a way to make a nice radiator cap by using a six-sided brass strip, cutting slots in each side, smoothing the top side and turning the part below:
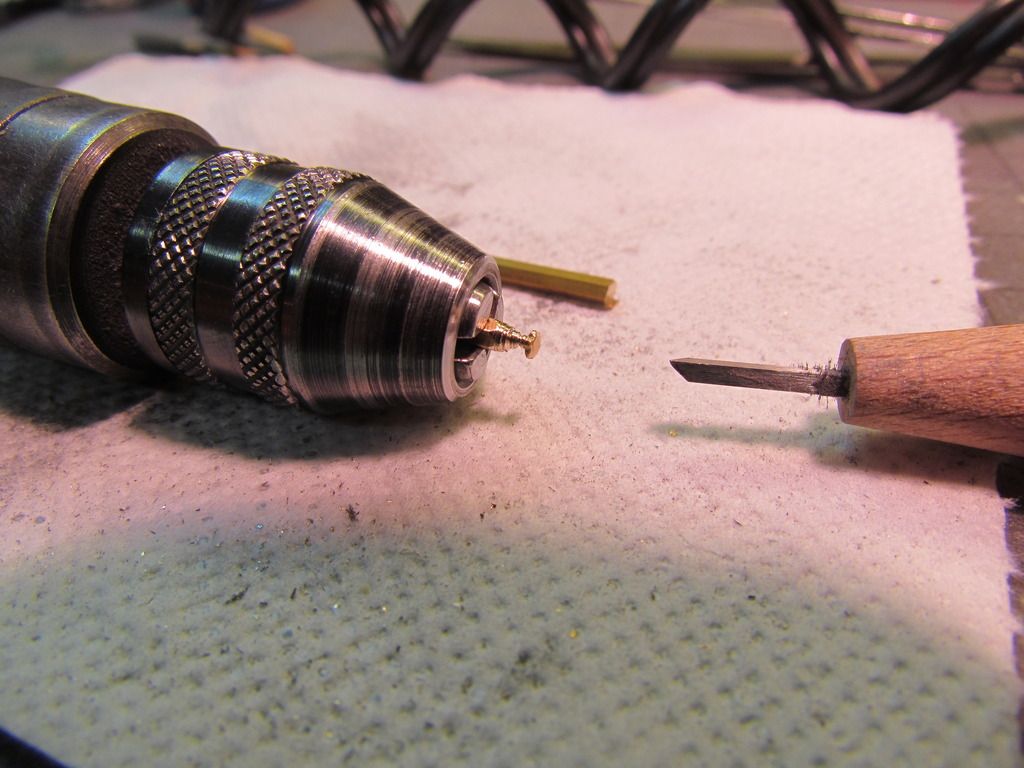
This will of course be nickel-plated and mounted onto the grille.
Hoping that this is the crisis and better times will come soon... :roll:
Al-Clad chrome-painting has been repeated, and it was worth the effort! Shine, baby, shine - that's all I can say, convince yourselves:

The radiator grille has got its vertical rods, made of ordinary pins. First cut to length and taped to fix them:

...and then glued onto the back. The result:
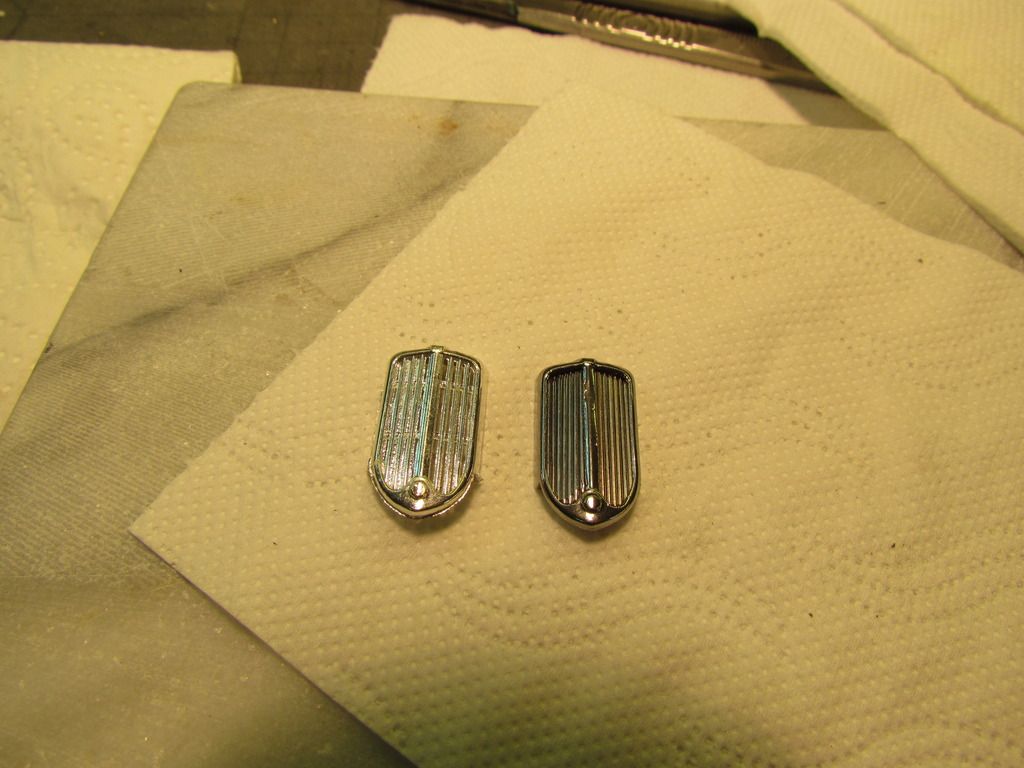
(the left one is the original one from the Dual Cowl Speedster, only if you were not sure which is the revised one ).
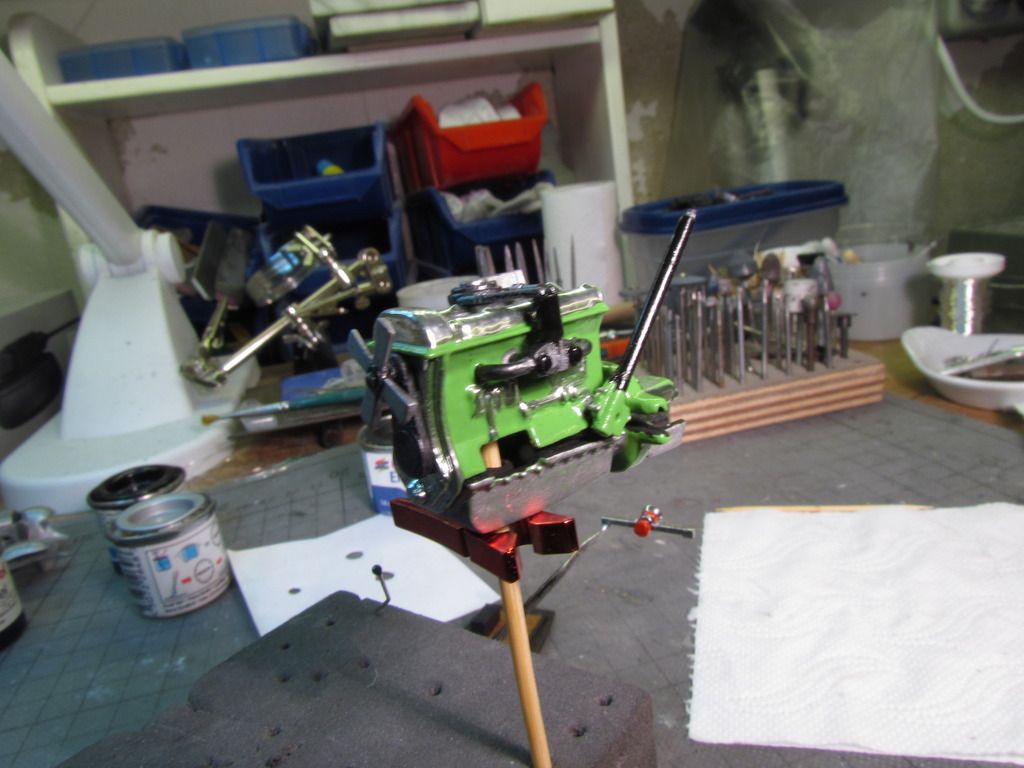
The engine is painted with another lacquer, and this time it worked. Take this photo as a preview, because the engine is not yet ready:
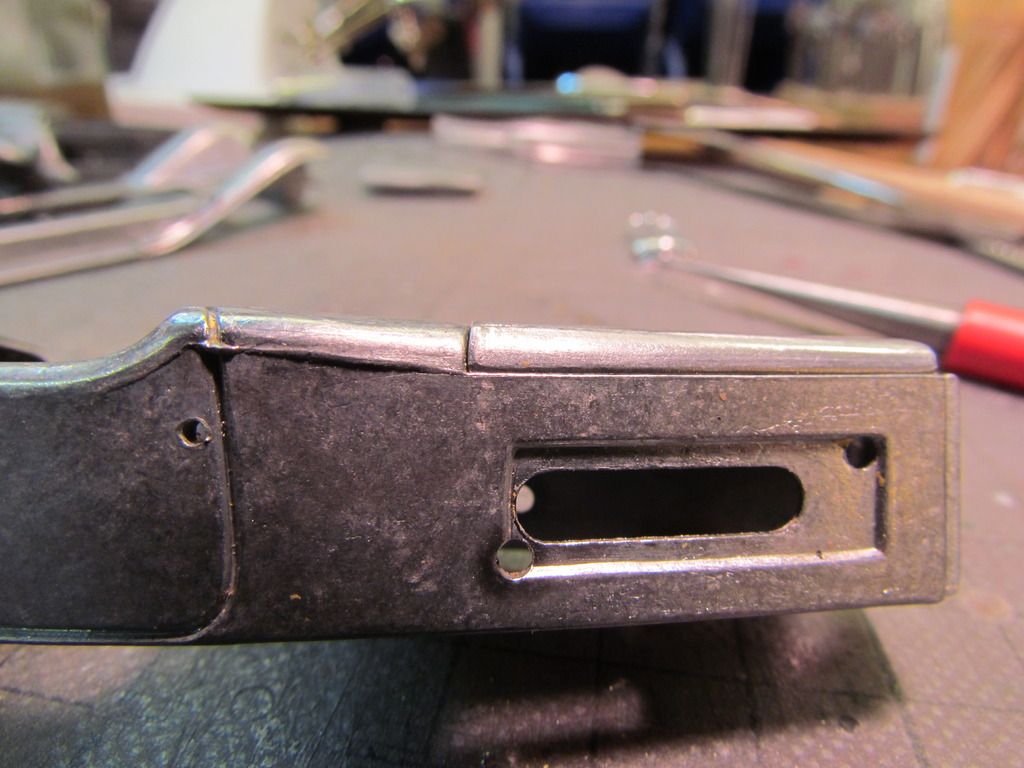
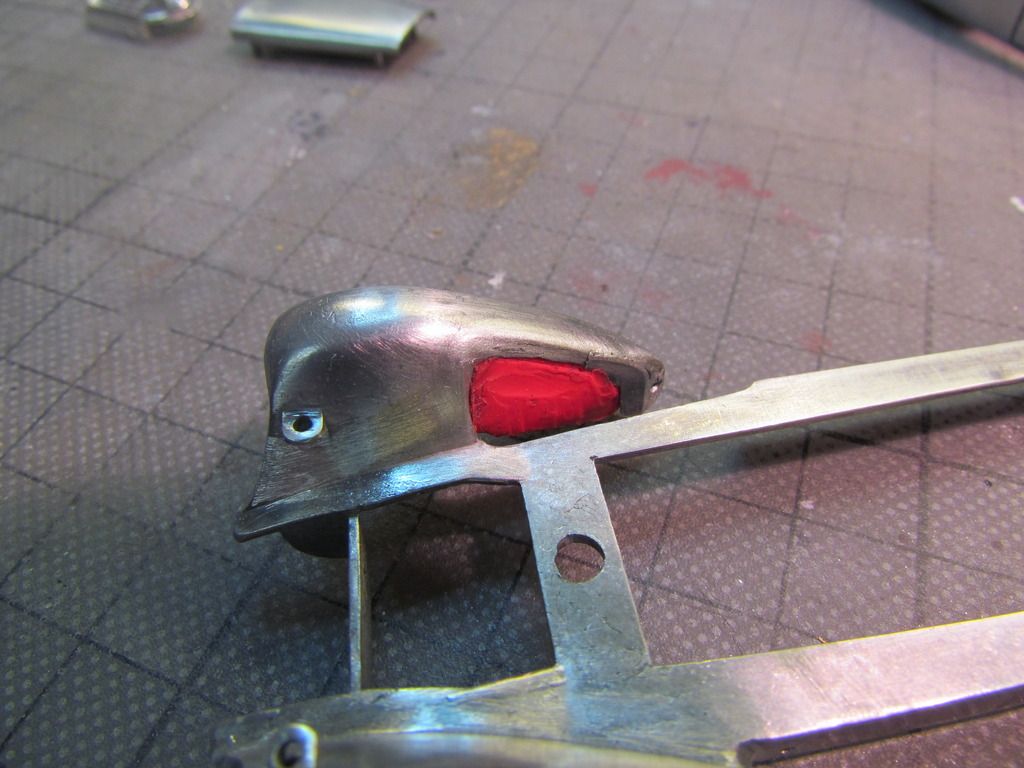
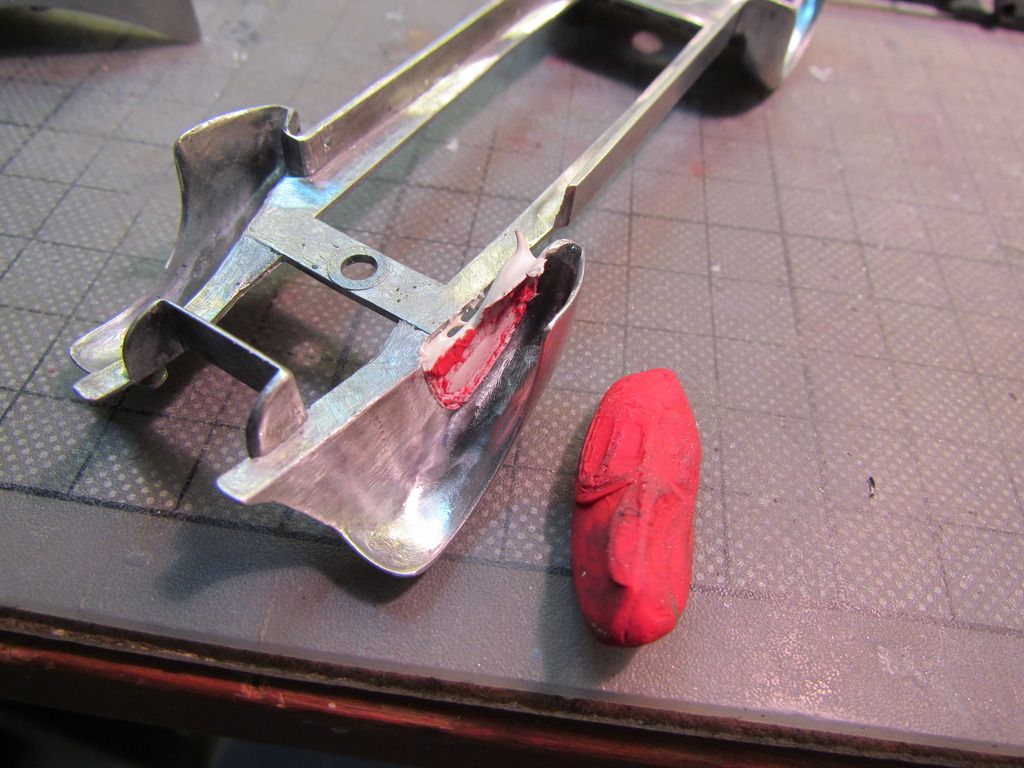
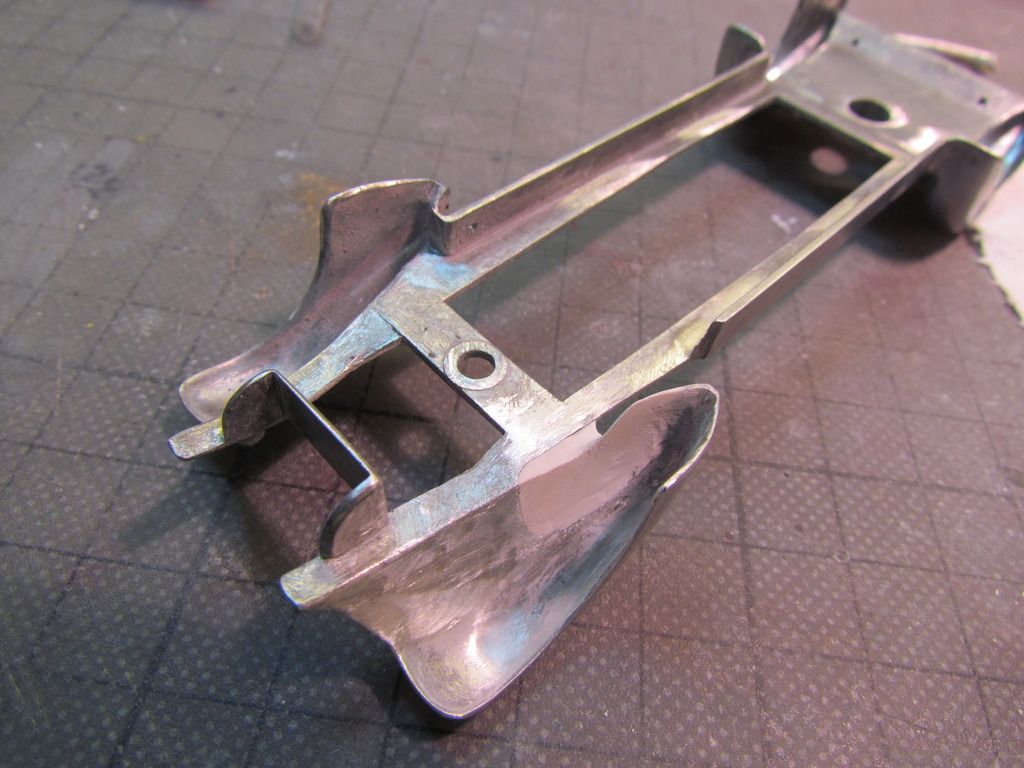
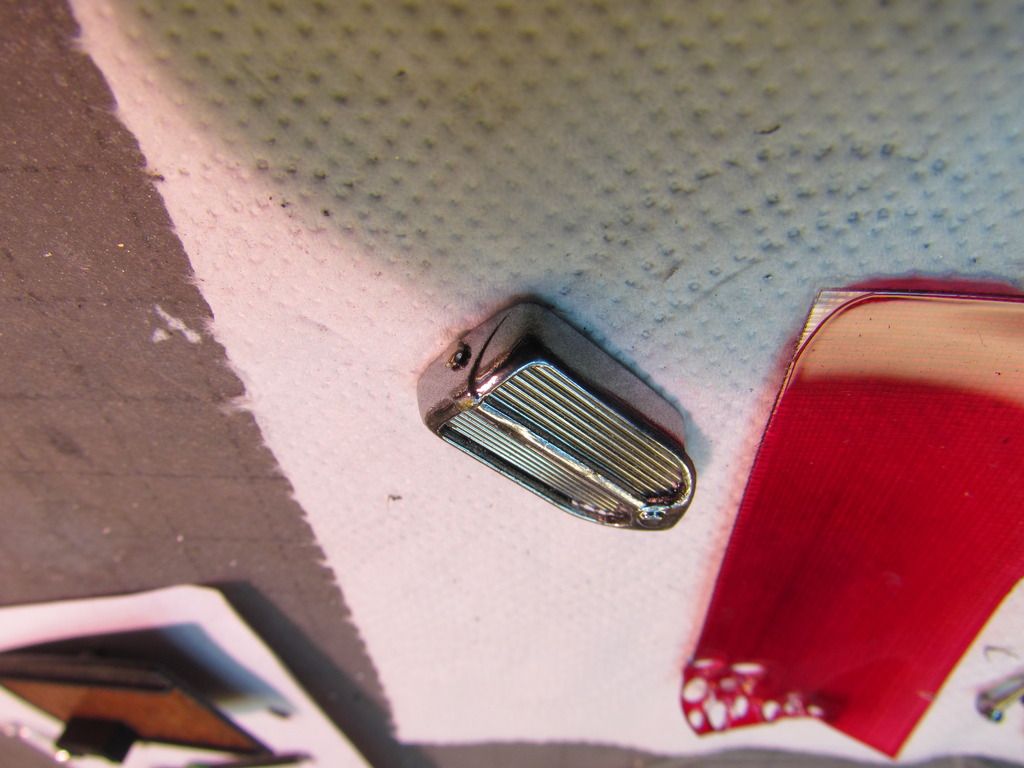
And - at last for today - the tail-lights:


The radiator grille has got its vertical rods, made of ordinary pins. First cut to length and taped to fix them:

...and then glued onto the back. The result:

(the left one is the original one from the Dual Cowl Speedster, only if you were not sure which is the revised one
).The engine is painted with another lacquer, and this time it worked. Take this photo as a preview, because the engine is not yet ready:

And - at last for today - the tail-lights:

Wish I had some more time at the moment for the really important things :? Instead all days long something keeps me away from my Duesenbergs... Today I have finally made the wheels, that means tyres onto the wheels, rear painted gray and put the disc brakes onto, front covered with white walls, tyre logos and "red dot" (with "Duesenberg" writing around ) applied, and here's the result:

Ah, I forgot: a silver ring around the rim has also been added! So long, guys!
) applied, and here's the result:
Ah, I forgot: a silver ring around the rim has also been added! So long, guys!
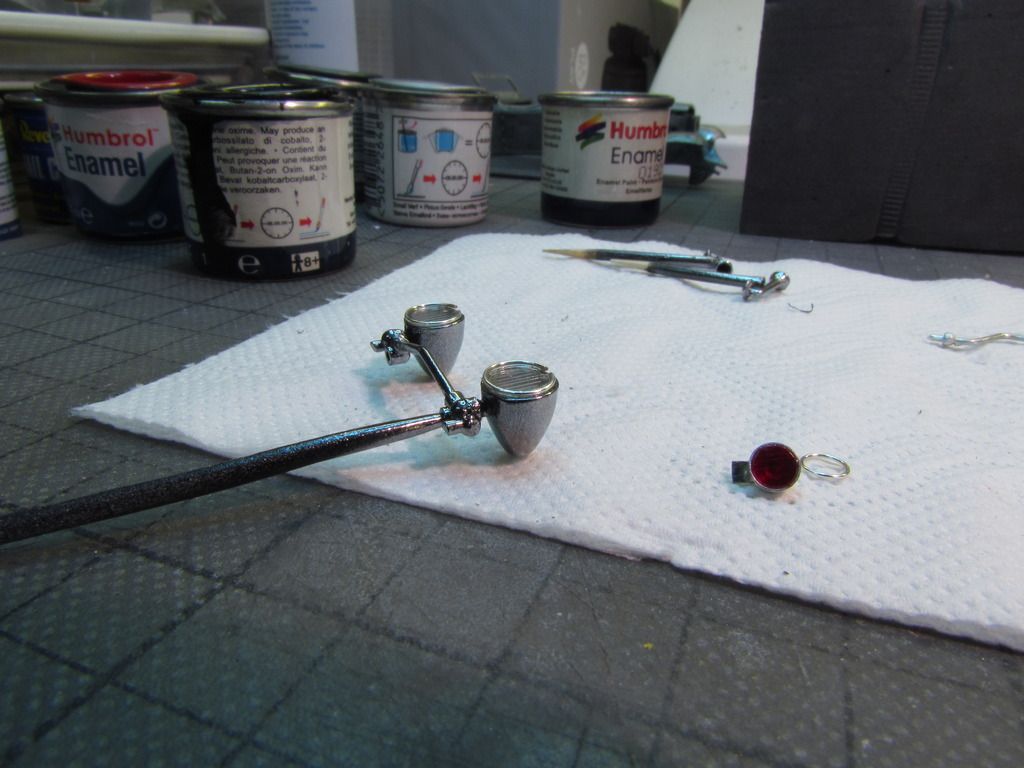
Hard to believe how much time all the tiny details require... Here's the steering wheel (turnable) the upper part with the metal column is to be fixed when the model is assembled (whenever this will be :? ):

The headlights including the red "fire-chief" light got a small rhinestone as a kind of "lightbulb"...

...and received afterwards "lenses" made of polycarbonate, which was engraved with a needle and painted with clear lacquer with a yellowish hue resp. red glass lacquer, as well as rings of silver wire:
The chassis is painted plain black:

The driveline of the car is sprayed with a thin metallic spray to make it a little bit "technical", and the exhaust pipes were newly made of nickle-plated brass tube (I always try to get as much metal into the die-cast cars as possible ):

The radiator grille got the cap which has meanwhile been nickel-plated:
... and a new gear lever was made of a needle, the knob of UV-adhesive (I think this looks better than the original made of plastic):

Feierabend!

The headlights including the red "fire-chief" light got a small rhinestone as a kind of "lightbulb"...

...and received afterwards "lenses" made of polycarbonate, which was engraved with a needle and painted with clear lacquer with a yellowish hue resp. red glass lacquer, as well as rings of silver wire:

The chassis is painted plain black:

The driveline of the car is sprayed with a thin metallic spray to make it a little bit "technical", and the exhaust pipes were newly made of nickle-plated brass tube (I always try to get as much metal into the die-cast cars as possible
):
The radiator grille got the cap which has meanwhile been nickel-plated:

... and a new gear lever was made of a needle, the knob of UV-adhesive (I think this looks better than the original made of plastic):

Feierabend!

What can I say? I'm a little bit crazy, very obsessive and quite childish, when I stomp my feet and say "I WANT to have it this way! :evil: The rest results in the questions "how to?" and needs a portion creativity, which materials could serve to achieve the look I want to have. If possible, have a look at the books of Gerald Wingrove "The Complete Car Modeller 1 + 2". There the REAL scratch-building is presented at its - unreachable? - best .
For today, the head-lights unit is completed:


The "wooden" base plate as well:

The fire-chief horn:

The engine unit:

And a new tool for sawing sheet metal, a fret-saw by Proxxon:

When I'm allowed to leave the cellar, I'm designing the photo-etch parts (windshield frame, side louvers, mascots and so on...):

Will be fun dealing with all that stuff :mrgreen:
.For today, the head-lights unit is completed:


The "wooden" base plate as well:

The fire-chief horn:

The engine unit:


And a new tool for sawing sheet metal, a fret-saw by Proxxon:

When I'm allowed to leave the cellar, I'm designing the photo-etch parts (windshield frame, side louvers, mascots and so on...):

Will be fun dealing with all that stuff :mrgreen:
That's a funny point: For a long time I have deleted all the manufacturer prints on the model cars, as I always thought "this one is MINE". The last few cars I kept the manufacturer logo, I did not mind anymore. This Duesenberg Fishtail is indeed the only RIO model car I know, which really has no manufacturer print at all. When I stripped it off I looked at any part - nothing!
But: I really like the RIO models. The finishing is a little bit poor, but - anyway - these were consumer model cars, no luxury class. On the other hand, I do not know any 1/43 models which are so incredibly fine detailed up to the smallest screw. I miss these models...
But: I really like the RIO models. The finishing is a little bit poor, but - anyway - these were consumer model cars, no luxury class. On the other hand, I do not know any 1/43 models which are so incredibly fine detailed up to the smallest screw. I miss these models...
Well, 30 years ago I bought my first RIO model, the blue Bugatti Atlantic, and I can remember that DM 39,90 (€ 20 today) was so much money for me. But at the same time Western Models & others started at DM 60 and went up to DM 120, so it was good that I didn't knew anything of them, I would have started a criminal career 
And with all the CAD-designed models of today, they nevertheless do not show the accurate technique as RIO did! The RIO cars had a real chassis, base plate, detailed engine, drive-train, coachwork - an absolute authentic construction. Even with the well-made Ixo and Minichamps or any other, you only find "closed" coachworks, that means without engine, and one-piece baseplates with only relief(ed?) details.
As I am waiting for some tool parts to go ahead with photo-etching, work does not proceed very quickly at the moment. Today I have made the template for the two-tone painting.
So-called "modelspan" (Japanese paper for walls and kites) made wet and put onto the coachwork:


Marked the fix points of the curved line according to photos of the original car:

Completing the line:

Copying on cardboard and cutting out:

Curving the cardboard into 3-dimensional shape to fix to the coachwork (later) and draw the line with a pencil:

Tomorrow I will go ahead with the second Duesenberg, the Dual Cowl
Fell asleep in my workshop yesterday and couldn't post the pictures...
Started with the Dual Cowl Phaeton and cleaned the coachwork, removed door handles and hinges, rounded the rear of the car, closed the much too big cut-out for the compressor pipes:


Fishtail Speedster: Today I have finally got the necessed sawblades for my new fret saw and could start working with it. The results are the interior door panels...:

...and the dashboard (all from 1.0mm nickel-silver):

Polished and topped with side parts made of 0.1mm nickel-silver:
Printing gauges on overhead-projection-foil and covered with white paint from back:

Punched the gauges, glued onto and added some silver rings:

For comparison:

Looks a little bit uneven on the photos, but this is due to the enlargement on the screen, actually it looks pretty nice
Stay tuned!
Started with the Dual Cowl Phaeton and cleaned the coachwork, removed door handles and hinges, rounded the rear of the car, closed the much too big cut-out for the compressor pipes:


Fishtail Speedster: Today I have finally got the necessed sawblades for my new fret saw and could start working with it. The results are the interior door panels...:

...and the dashboard (all from 1.0mm nickel-silver):

Polished and topped with side parts made of 0.1mm nickel-silver:

Printing gauges on overhead-projection-foil and covered with white paint from back:

Punched the gauges, glued onto and added some silver rings:

For comparison:

Looks a little bit uneven on the photos, but this is due to the enlargement on the screen, actually it looks pretty nice
Stay tuned!
... new record The rings have diameters of 0.6 to 2.0 mm, but it works if you just stop breathing for a couple of hours...
The rings have diameters of 0.6 to 2.0 mm, but it works if you just stop breathing for a couple of hours...Making a template and cutting the groove of the persenning:


Giving the headlights a new, lower position:


Cutting the side vents:

And for the Fishtail Speedster: The interior door panels


Giving the headlights a new, lower position:


Cutting the side vents:


And for the Fishtail Speedster: The interior door panels

All the time I thought that the interior of the Dual Cowl wouldn't cause any trouble... Well, it does! The complete part was bent so it didn't fit properly into the coachwork, the side panels did not fit as well, and furthermore it is nearly impossible to cut out the sides without destroying the seats :evil: :evil: :evil:
Anyway, it must be done what has to be done :twisted:
Here's the original condition:

Here's the coachwork with already smoothened surfaces (top edges):

The still untouched seat shell:

And after the chainsaw massacre:
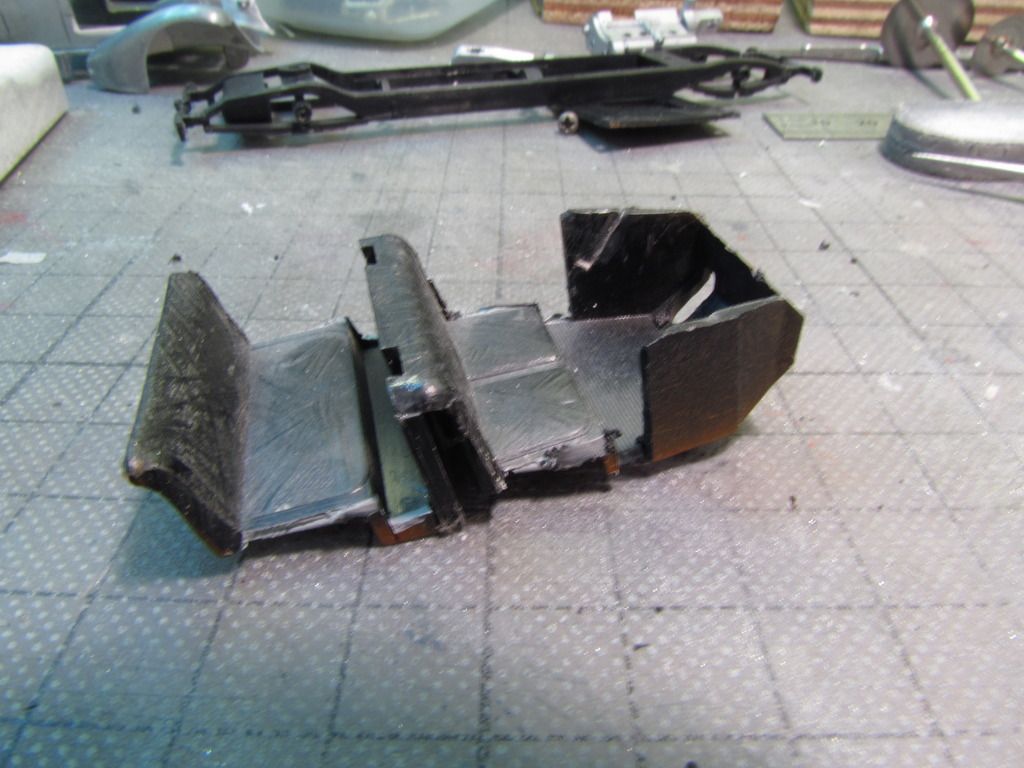
On the photos you cannot see all the mess - you wouldn't sleep well -, but I can calm you: the worst part is already done and smoothened with pounds of polyester putty, the rest will be fixed tomorrow, and then the sun will shine again !
To be continued!
Anyway, it must be done what has to be done :twisted:
Here's the original condition:

Here's the coachwork with already smoothened surfaces (top edges):

The still untouched seat shell:

And after the chainsaw massacre:

On the photos you cannot see all the mess - you wouldn't sleep well -, but I can calm you: the worst part is already done and smoothened with pounds of polyester putty, the rest will be fixed tomorrow, and then the sun will shine again
!To be continued!
I'm going slightly mad :mrgreen: :mrgreen: :mrgreen:
First I want to show the decorative reliefs on the front wings. After studying the Duesenbergs I believe that almost all "classic" model Js have these "V"-shaped ornaments:

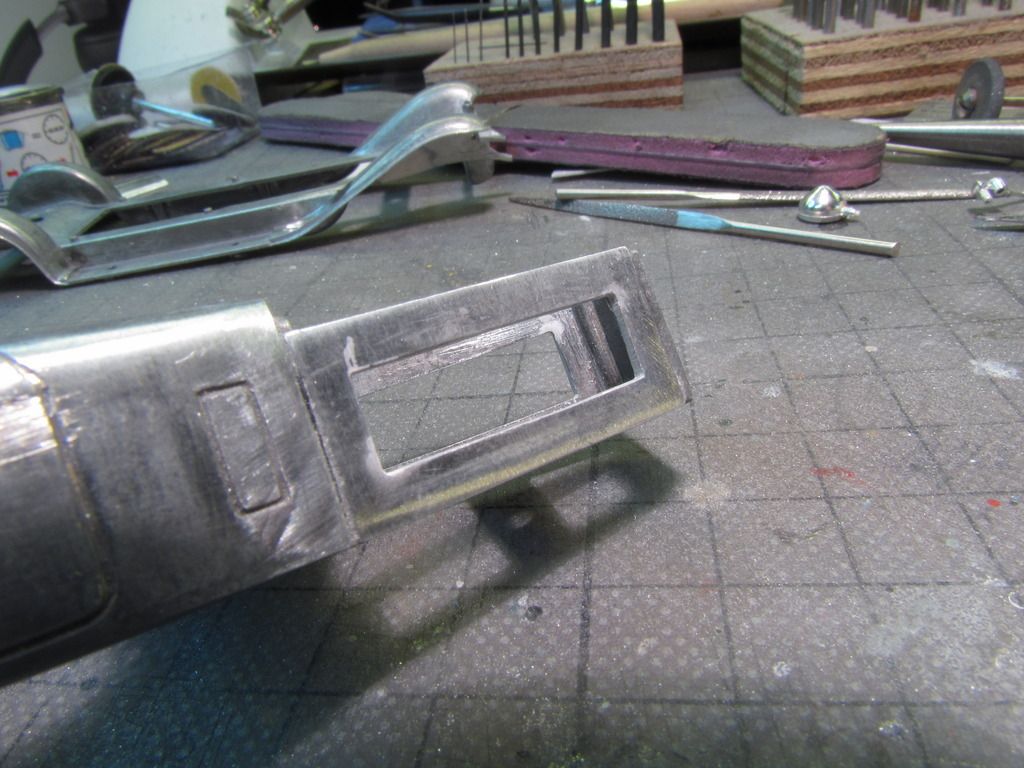
But to top all this: I've always loved the side windows at all these old "Dual Cowls", especially with this Duesy where they are shaped in a quarter-circle. So I cut a (wider) slot into the upper door edge, filled it up with putty, cut a new (very narrow) slot and can now stick a glass window into (on the photo - of course - just a piece of glass scrap for demonstration):

Please let me know if you think that I should ask for professional mental care :lol:
First I want to show the decorative reliefs on the front wings. After studying the Duesenbergs I believe that almost all "classic" model Js have these "V"-shaped ornaments:

But to top all this: I've always loved the side windows at all these old "Dual Cowls", especially with this Duesy where they are shaped in a quarter-circle. So I cut a (wider) slot into the upper door edge, filled it up with putty, cut a new (very narrow) slot and can now stick a glass window into (on the photo - of course - just a piece of glass scrap for demonstration):

Please let me know if you think that I should ask for professional mental care :lol:
...too late! I've already completed the window slots, as shown here:

And the interior shell, ready for primer:

Postal services in Germany are on strike, so weeks later I have today finally got the etchant for starting photo-etching And this will be the next step for both Duesenbergs, making the windshields. Probably first on Wednesday, but don't worry, I will post any step I make

And the interior shell, ready for primer:

Postal services in Germany are on strike, so weeks later I have today finally got the etchant for starting photo-etching
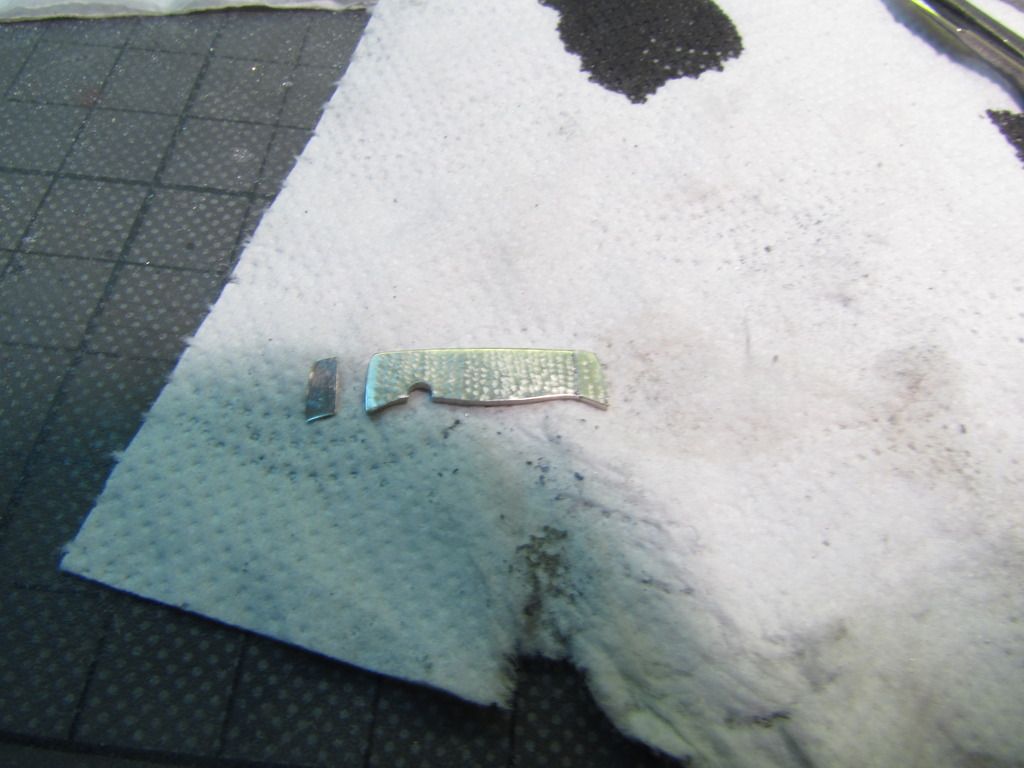
And this will be the next step for both Duesenbergs, making the windshields. Probably first on Wednesday, but don't worry, I will post any step I make Today I have started photo-etching. As supposed, the first trial was not so very successful  At least everything does work, so I have to train my skills. The first test strip was to explore the best UV-exposure, the result shows "1 minute" and the small strips beneath were etched through after all (still not perfectly...):

The remains of the etchant should give a delicate drink, I suppose, so I possibly will give you a recipe later :mrgreen:
 At least everything does work, so I have to train my skills. The first test strip was to explore the best UV-exposure, the result shows "1 minute" and the small strips beneath were etched through after all (still not perfectly...):
The remains of the etchant should give a delicate drink, I suppose, so I possibly will give you a recipe later :mrgreen:
Good news, gentlemen: Second trial with photo-etching was nearly successful. Still not perfect, but it definitely works and the spoilers will be minimized with the next turn.
Here are the etched parts (compared to the original ones, guess which ones are in the top and in the bottom line ):

And here's the fishtail windshield in its position:
Life is wonderful, isn't it?
Here are the etched parts (compared to the original ones, guess which ones are in the top and in the bottom line
):
And here's the fishtail windshield in its position:

Life is wonderful, isn't it?
... yes, that's right! I made my first step when I was a boy of 7 years, when a so-called "gimmick" came in a kid's magazine named "Yps" with which you could make a brass name-plate for the door . It took some decades to proceed with this, like above... Most of the present model car manufacturers use this technique, of course much more professional than it is possible in the private kitchen :oops: The main problem is to get a useful film, as you normally have only a common laser printer and foils to print on, despite industrial producers can use plotters and so on... But nevertheless, it's fun and I think you can improve old models a lot with this
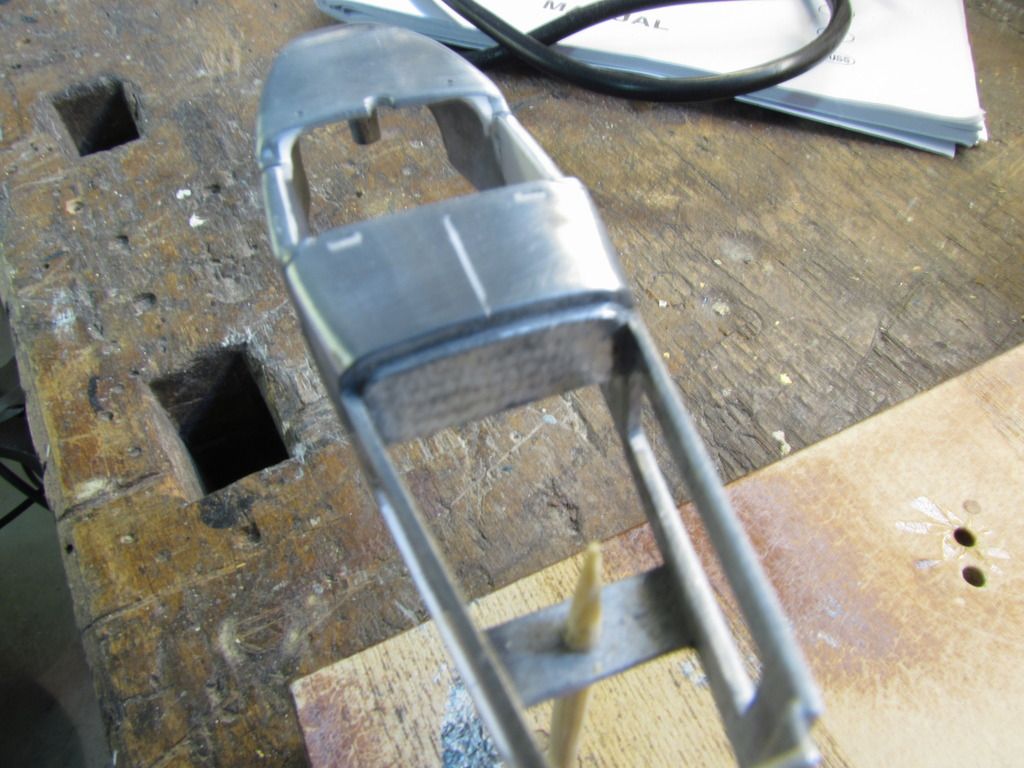
. It took some decades to proceed with this, like above... Most of the present model car manufacturers use this technique, of course much more professional than it is possible in the private kitchen :oops: The main problem is to get a useful film, as you normally have only a common laser printer and foils to print on, despite industrial producers can use plotters and so on... But nevertheless, it's fun and I think you can improve old models a lot with this Progress of my work is a little slow at the moment... Unfortunately I have to work from time to time to support my model building :roll: The results of today: The etched windshields are - of course - much thinner than the ones made of plastic, so that the joints of frames and body do not fit anymore. Therefore the panel of the rear compartment is now prolonged to meet the new frame and the fixation holes of the fishtail speedster are filled up to make them narrower for the new frame:


The good news: Now there are only very few steps left until I can start priming and painting


The good news: Now there are only very few steps left until I can start priming and painting
Imitating a circle-brushed aluminium surface (sorry for the lousy photo... :oops: ):
Small holes in the hood for rivets:

First layer of metal primer:

(Now the smaller holes for the windshield can be seen well)
And upper body and hood with first layer of white paint:

(looks dark due the lighting in my cellar)

Small holes in the hood for rivets:

First layer of metal primer:

(Now the smaller holes for the windshield can be seen well)
And upper body and hood with first layer of white paint:

(looks dark due the lighting in my cellar)
Working with RIO? Well, I should ask for But I think they are nowadays only a subsidiary of brumm and they still produce only a few boring models...
second layer of white paint and first layer black:

...and the V-ornaments on the tips of the rear fenders (I forgot last time):
But I think they are nowadays only a subsidiary of brumm and they still produce only a few boring models... second layer of white paint and first layer black:

...and the V-ornaments on the tips of the rear fenders (I forgot last time):

I've had a colourful day and these are the results:
First of all I made a new template out of polycarbonate and cut out BMF-foils for masking:

Then applied these onto the upper body:

...and covered the rest with Maskol (looks like a painting scheme for Pebble Beach ):

Finally two layers of black paint:

...and red undersides of the fenders:

(The black areas had been covered with Maskol, at least I hope that all this will work :oops: )
First of all I made a new template out of polycarbonate and cut out BMF-foils for masking:

Then applied these onto the upper body:

...and covered the rest with Maskol (looks like a painting scheme for Pebble Beach
):
Finally two layers of black paint:

...and red undersides of the fenders:

(The black areas had been covered with Maskol, at least I hope that all this will work :oops: )
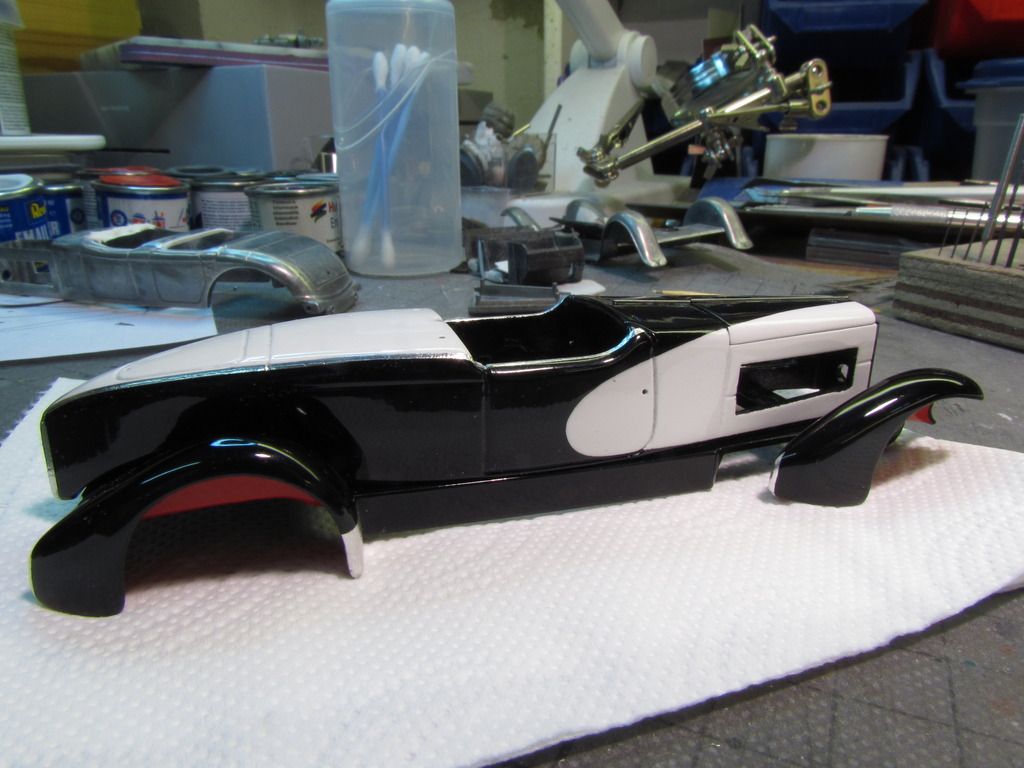
Tadaaa!!! Couldn't sleep well last night - as usual -, but this time I'm quite satisfied. Was today like unwrapping X-mas gifts, and everything was worth the effort:


Slowly you can imagine how the completed car will look like...


Slowly you can imagine how the completed car will look like...
What size wire did you use to make the pipes?
Take 2.00mm soft aluminium wire (available in handicraft shops), make it straight by turning it between two hard boards, cover with spray adhesive. Then take a 0.3mm silver wire (1 m) and spin carefully around the aluminium wire by turning the aluminium wire on and on with one hand and giving the silver wire with the other. So the completed pipe is 2.6mm in diameter and fits into 3.0mm holes. Any further questions?
The chrome ornaments have been applied, made of BMF: lines on the upper body, small lines on the fenders, mudflaps and the center line on the hood, made of steel wire. Afterwards the first layer of clear lacquer had been sprayed on:


Slowly the whole stuff turns into something similar to a car...


Slowly the whole stuff turns into something similar to a car...
The second layer of clear lacquer ist not so very exciting, I will present the polished coachwork tomorrow to you. Today I have made the second tour of photo-etching, this time the tiny parts with only 0.2mm thickness. And this is the result:

Still not perfect, but I am absolutely thrilled how fine this works! The clue is to arrange parts together which have a similar ratio of gaps and lines. The fine mesh of the louvers would have been perfect, if not the other parts would have taken a minute more to be etched through. Anyway, below you can see a piece of stainless steel mesh which I prefer, anyway. Again I won't sleep a night, this time because I will make my mind up how I can pimp my dozens of models with inidividually etched parts... :mrgreen:

Still not perfect, but I am absolutely thrilled how fine this works! The clue is to arrange parts together which have a similar ratio of gaps and lines. The fine mesh of the louvers would have been perfect, if not the other parts would have taken a minute more to be etched through. Anyway, below you can see a piece of stainless steel mesh which I prefer, anyway. Again I won't sleep a night, this time because I will make my mind up how I can pimp my dozens of models with inidividually etched parts... :mrgreen:
It's looking awesome already. These cars are very far from my collecting themes, but I'm loving these and your work. I hope you have plenty more cars to do after these two as I love following your progress on them.
Thank you! Don't worry, until approximately March 2053 I will have enough model cars to make up :lol:
Polishing has been done, and although some small areas still have to be overdone, you can already recognize the character of the car - at least I hope so:
And the first mesh is ready, was quite an effort as stainless steel is very stiff and difficult to cut:


And the first mesh is ready, was quite an effort as stainless steel is very stiff and difficult to cut:


Jean,
Would you consider commuting to N,Wales ? I have plenty of work for you. 50Es per hour ?
Would you consider commuting to N,Wales ? I have plenty of work for you. 50Es per hour ?
I love the island! Send address and time and I'll be there!
You won't believe how long it takes to handle all these micro-tiny parts... :roll: For today I have only completed one side of the car, including frame of the air-intake, the two "snap-tites" of the hood, the door handle and hinges, the rear Duesenberg-mascot and the rivets on front and rear bonnet:

The interior shell, now with pedalry, gear lever and hand-brake:

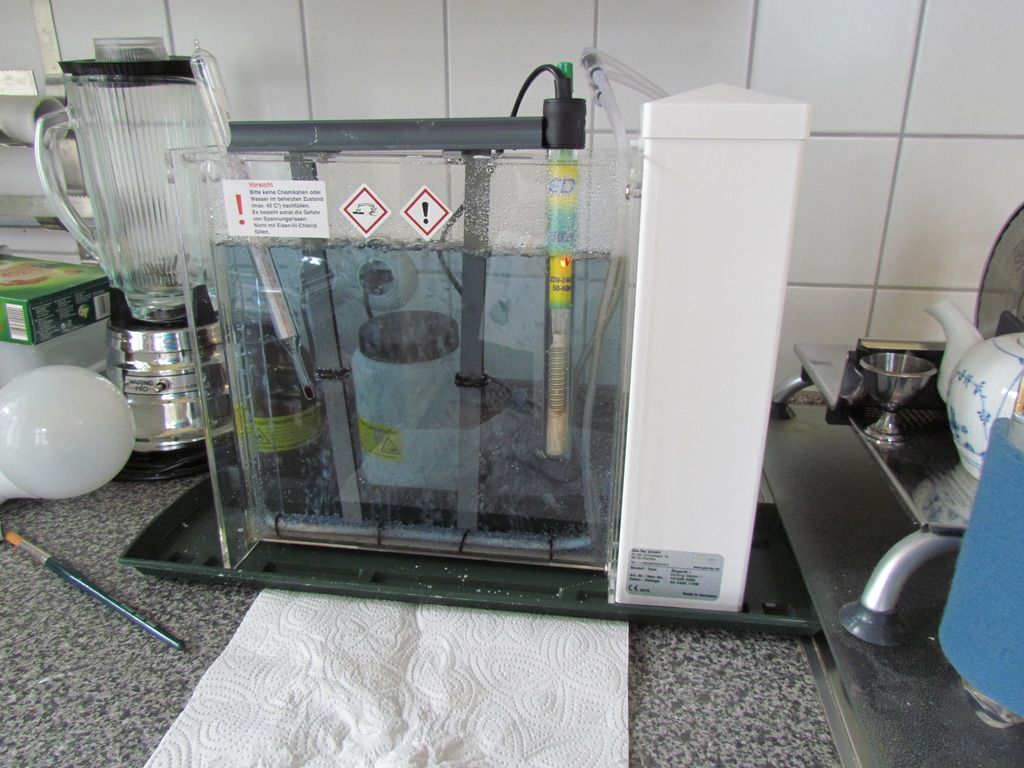
And here some impressions of photo-etching, first the films, then the UV-lamp for exposing and the etching station:


The interior shell, now with pedalry, gear lever and hand-brake:

And here some impressions of photo-etching, first the films, then the UV-lamp for exposing and the etching station:


The lametta on the driver's side has been fixed, the interior door panels and the dashboard as well:
That means, that tomorrow the "wedding" will take place, when all the major parts will be joined and today we can open some bottles to have a polterabend :lol:

That means, that tomorrow the "wedding" will take place, when all the major parts will be joined and today we can open some bottles to have a polterabend :lol:
What's striking, as illustrated in the last pic, is the long, narrow shape of the body, it's like a kayak or similar watercraft. Hope it comes with a paddle. :lol:
Yes, that's stunning, indeed! Most of the Model J's were equipped with the long wheelbase (although even the "short" wheelbase was longer than most of the other cars...), and owner George Whittell - as one of the richest men in the US - of course only ordered long wheelbases. Equipped with a two-seated speedster coachwork you get something like this model. But, I have to admit, the last photo stretches the car a little bit, and the proportions by RIO are not so very exact, I think the model in its proportions is indeed longer than the original car.
No one would ever believe this was a Rio if they had not watched this thread. I have the Rio dual cowl Duesie and I see no family resemblance.
Well, I'm astonished by myself about this transformation, but the RIO models are really good model car kits, as they show very many details and can quite easily be disassembled. Stay tuned, the Dual Cowl will follow next week resp. month here on this thread
That dashboard looks amazing I must have missed where you did that
I did read your dashboard tutorial elsewhere so I am assuming you used the same techniques but it really stands out in a Duesie
I did read your dashboard tutorial elsewhere so I am assuming you used the same techniques but it really stands out in a Duesie
It's on page 3 on this thread, 4th June. Yes, I did use mostly the same technique as with the Lancia, but this time I took a sheet of nickel-silver (0.5mm) instead of plastic. This has to be polished with a sharp silicone torpedo to imitate the typical "flexed" aluminium surface. The rest is the same as ever, print gauges on foil, paint the rear side in the desired colour (here: white), and bend small rings of silver wire (0.3mm). Please let me know if you need more detailed assistance.
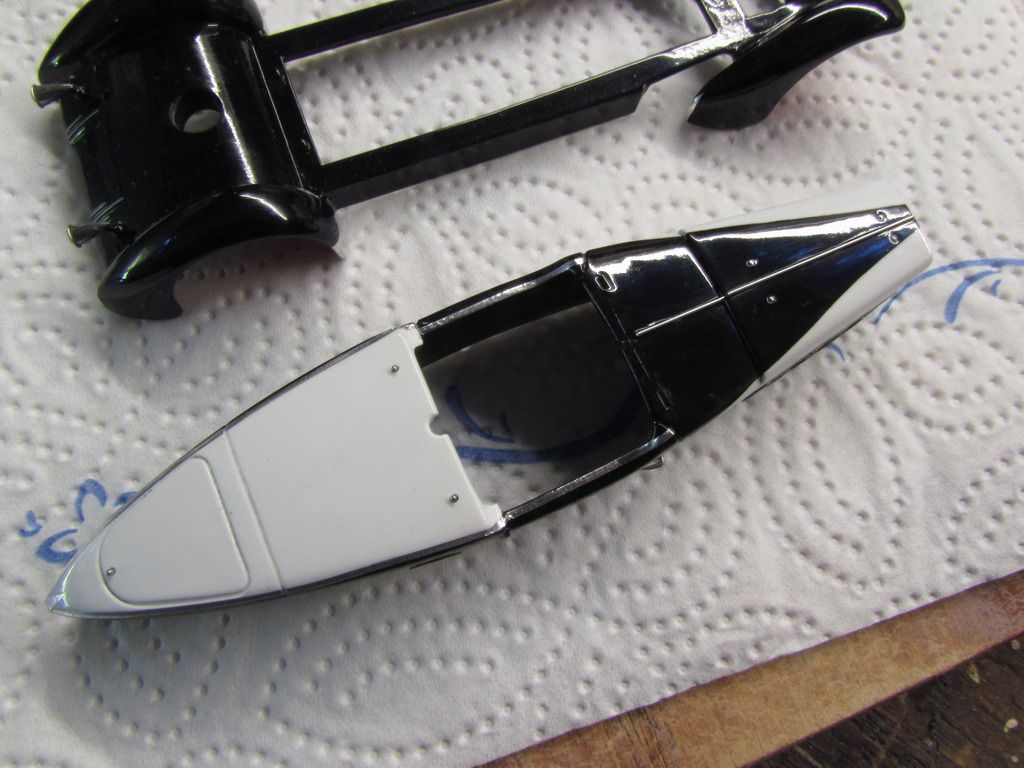
Temperature is already high, last minute before joining the main parts together:

It's done, only one wheel left to be fixed:

Ready for first test drive:

And the first two compressor pipes (obey the small rod between fender and chassis!):


It's done, only one wheel left to be fixed:

Ready for first test drive:

And the first two compressor pipes (obey the small rod between fender and chassis!):

Plus the last two compressor pipes, bumpers, headlights and windshield frame:

Not very much left...

Not very much left...
Duesenberg in Knight Rider episode "Custom K.I.T.T." with similar black & white 2-tone paintjob
www.facebook.com/knight.rider.historians/photos/pb.288477031277431.-2207520000.1435306252./386157754842691/?type=1&theater
Car was named in that episode as Pennington Ascott Regency
www.facebook.com/knight.rider.historians/photos/pb.288477031277431.-2207520000.1435306252./386157754842691/?type=1&theater
Car was named in that episode as Pennington Ascott Regency
Back to the future, I guess
I think the '70s and '80s were the great time of the "oldie-kits" with such creations as the shown Duesenberg and all the "Excaliburs", "MGs" and also "Stutz" - some of them better, some worse. At the "Hasselhoff-Doozy" shown one can see the difficulties to repeat the complicated details like bumpers. In Germany we say "there the wheat from the chaff is separated" Gentlemen (or are there any ladies around, too? :oops: ), the fishtail speedster is finished! I'll give you a sneak preview, before I will take some more glamourous pictures tomorrow
Let's play the popular "before & after":


Enjoy your weekend, I'll tidy up my workshop to proceed with the dual cowl phaeton
Let's play the popular "before & after":


Enjoy your weekend, I'll tidy up my workshop to proceed with the dual cowl phaeton
Dear friends, thanks a lot for all your postings, your feedback and your compliments! I have to admit, to get all the response by you adds a lot of joy to my work and pushes me to make sometimes a little bit more than I would have made without a patient audience as you are. I have already posted some pictures in "Gems of the '30s & '40s", here are some more:


Tremendous work, Jean!
Actually your thread was the reason why I joined the forum - I googled "Duesenberg speedster 1:43" and came across your article.
I have the counterpart of the car made by Precision Miniatures, but I think your version is by far the better one.
Actually your thread was the reason why I joined the forum - I googled "Duesenberg speedster 1:43" and came across your article.
I have the counterpart of the car made by Precision Miniatures, but I think your version is by far the better one.
Welcome, Ralf! You're already the second guy telling me that he owns the Precision Miniature version! I've been looking for that for two years, as I am absolutely crazy about the old white-metal model cars. The present RIO miniature was only a "cheap replacement" (got it for € 3!) as I could not get the other one
Anyway, take care of your one and I hope you will post something of your collection, won't you? Agreed stunning work. The photo etch adds a lot to the effect and the pipes are so much better than the original. You set a high bar for the rest of us to aim for by showing what is possible
Thank you! But again: I'm doing this for two years now and haven't had any education or special equipment for that at all. With some (not very expensive) tools and a quiet place I'm sure you can do the same. It would be a pleasure for me to give you some support if you like to. Go ahead with your 540K!
...But I didn't want to let this latest work go by ...
Very kind, thanks! But never mind, I feel fine if this thread is a little bit entertaining and gives some ideas and encouragement to enhance model cars
And don't forget: I'm the kid with the recorder, too My restless model-building life goes on, and so I'm slowly getting familiar with the second Duesenberg, the dual cowl phaeton. Following a small tutorial for making compressor tubes:
Starting with 2.0mm soft aluminium wire:

Making it straight by rolling under a hard board (I use a small marble plate):

Spraying permanent adhesive on:

Take 0.3mm silver wire (ca. 1.5m):

Spinning around the aluminium wire very tight, so that there are no gaps:

Curving into the right shape. Again: carefully, do not damage the outer wire with pliers etc. If necessary (as with the RIO Duesenberg) drill holes into to fix it at the appropriate points:

And finally dip into a thin (acrylic) clear gloss kote to avoid tarnishing:

Furthermore both top panels in front of the windshields are now prolonged to fit side windows and windshields. The patterns for the interior door panels are cut out:

And the fixation holes for the luggage rack were closed, as it does not appear in the version I will make:

Holiday's over, work continues. Rear dashboard (left) is not ready yet, but on its way. Front dashboard is cut out from nickel-silver and got its rough shape. Detailing will start tomorrow.


Following the front and rear dashboard in the finished state:


The exhaust pipes, now with real metal endings and already finished with graphite powder:


The exhaust pipes, now with real metal endings and already finished with graphite powder:

Tom: Well, I wish it would go a little faster... But with the heat wave my working place in the cellar is just the place to be
@ralf: I'm doing all this only because I cannot afford all those fantastic MiniMarques & Co. you have in your collection But - I wrote this already elsewhere - for me a model car is first my model car when I have overdone any little detail of it. I guess it's a kind of mental illness. And furthermore I like to deal with almost any material and any technique, this way life never gets boring
At the moment the working steps repeat compared with the Fishtail Speedster, so only some impressions for today:
Filling up the gaps for the center headlight, which will not appear at my car, and adding a thin rod behind the bumper:

Making the steering wheel turnable (as I already said, mental illness):

A pin is still the perfect way to make an elegant gear lever:

How to turn a hexagon brass profile...

...into a nice radiator cap (still to be nickel-plated):

And the same pins work very well...

...as real metal rods for the radiator grille:

@ralf: I'm doing all this only because I cannot afford all those fantastic MiniMarques & Co. you have in your collection
But - I wrote this already elsewhere - for me a model car is first my model car when I have overdone any little detail of it. I guess it's a kind of mental illness. And furthermore I like to deal with almost any material and any technique, this way life never gets boring At the moment the working steps repeat compared with the Fishtail Speedster, so only some impressions for today:
Filling up the gaps for the center headlight, which will not appear at my car, and adding a thin rod behind the bumper:

Making the steering wheel turnable (as I already said, mental illness):

A pin is still the perfect way to make an elegant gear lever:

How to turn a hexagon brass profile...

...into a nice radiator cap (still to be nickel-plated):

And the same pins work very well...

...as real metal rods for the radiator grille:

Tom: Unfortunately I am absolutely not able to handle 3D-PC-programs, so I think this will not work for me... The technique itself is - of course - fantastic, and I know that TinWizard for example works with 3D-printers.
The spare wheel housings are ready (as well as many other small parts, therefore it goes a little slowly at the moment...):


The technique itself is - of course - fantastic, and I know that TinWizard for example works with 3D-printers.The spare wheel housings are ready (as well as many other small parts, therefore it goes a little slowly at the moment...):


Tried to create a new style of window lifters:

The spare wheel dummy (with a chrome strip as a test) and its fixation:

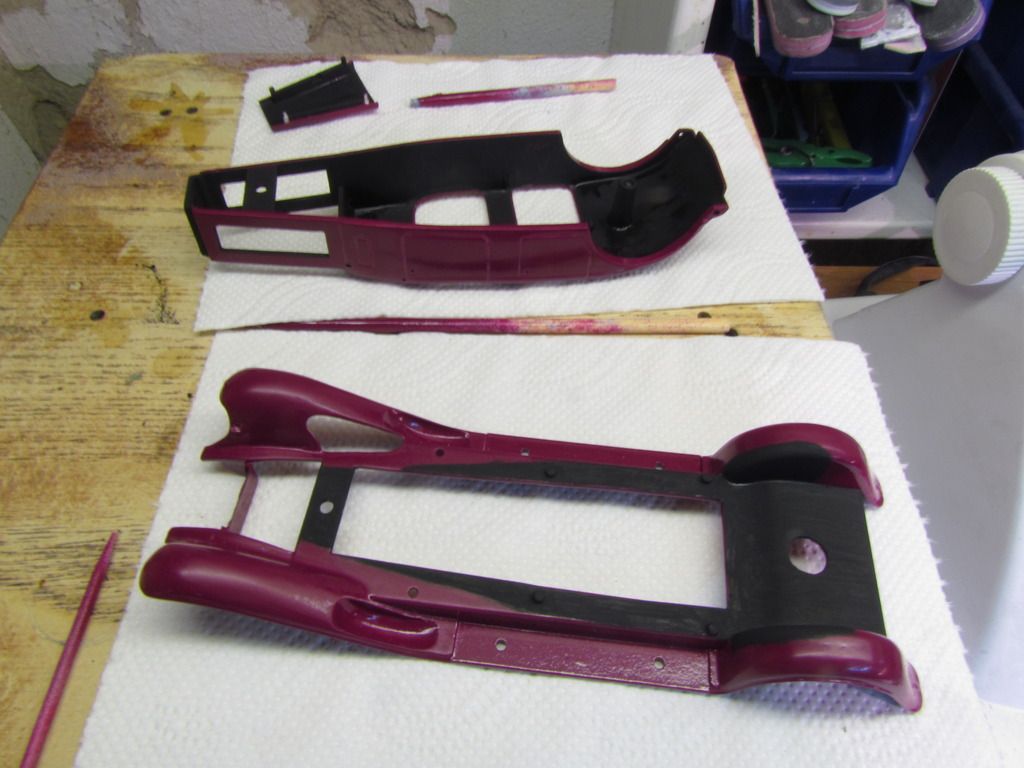
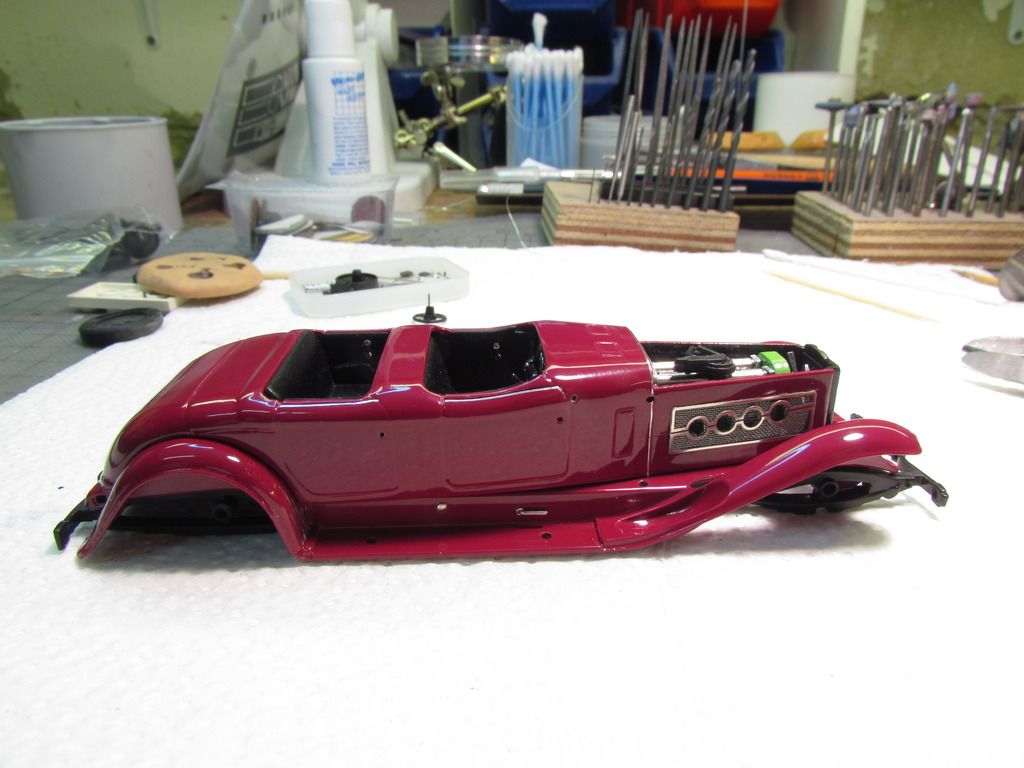
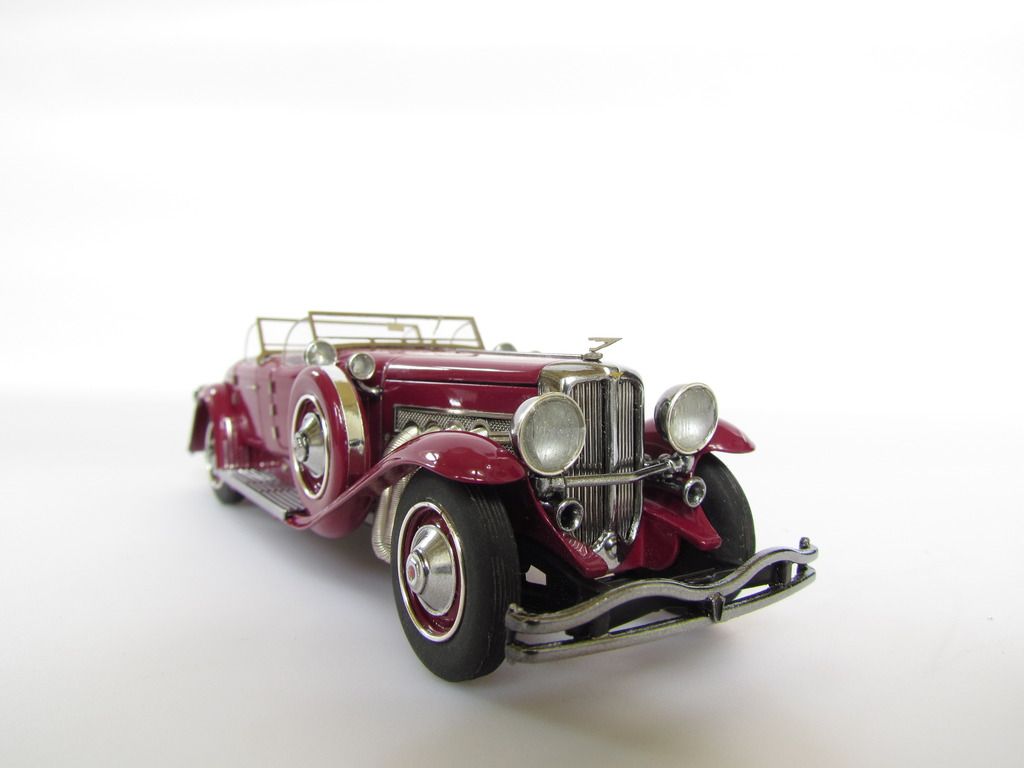
And - I'm so excited! - the first layer of painting:

(Knowing that this colour will divide the audience )

The spare wheel dummy (with a chrome strip as a test) and its fixation:

And - I'm so excited! - the first layer of painting:

(Knowing that this colour will divide the audience
)The colour is "bordeaux-violet", in fact it is more purple - the "pinkish" touch is due to the camera and lighting...
To strip a model car:
1. unscrew (carefully with RIO, sometimes the rear screws are hidden under glued parts!)
2. remove all parts "dry", but very carefully, which are not glued too tight (with a sharp knife)
3. dive the car into hot water (65 °C resp. 149 °F) - don't boil, but also don't let the water get cold, so after a few minutes try to disassemble the glued parts carefully and remove the softened glue remainings with a toothpick. Repeat several times if necessary.
4. When all parts are disassembled, put the metal parts into acetone (at least an hour, sometimes over night) and remove the painting with an old, hard brush.
5. put the painted plastic parts into "Revell Aqua Clean" (acrylic paint detergent) and remove paint (and also chrome) after a few minutes with a brush. This stuff does not harm plastics.
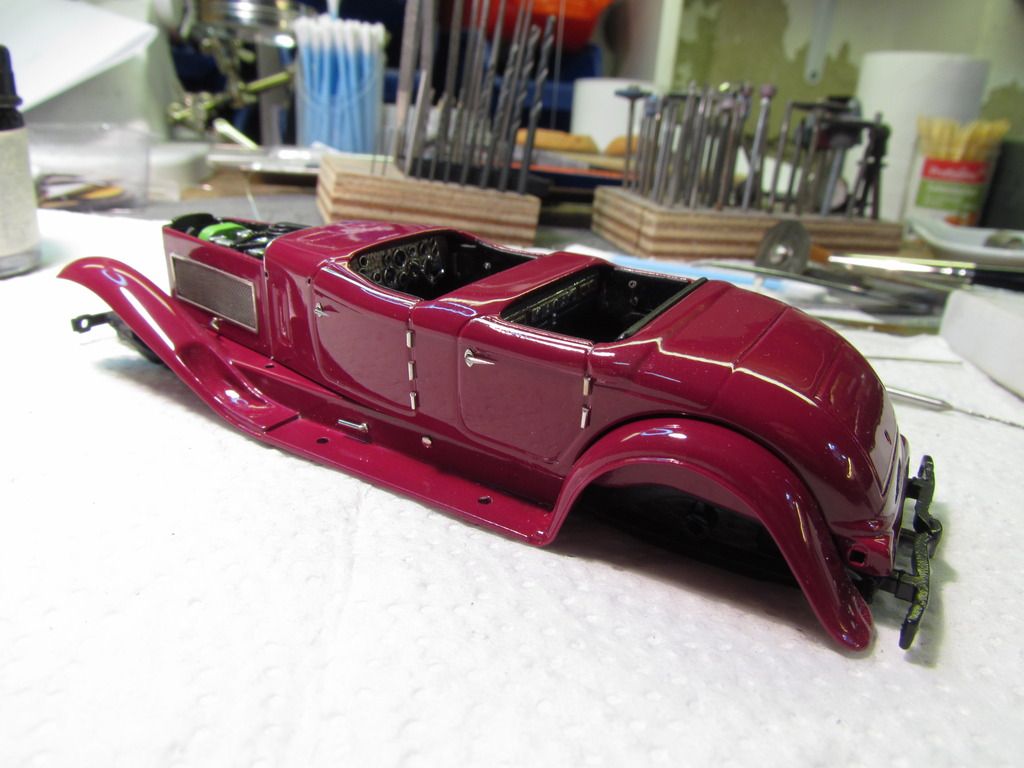
Another colourful day of my life:


Second layer:

Really wondering why so many people need hallucinogenics, a couple of spray cans evoques the same effect :mrgreen:


Second layer:

Really wondering why so many people need hallucinogenics, a couple of spray cans evoques the same effect :mrgreen:
Undersides of coachwork painted black, to avoid "flashes" when viewing from certain angles:
Interior airbrushed black, base plate with "wooden" paint:

And silver rings on the wheels as a first step for chrom-plating the hubcaps:


Interior airbrushed black, base plate with "wooden" paint:

And silver rings on the wheels as a first step for chrom-plating the hubcaps:

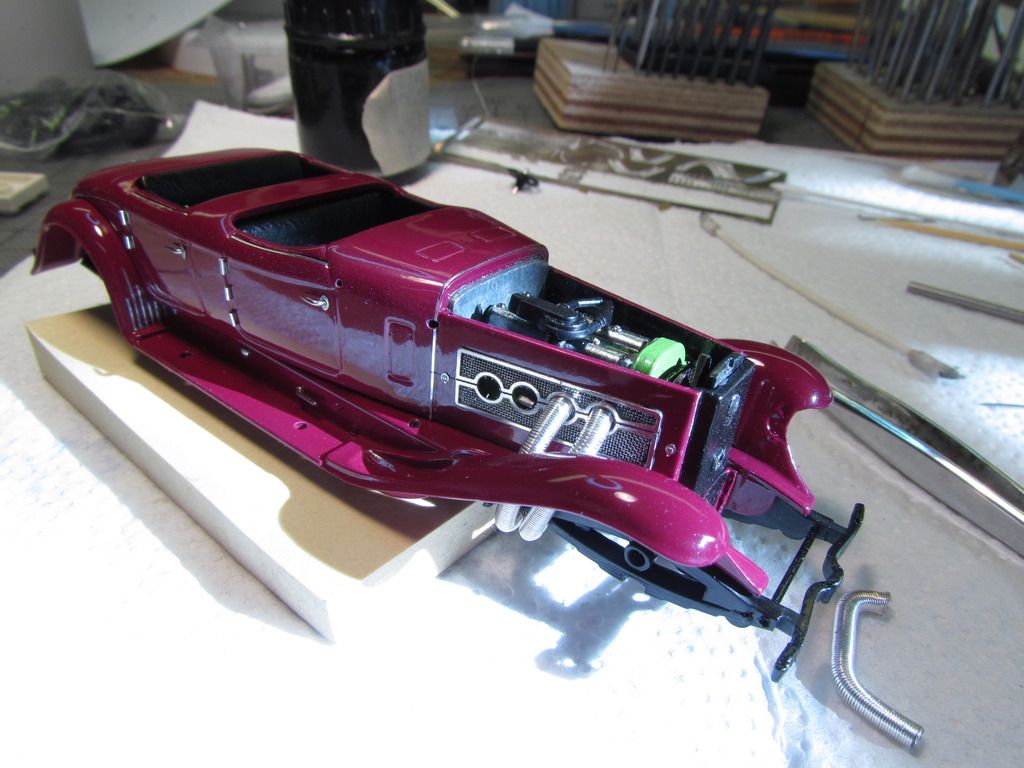
Time for some new impressions of my work. Undersides of the baseplates painted with woodwork:

Chrome decoration of the rear fenders:

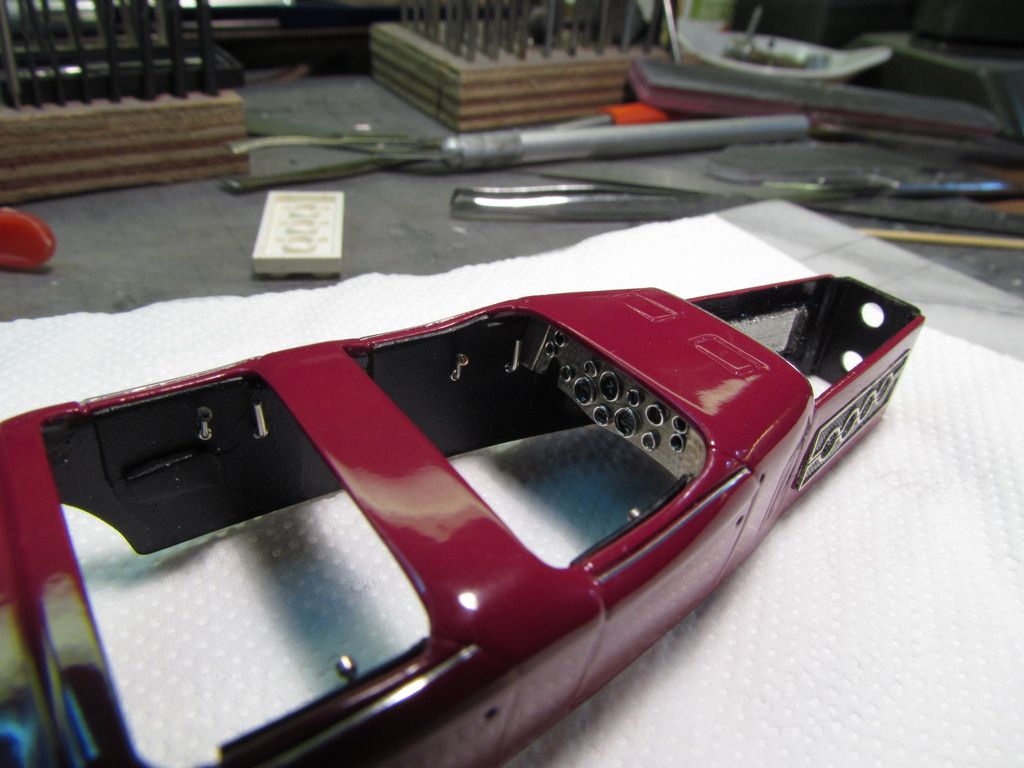
First impression of the completed body:

The wheels with the chromed hubcaps:

And the coachwork with the second layer of clear lacquer (still to be polished):


Chrome decoration of the rear fenders:

First impression of the completed body:

The wheels with the chromed hubcaps:

And the coachwork with the second layer of clear lacquer (still to be polished):

Interior with gear lever, handbrake, pedalry and door panels:

Wheels with small red "Duesenberg"-dots in the center:

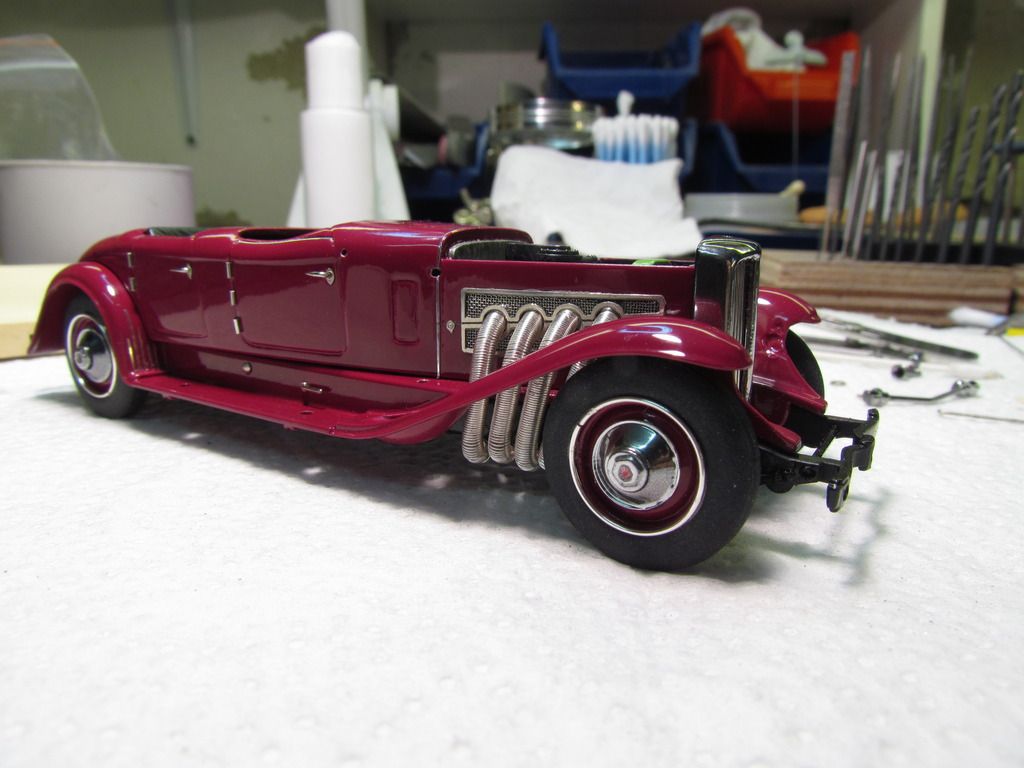
The radiator grille:

Finished bumpers:

And the finally polished coachwork in its full beauty :


Wheels with small red "Duesenberg"-dots in the center:

The radiator grille:

Finished bumpers:

And the finally polished coachwork in its full beauty
:
Never have counted the hours I spend with my model cars... But I think it takes approximately 60 - 80 hours to build up a model like this one in total.
For today, the engine is ready:


Small rhinestones are placed into the headlights:

The wheels are ready:

And - always very exciting for me :roll: - a new turn of photo-etching. This time I have made templates for the windows, too. I hope that I can cut them out more easily:

For today, the engine is ready:


Small rhinestones are placed into the headlights:

The wheels are ready:

And - always very exciting for me :roll: - a new turn of photo-etching. This time I have made templates for the windows, too. I hope that I can cut them out more easily:

Excellent observation : The seats are originally made this way, only sprayed with black semi-gloss lacquer. The door panels are first airbrushed with matte enamel paint by Humbrol, after drying with semi-gloss paint from a spray can (nitro-cellulose). By dosing the amount carefully you can handle the amount of getting the enamel paint crinkled, the result are some "wrinkles" to imitate leather. Good luck!
: The seats are originally made this way, only sprayed with black semi-gloss lacquer. The door panels are first airbrushed with matte enamel paint by Humbrol, after drying with semi-gloss paint from a spray can (nitro-cellulose). By dosing the amount carefully you can handle the amount of getting the enamel paint crinkled, the result are some "wrinkles" to imitate leather. Good luck! Sorry for my absence! Friday I was allowed to leave the cellar, and you can't imagine what I have seen: People talking into small black boxes, and there were different channels on TV, and everything was in colour! What's next, a rocket to the moon
This made me so nervous, that yesterday half of my work went wrong and I had to repeat many steps. At last, here are the results:
Hood louvers on the left:

...and on the right:

The rear lights:

Some of the head-lights (this SJ has 3 pairs ):

And the interior door panels and the dashboard:
Now we can count the days 'till it's done...!

This made me so nervous, that yesterday half of my work went wrong and I had to repeat many steps. At last, here are the results:
Hood louvers on the left:

...and on the right:

The rear lights:

Some of the head-lights (this SJ has 3 pairs
):
And the interior door panels and the dashboard:

Now we can count the days 'till it's done...!
Hey guys, please stop that "inadequate" thing. People who are not collecting model cars may be inadequate, but everyone who is fascinated by tin boxes on wheels is so very adequate as can be And if I would tell you all the things going wrong and ending up in a mess, you would tar and feather me... :oops:
But, assembly has started:

And if I would tell you all the things going wrong and ending up in a mess, you would tar and feather me... :oops: But, assembly has started:


Slowly all parts get into position...
The wheels:
The headlights and the running boards:

The spare wheels:
And the bumpers:

The wheels:

The headlights and the running boards:

The spare wheels:

And the bumpers:

Blood, sweat and tears were necessary, as well as about five hours work, to have the Duesenberg finally completed. And again: I think it must be the same feeling that many women have when giving birth to a child... you're completely shattered, don't know what you have done and also cannot be fully satisfied, as everything was so terribly exhausting :?
So I'll give you first some impressions of cutting the windows...


...before I proudly present the "preview" of my Duesenberg SJ Dual Cowl Phaeton to you:


...and to have the "before & after" show:


Time to have a break, before final cleansing will be done tomorrow to take some nicer pictures. Was it worth it?
Can we have a side by side with the boat tail ?
I absolutely do not know, if this could be possible
My convalescence shows a good progress, so have a look here today or tomorrow...
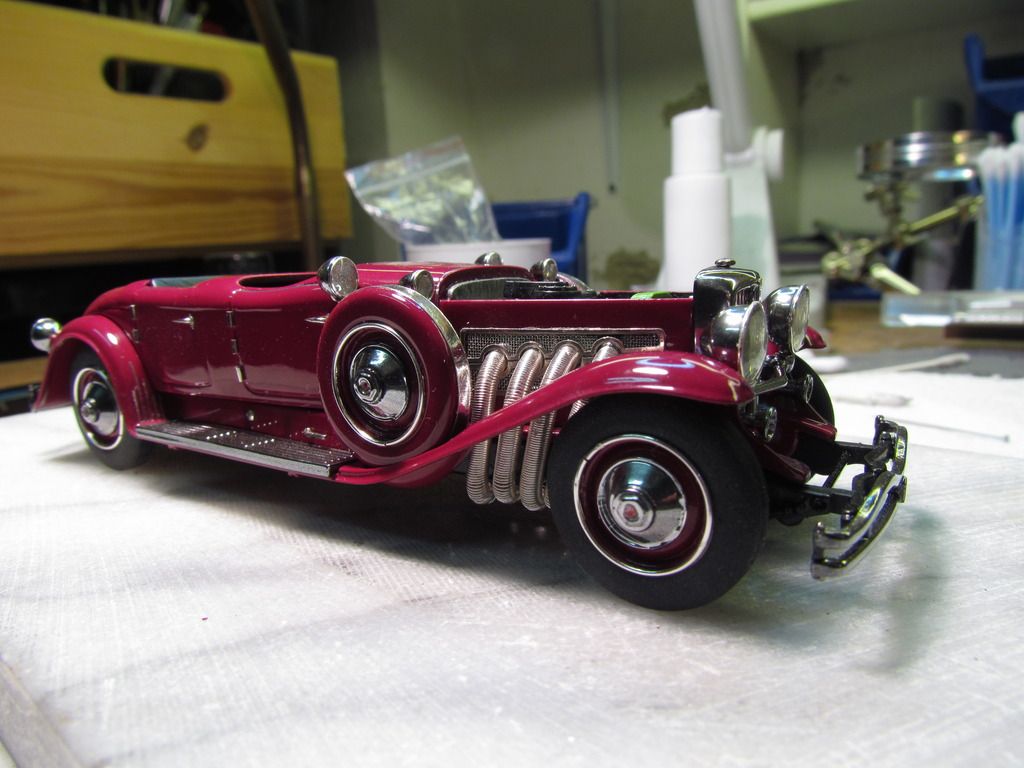
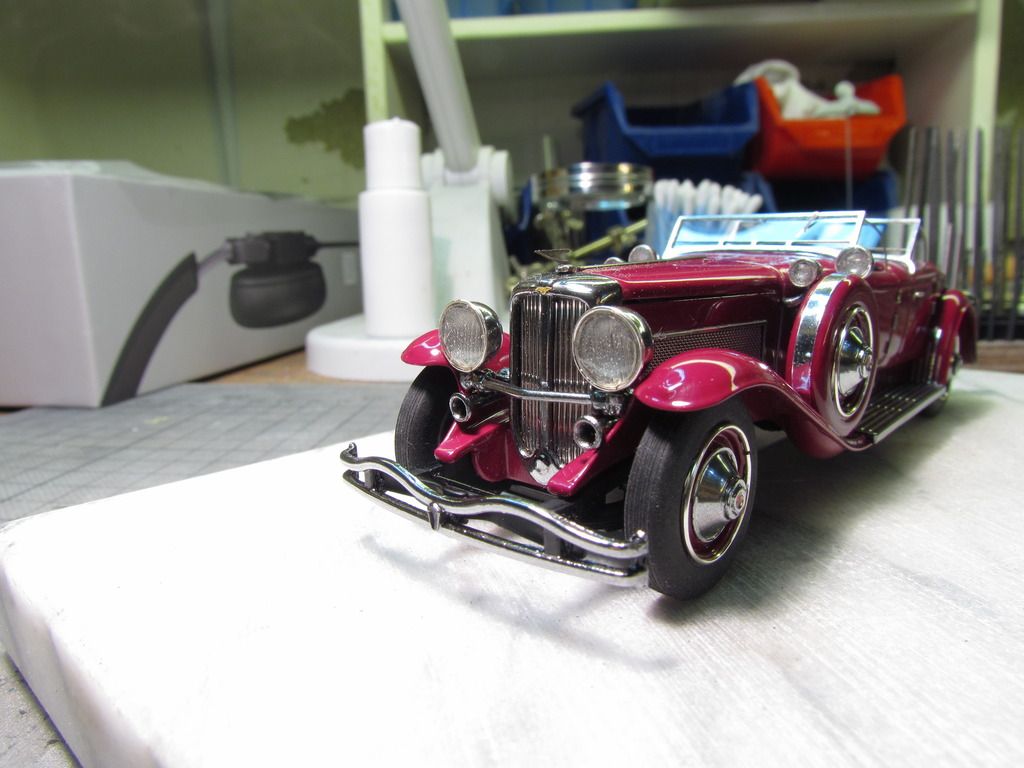
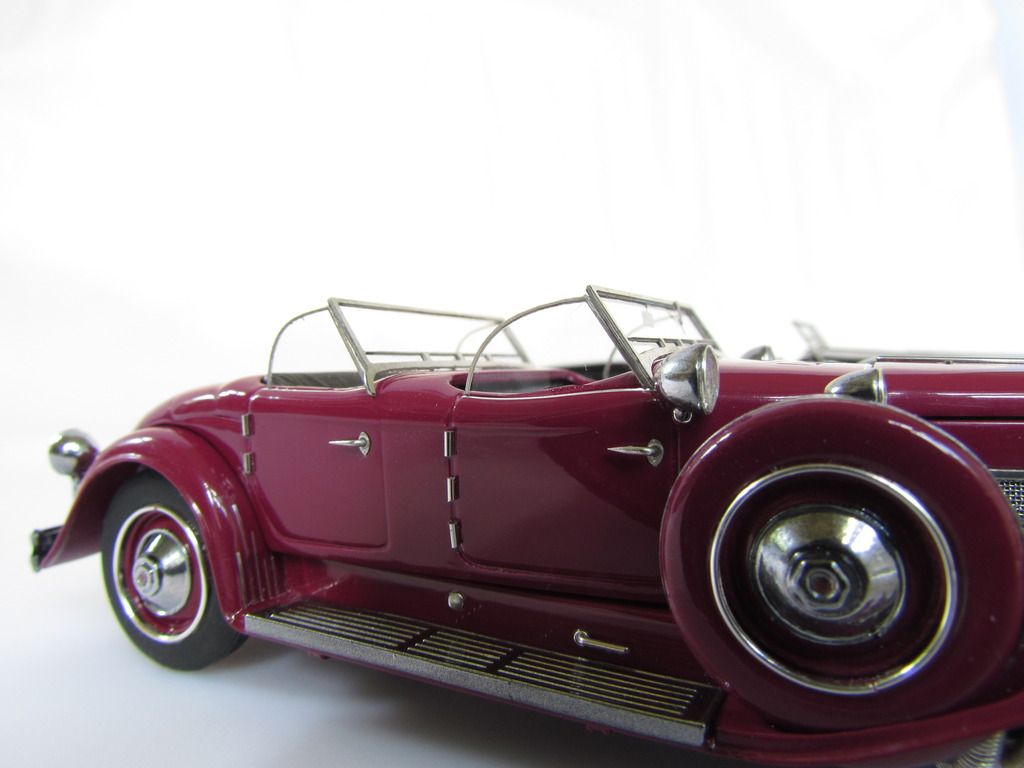
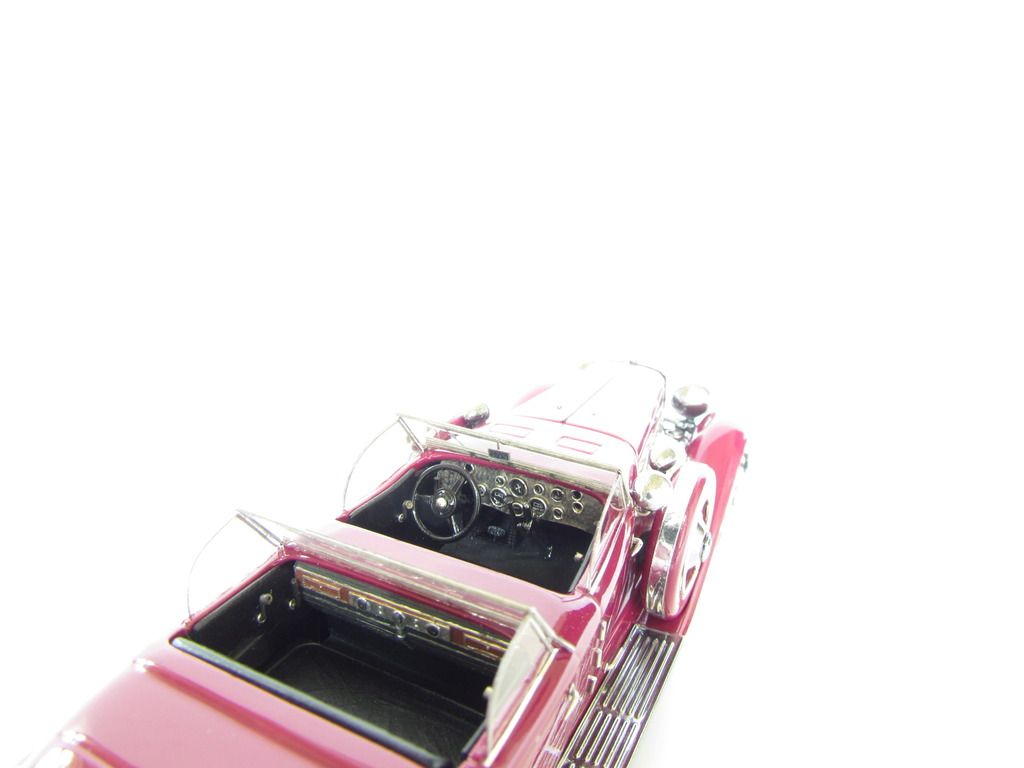
Gentlemen, mission completed! I have taken dozens (or even some hundred?) pictures and would like to share some of the most beautiful (in my opinion) with you. So take your time, as this post seems to get the most extensive in this thread :oops:


That's all for today, and I think for a while, too... :cry: I have received an order from my local parish for restoring the painting of an old balustrade in the church, and this will probably take some time. Thereafter I will have my (late) summer vacation, unhappily without my workshop. So I fear that it will be autumn until I can go ahead with car modelling. During my vacation I plan to write a small book about car modelling, probably on the basis of these two Duesenbergs, and of course I will visit our forum regularly, promised !
It was a sheer delight sharing all the work and the photos with you. Many thanks to all of you who have accompanied my work, made generous compliments and contributed so much to my enthusiasm in modelling.
And don't forget, James Bond :oops: - pardon: Jean B. will return with a "Horch 855 Spezialroadster". Stay tuned!


That's all for today, and I think for a while, too... :cry: I have received an order from my local parish for restoring the painting of an old balustrade in the church, and this will probably take some time. Thereafter I will have my (late) summer vacation, unhappily without my workshop. So I fear that it will be autumn until I can go ahead with car modelling. During my vacation I plan to write a small book about car modelling, probably on the basis of these two Duesenbergs, and of course I will visit our forum regularly, promised
! It was a sheer delight sharing all the work and the photos with you. Many thanks to all of you who have accompanied my work, made generous compliments and contributed so much to my enthusiasm in modelling.
And don't forget, James Bond :oops: - pardon: Jean B. will return with a "Horch 855 Spezialroadster". Stay tuned!
Thanks , and I have put on my own logo, on the other running board as you can see... For a while I have removed all logos of the original producers, but meanwhile I'm so relaxed that I go for a peaceful co-existence of manufacturer and myself As you can see, I have removed the "Made in Italy" - at least
, and I have put on my own logo, on the other running board as you can see... For a while I have removed all logos of the original producers, but meanwhile I'm so relaxed that I go for a peaceful co-existence of manufacturer and myself As you can see, I have removed the "Made in Italy" - at least