
Post by Jean B. on Apr 23, 2022 11:48:27 GMT -5
OCTOBER 2019
Hello guys, I guess I need your help! I've been asked to build a race car :shock: , and you know that you could also ask a sea-dog to dance cha-cha. However, I'd like to inform the interested person about the availability of an appropriate model, at least. The subject is
BMW ADAC Formel Junior - Team Abt Motorsport - Fahrzeug Abt Formel junior, Ralf Schumacher 1993

Does anyone of you know whether a 1/43 model of this one exists, or any similar type? Thanks a lot for your help in advance!
Hello guys, I guess I need your help! I've been asked to build a race car :shock: , and you know that you could also ask a sea-dog to dance cha-cha. However, I'd like to inform the interested person about the availability of an appropriate model, at least. The subject is
BMW ADAC Formel Junior - Team Abt Motorsport - Fahrzeug Abt Formel junior, Ralf Schumacher 1993
Does anyone of you know whether a 1/43 model of this one exists, or any similar type? Thanks a lot for your help in advance!
If I were on the hook for this build (I'm glad I'm not) I would probably start with a 1990's era Reynard F3 car. Minichamps made some in diecast:
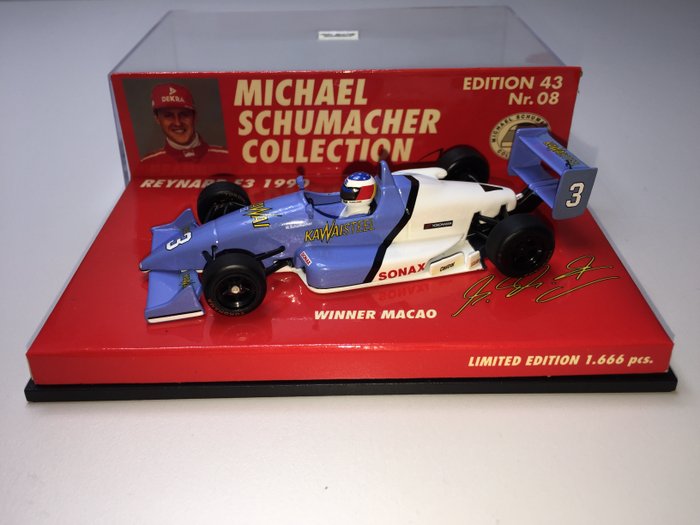
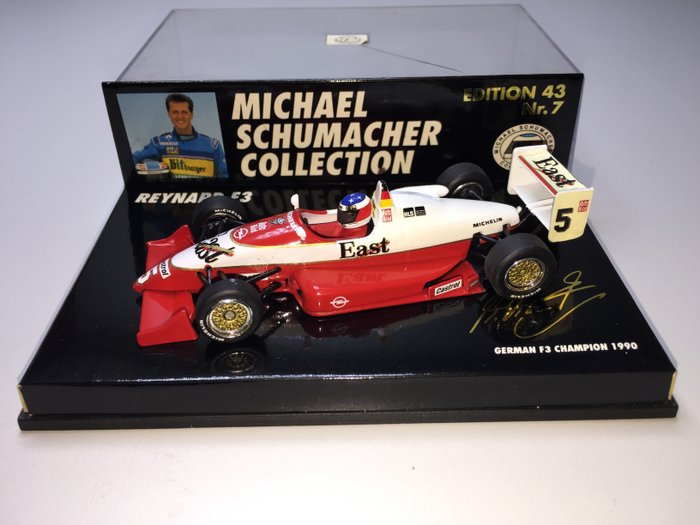
I know you prefer white metal, but these are close enough in shape that a bit of grinding/filing and putty should produce a good result. If you find two of them the front wheels/tires may work for all four corners of the Formula Junior. I'm sure the wings and suspension will be no problem for you to scratch build (or wheels and tires, if need be).
I see some for $80-$90 US on ebay
While the shape of the Formula Junior and Formula 3 cars is similar, I think the Formula Junior cars would be smaller (shorter in length, width and possibly height).
Formula Junior was a feeder series for F3. While the F3 cars ran 2 litre engines, I suspect Formula Junior ran smaller 1.6 litre engines. You probably need to google the race regulations for the cars to understand if they were similar or not.
They can't be too much smaller and still fit the driver, can they? I mean the same drivers participated in both series. I think the idea of searching the reg's is a good one. These builders weren't flush with money so I'm betting there is a lot of parts that cross over. A 1.6 and a 2.0 would probably use the same block. right? Wheelbase is an easy fix, height has to do with the rear wing, which needs to be scratch built anyway. I suspect width is determined by the wheels, not the body. But I'm just a loudmouth Yankee, so what do I know?

They can't be too much smaller and still fit the driver, can they? I mean the same drivers participated in both series.
Generally ever category of open wheel racing is a step up from the next in terms of size and power.
Go karts lead to Formula Ford
Formula Ford leads to Formula Junior (or these days F4)
F4 leads to F3/GP3
F3 to GP2
GP2 to F1
(Unless your name is Max Verstappen then you just go from Step 1 to Step 5 and skip everything in between.
Here's an interesting size comparison of current F1 and GP3 cars.

Same drivers, the only difference is 2 or 3 years experience (and maybe $20million in personal sponsorship).
Yeah. Modern F1 cars are huge.
From what I've found, the ADAC uses a single chassis manufacturer (BMW since 2000) and a modified motorcycle engine.
The shape looks close on the F3 car, though it might make a model that is slightly over-scale if you are correct about the size difference.
Dear Alex, dear Ian: Thank you so much for your kind help, I knew I could rely on you
 I would've had no idea only for what I should look for... So I could inform my (not-yet) customer about what he should be aware of
  By the way, your posts are quite interesting, even for me :oops: Perhaps I'll be an expert for race cars, too, sometime :lol:
Dear Alex, dear Ian: Thank you so much for your kind help, I knew I could rely on you
I would've had no idea only for what I should look for... So I could inform my (not-yet) customer about what he should be aware of By the way, your posts are quite interesting, even for me :oops: Perhaps I'll be an expert for race cars, too, sometime :lol:You're welcome. If you decide to proceed with the build, let me know. I know a few places that you can contact to get custom decals printed.
Meanwhile I've got the order for making this model, based - as recommended by you - on the Minichamps Reynard F3.

The model as delivered.

Luckily it's screwed and not glued together.


Disassembled.


Acrylic paint without primer is stripped off in acetone within a few minutes

Everything clean and ready for converting.

These two or three photos...

...are the only I could find. So if anyone of you cracks would have more information of how such a racer should look like or how certain details should be converted, I'd appreciate any response! You know, normally I'm dealing with Art-Déco cars, so this one's for me like a trip to Mars...
It's cool that you are taking this on.
If it were me I'd start with that side shot of the race car. I'd make a silhouette of the race car photo, then I'd try to take a photo of the model from the same angle and overlay them in GIMP or Photoshop and see where they differ in profile. It should also give you a pretty good idea of wheel and tire circumference.
You've got a good shot of the suspension, which will be helpful.
Will the car be mounted on a base when finished?
Here is a good suspension/side pod shot:
The rods in front of the upper A-arm are steering arms. Note the brake lines taped to the front of the lower A-arms.
Here is a 3/4 rear shot:

Straight on side shot:

This is a 1993 car like the one you are modeling.
I noticed that the wheels on the "display" car in your first post are different than the race wheels. I suspect the display car has more modern wheels than it raced with.
Hi Alex, that's simply great, thank you so much! I thought I had no chance to get any further pics of this racer, but those you've posted are fantastic! I've already proceeded works and only referred to the pictures I had, but I think I'm on the right way. I simply do not know whether to change the rods of the front wheels... :roll: Of course this would be very nice to have it authentic, on the other hand I have no idea how to do this really accurate. I guess I have to sleep over that matter some further nights...

Some first markings which details should be changed.

The roll bar should be opened.

Done.

The two halves of the rear axle should be combined for better working.

...like this.

The cutout for the drivers compartment is altered.

Tricky to get the very small wheels out of the very wide and tight tyres. By the way: Are the tyres on the original car made by Michelin? And what about those two yellow strips (?) on the wheel rims (I mean on the colour pictures)?

The coolers (?) should get a completely new shape, I will make them by photo-etching.


The front spoiler is bent, the side parts have a wrong shape.

Not ready, but already much better.

Tidying up the bottom side...


Removing the small fins.

By the way: Are the tyres on the original car made by Michelin?
I'm following this with interest Jean since its so different to your usual work. In answer to your question, you can see that one of the sponsor logos on the car in the pictures was Pirelli, so I think its safe to assume it ran on Pirelli tyres.
That is really impressive.
, but let's see how all this will turn out... I'm following this with interest Jean since its so different to your usual work. In answer to your question, you can see that one of the sponsor logos on the car in the pictures was Pirelli, so I think its safe to assume it ran on Pirelli tyres.
 Great idea with "Pirelli", now, how to get this script on the rubber tyre...?
Starting with the first p/e parts.

The template for the front hood (?).

One of the side air intakes.

Filled with solder from the bottom side...

...for having enough material to round the edges all along.

The new rims have exactly the correct diameter

Now the original wheels can be milled out.

Scribing in the fugues.

Not that bad...


Getting rid of the original air intakes...

...and mounting the new one.

I'm in need of further p/e parts, as it seems...
Tameo used to do their photo-etched suspension in one piece for each corner so they could be folded into shape. They are the silver parts in the center of this photo.

You might be able to do the front and/or rear each as a single piece with the lower A-arms connected and passing through the chassis for added strength.
You may be able to modify the existing plastic suspension instead. The rear looks pretty close already. The front looks like the trailing edge of the upper A-arm will need to be attached further forward on the chassis.
Tameo used to do their photo-etched suspension in one piece for each corner so they could be folded into shape. They are the silver parts in the center of this photo. You might be able to do the front and/or rear each as a single piece with the lower A-arms connected and passing through the chassis for added strength. You may be able to modify the existing plastic suspension instead. The rear looks pretty close already. The front looks like the trailing edge of the upper A-arm will need to be attached further forward on the chassis.
But I also have another idea, I guess over x-mas I won't do this, so I can make up my mind about "how to"...It looks really good so far. I must get off my ar$e and learn to photo-etch. It really opens up new possibilities.
! A life without photo-etching is possible, yet it lacks any sense :lol: You can buy pirelli curved tyre 1/43 waterslide decals on eBay or via shops like grandprixmodels.com Jean. Rgds

Making nails with heads (as we say in Germany): cutting off the suspension rods. They are in a wrong position and the soft PVC looks rather ugly.

The holes and gaps then have to be filled in with putty.

Making the suspension only with p/e parts is not my favourite idea, as the different angles are difficult to plan and the p/e parts would be flat. So I decided to take 1.00mm brass tube, black-burnished, to fix on p/e disc brakes which are to be equipped with small pins. (Hope you can understand what I mean, it's difficult enough to describe in German
)
The body is meanwhile made over with putty and slowly gets its final shape.

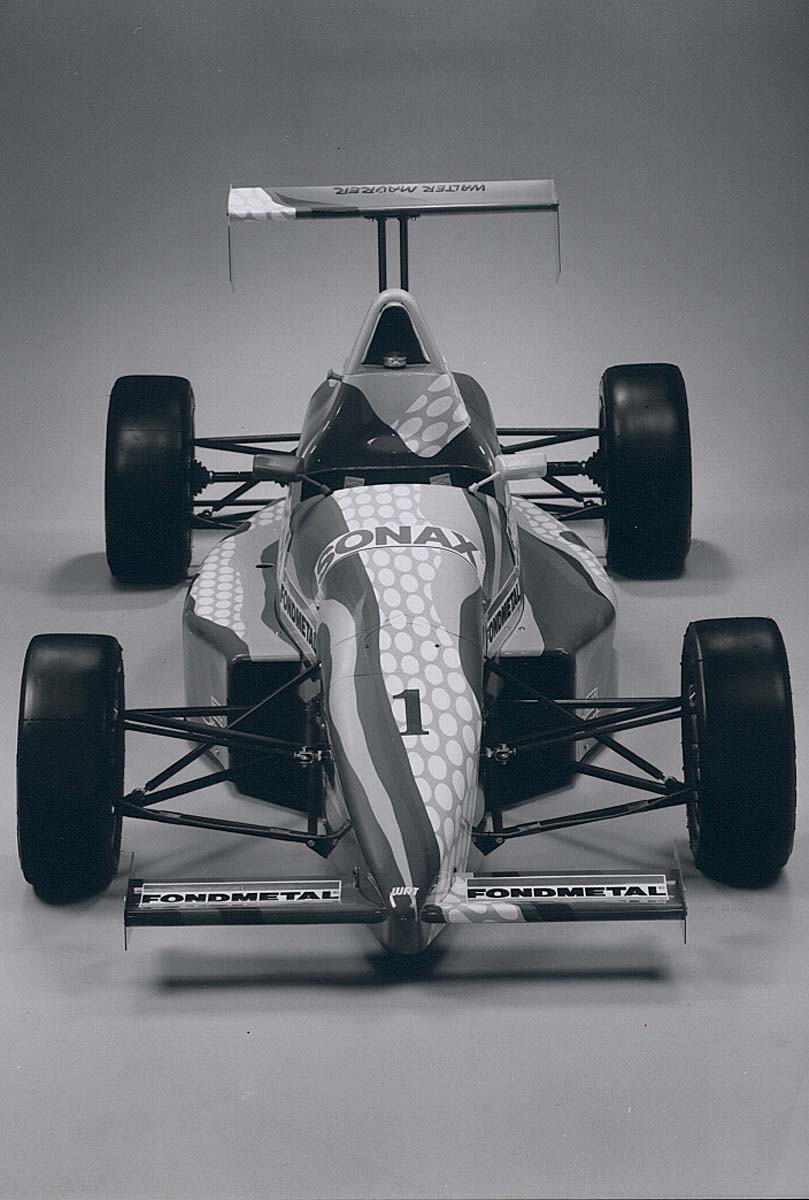
Jean, maybe it's the angle of the photo, but those side pods don't look wide enough. Looking at the head on black and white photo, they should equivalent to roughly 50% of the cockpit width at the widest part (or a bit wider than the tyres).
I don't think the photo-etched pods are mounted yet.
That's what happens when you're browsing the forum on your phone :oops: .
alex & Ian:
The pod was already mounted, but removed for works on the body. But: I made only the single right one, as I knew that this wouldn't be the final version
Originally it had correct dimensions, but milling out the curved inside, it became narrower all the time... :roll: So I followed your advice and changed the graphic. Generally wider, and the "elbows" are sharper. Here's the result:
First version and new version.

Both sides new.

I guess the rear end of the pods should be narrower, the last 2/3 more curved, what do you think :?:
I think you are correct about narrowing the pods and curving them a bit mote in the back.

These are almost all remaining p/e parts for the racer.

These parts will help making the air-intake behind the rollbar.

The new side pods.

Wider and better fitting to the body...

Sharper elbows.

As promised, more curved and narrower end points.
So far you seem to be doing very well on a subject far from your comfort zone. After all, model making is model making: finding a way to get the correct shape and detail.
! However, of course your eye is trained on a certain style, but I take this project as a kind of "challenge" ( with no intention to repeat this subject :oops: ).Looks good!
! That's the point: Having no idea of racing cars, I can only repeat the visible shapes of the car :roll: 
The air-intake behind the rollbar is made.


The baseplate must be narrowed fitting the airpods.

Done.

The rims are basically assembled.
I've never seen a conversion at that level on an open-wheel race car. Outstanding work!
, really  ? I'm sure there are model builders which make much more elaborate conversions of such racers than I do... However, although I'm not crazy for this type of cars, I simply try to do the best I can
Meanwhile: The rims are painted black, tiny "Fondmetal" scripts are applied (0.3mm height, I thought I'd go crazy :evil: ), and the Michelin scripts on the tyres are gone - following Ian's advice that this F3 racer obviously was developed under the participation of Pirelli and should therefore wear according scripts.

Brass tubes and several p/e washers are mounted to give the wheels - hopefully! - a good fit & look!
I would've screwed up the first decal and 'forgotten' about the rest.
I'm impressed. I think the wheels are excellent and the "sweep" of the side pods capture the feel of the car really well. I know how difficult it is to work from photos of race cars. You are doing a great job.
It's very impressive to see your skills applied to something completely different and a subject you know little about. Congratulations on a job well done so far.
! Perhaps I'm looking at such a racer the same way as I do with my 1930s gems: always looking for the elegance and economy of lines... :oops: 
I hate PVC parts :evil: ! They always bend and don't fit very well, when honing & filing the material ripples off... I had to add a third screw into the baseplate for a better fit to the body.

The front spoiler together with the small nose got the final finish.

The rear spoiler must only have one deck...

...so getting rid of the lower part.

I decided to to switch to 0.8mm steel wire for the axles, and meanwhile the body is perforeated like a Swiss cheese...

Designing the next parts (for the rear axle).
You and me both! It's like trying to sand bubble gum. Be careful with the paint. If the mix is too "hot" it will turn the plastic into a sticky mess.

The announced device for fixing the complete rear axle.

Funny part, isn't it ?


The discs for fixing all the rods.
Good to see that you're attacking this in your usual thorough way. Excellent work.
Born this way :lol: Have you thought about replicating the wing and endplates in PE Jean. The reason I ask is these parts are usually very thin.....much thinner than the model makers represent them in plastic. If nothing else, I would replace the end plates with PE parts glued to the main wing.

First made a sketch on screen and printed this out, then making the parts for the holder of the rear wing of brass profiles.

Painted black...

...and glued together this should work well.

Making a first test with attaching the suspension rods.

Believe me, it's far worse than playing mikado.... :roll:
That's what it reminded me of indeed. It will be an interesting job to get both sides to look identical.
- as I said, I hope so... :roll: 
Having made new mirrors.

Seems as if I would slowly approach painting all parts...
This is awesome!
, but I'm simply trying not to fail - knowing that so many experts are all around here on S1/43... :oops: 
First two coatings with white primer...

...are made, and the body looks quite good. The wings need some retouching, though... :roll:

Starting with the decals: This car needs dozens of decals, and I have to design each single one by myself... :roll: Here's an example of how to make a new "a" for the script of an old magazine.

...and the final result.

Some are already finished...
Fantastic job, love the graphics!
! It took me some time to find the original graphics of the advertising companies and to identify some tiny writings. By the way, the "i-dot" for the "Auto Magazin" had to be changed, I hope that you will see anything of those works with the final car - the decals measure only a few millimeters... I imagine the decals took you almost as long as the car Jean. Another skill of yours we can all be envious of  .
.
. ) I tried a new tool for direct writing with a broad inkbrush, nice result, isn't it? And of course I was aware of this work and calculated accordingly.Nice! Do you have the capability to print in white? There is no inexpensive way to do so as far as I know. There are some vendors who will provide the service though.

Meanwhile two coatings with yellow paint are airbrushed and so the basic colour is done.

For making white numbers or printings, I take white decal paper and choose a matching colour for the surrounding. For that reason I made sample sheets of all standard colours of my graphic programme and then compared it with my paint patterns.

This way you will hardly see that the base of the white scripts is printed decal paper and no real paint - at least I hope so...

By the way: Does anyone of you have an idea which scripts the marked ones are? I simply cannot recognize them, but perhaps you know them from other racing cars...

Your work here has encouraged me to pick up an SMTS F1 model i started building back in the summer but lost interest in as it was fiddly and the instructions are useless.... finally getting somewhere now!

I think the top one above Warsteiner says Ferodo. Trying to read it gave me a headache.
www.google.com/search?q=ferodo+logo&oq=fero&aqs=chrome.0.69i59j69i57j0l2.2340j1j7&client=tablet-android-samsung&sourceid=chrome-mobile&ie=UTF-8#imgrc=Wpp5pDSFLJE6KM:
The red one with the circle might be an E, perhaps for Extinguisher?
www.google.com/search?safe=off&client=tablet-android-samsung&ei=FwsaXvGHGcrLwQKjt4u4AQ&q=fire+exttinguisher+logo+on+racing+cars&oq=fire+exttinguisher+logo+on+racing+cars&gs_l=mobile-gws-wiz-serp.3..33i22i10i29i30.21631.26567..28172...0.0..0.234.2121.2j13j1......0....1.........0i13j0i13i30j0i19j0i13i30i19j0i8i13i30j33i10i160j33i10i21.Icp8qxTfdZ8#imgrc=69DvaESJ9-S21M:
For the ADAC logo, have you noticed that there's a vector version online for download? This might offer a clue for the question marks:
docplayer.org/19166715-Das-adac-logo-das-logo-des-adac-besteht-aus-der-quadratischen-flaeche-und-dem-schriftzug-adac-gesetzt-in-der-franklin-gothic-condensed-von-linotype.html
The logo on the nose cone is two pixels high and they're blurry. Good luck finding that.
The "E" is definitely the extinguisher mark. You can see the red switch right below it.
The logo on the nose could be that of the chassis manufacturer as it is on all of the cars in this photo:

I suspected the same Alex. I was googling last night to see who that was but couldn’t find any info.
Me either. But it has got to be out there somewhere.
I agree with Tom that the logo above the Warsteiner logo is from Ferodo.
Here's a slightly clearer shot of the nose, though the logo is still a bit of a mystery. Looks like it has a red slash running through it. At least this picture might be helpful for the helmet detail.

Here's another picture I found of the car at the Nurburgring.

Here's another interesting picture I found....Ralf Schumacher's first Formula Junior race in the above car at the Norisring in 1993, but in a (mostly) monocromatic black & white livery.

Unfortunately it doesn't help with the nose cone logo, but perhaps gives Jean the option of producing a 2nd version of this car.
I think the top one above Warsteiner says Ferodo. Trying to read it gave me a headache.
The red one with the circle might be an E, perhaps for Extinguisher?
For the ADAC logo, have you noticed that there's a vector version online for download? This might offer a clue for the question marks:
The logo on the nose cone is two pixels high and they're blurry. Good luck finding that.
The red one with the circle might be an E, perhaps for Extinguisher?
For the ADAC logo, have you noticed that there's a vector version online for download? This might offer a clue for the question marks:
The logo on the nose cone is two pixels high and they're blurry. Good luck finding that.
!The "E" is definitely the extinguisher mark. You can see the red switch right below it.
The logo on the nose could be that of the chassis manufacturer as it is on all of the cars in this photo:
I suspected the same Alex. I was googling last night to see who that was but couldn’t find any info.
I agree with Tom that the logo above the Warsteiner logo is from Ferodo.
Here's a slightly clearer shot of the nose, though the logo is still a bit of a mystery. Looks like it has a red slash running through it. At least this picture might be helpful for the helmet detail.
Here's another picture I found of the car at the Nurburgring.
Here's another interesting picture I found....Ralf Schumacher's first Formula Junior race in the above car at the Norisring in 1993, but in a (mostly) monocromatic black & white livery. Unfortunately it doesn't help with the nose cone logo, but perhaps gives Jean the option of producing a 2nd version of this car.

Some detailing started...

...and the red parts finished.
That looks really good already!
Wow, just wow.... exceptional work and attention to details!
...at a certain point my skills are limited, I fear... :oops: I “think” Mygale produced the chassis for Formel Junior in the 1993 season but as they are a french company, and their current logo is a spider, that makes it less likely thats the small nose logo. Which leads me to wonder now if thats the logo for German Formel Junior series or something associated with it if its on all cars that year?
By jove, i’ve only gone and found the nose logo. Just bear with me as i can’t upload the image from work. Will do it as soon as im home tonight. It is the formel junior logo - its a nose on view of a car with a rainbow slash going through it. In the meantime there is a small chance this link may work: Bottom right hand corner

Here's another picture of the "mystery" badge, so I guess all decals can be finally completed

The basic paintwork is finished. I guess this is the only car I've ever made (and will ever make)...

...with a 4-colour-scheme.

The small parts are finished, too.
Nice work on finding the logo's guys.
The basic paintwork is finished. I guess this is the only car I've ever made (and will ever make)...
...with a 4-colour-scheme.
Jean, if you look at the pictures, in the majority of them the left sidepod is red not white. I think this is how the car ran most of the time (and how it is now displayed in the museum).
In the picture with the white sidepod, you can see that much of the rest of the car above the sidepod is being held together with blue duct tape. I suspect that the white sidepod was a quick replacement to repair damaged from a crash. Its perhaps not what you wanted to hear at this late stage, but I thought I should point it out as maybe its something to discuss with the client.
I agree with Jager on this one. It looks like the white sidepod was a raceday fix.
You cannot say that it's boring to look at. The VW Polo Harlekin comes to mind. 
Outstanding work so far 
Does look good! The one on the brochure also had meisterschaft under formel junior but i suspect the logo on the car didn't even have any wording Sorry for the delay in posting this evening. Managed to get my car stuck up to its axels in mud - needed a tow out. Not embarassing at all considering I was in a Range Rover.....
Thank you so much - I've decided to take the logo with the ADAC Formel Junior script below. It's hardly to recognize on the car... Jean, the paint looks great.
Nice work on finding the logo's guys. Jean, if you look at the pictures, in the majority of them the left sidepod is red not white. I think this is how the car ran most of the time (and how it is now displayed in the museum).
In the picture with the white sidepod, you can see that much of the rest of the car above the sidepod is being held together with blue duct tape. I suspect that the white sidepod was a quick replacement to repair damaged from a crash. Its perhaps not what you wanted to hear at this late stage, but I thought I should point it out as maybe its something to discuss with the client.
In the picture with the white sidepod, you can see that much of the rest of the car above the sidepod is being held together with blue duct tape. I suspect that the white sidepod was a quick replacement to repair damaged from a crash. Its perhaps not what you wanted to hear at this late stage, but I thought I should point it out as maybe its something to discuss with the client.

I agree with Jager on this one. It looks like the white sidepod was a raceday fix.
This thread is fantastic not only for checking the updates on the great work Jean is performing, but also reading all this detective story on the details!! Congrats !

Starting to apply the decals.


Very nice job on the decals. You're in the home stretch now.
Outstanding!
Looking good Billy Ray

Today I've started with varnishing all body parts, and of course the helmet, too.

Hardly bigger than a pinhead...

I have to spray very thin layers, as the decals quickly react with the solvents of the varnish and immediately crumble away...

All undersides are painted matte black.
What kind of witchcraft is at work here? Must be some kind of magic involved :lol:
Odd that your decals dissolve with the varnish. For future try clear car spray lacquer as that should not happen.
But thanks for the advice, next time... Looks amazing!
However, I wish it would look the way I had in mind when starting this project... :oops: Still awesome, great work.
Well, I've needed some days off to fix some stuff, but today I've resumed with this project. Meanwhile all decals were applied, some re-done, the car is varnished, and finally the main parts are already assembled:


Tomorrow I'm going to start assembling the wheels, wish me luck!
+1, that is another project worthy of your name tag.
Looks a bit like a Winter Olympics bob-sled at the moment, but with the wheels added it's going to look superb. I think if Ralf Schumacher saw this he'd want one too (unless he's your client ?).
And no, my customer is not Mr Schumacher - if so I would have added a "1" as the first price digit 
Starting with the wheels. First I have to make a template to adjust the wheels correctly.

Fixing a spacer under the car.


Starting with the rear axle.

For all the suspension rods I take 0.8mm steel wire, black-burnished.

Completed rear wheels.


Same procedure for the front wheels.
Very clever!
Most of those are more than 50 years old... That looks excellent

It seems - at least I hope so! - that the car is ready now...


Now the car must be refined & retouched at some details, and then put in an acrylic box. Daylight pictures will follow...
Congratulations, great job! If I was your customer I'd be very happy.
Very nice!
Excellent work Jean.


Amazing build, looks spot on to me!
! It was quite an experience, and I'm very lucky that it's now finished Considering this is an area well outside your usual expertise you've done a fabulous job Jean. I trust the client was suitably impressed ?

The boxed car with a translucent background picture.


That's all, folks
!A result you can be proud of, even more so because it's far out of your comfort zone.
Well, it's no comfortable car, I guess... Another high volume applause for the job, Jean! Very neat presentation, too! Just to make this clear - your customer is a lady and it was for herself? (I mean she is a model collector?) That is a rarity in our small world!!
Yes, the car is for a lady, she seems to be crazy for Ralf Schumacher and collects all model cars related to his career, autographs, pictures and so on... Finished car looks like a factory produced model which is a compliment! The finished car is a relatively basic looking model which belies all the hard work you put into it. Nice work Jean.
Just to make this clear - your customer is a lady and it was for herself? (I mean she is a model collector?) That is a rarity in our small world!!
I wondered that too? Interesting.
That was an outstanding work, Jean. You have achieved an impressive level of modelling skills.
I'm just starting in this modelling venture but I already know whom I should be mirroring myself.
! This F3 racer was indeed a challenge, but finally I was quite satisfied with it and - much more important! - my customer was, too Go ahead with modelling, it's the most fulfilling hobby I've ever started... I have to chime into the chorus Jean, outstanding work!
