
Post by Jean B. on Apr 23, 2022 11:56:10 GMT -5
This thread has been transferred from S1/43. Due to technical reasons possibly not all comments of members are visible. I'd like to apology for this. The photos, hosted by photobucket, will be deleted in near future. They will be replaced by new versions from flickr, but this will take some time. For any questions, please contact Jean B. Thank you!
As I was requested to show some more details regarding photo-etching, I will do so. To be honest, I feel unable to describe every single step in the necessary depth as it is very difficult for me to translate all the needed terms. Please let me know if you need any further assistance for the single steps.
1. Making the graphics
Of course you can paint all the desired parts with ink and nib, but I recommend an appropriate PC program. If you already own AutoCad, Solid Works or similar, you can skip this point, then you're already a professional! If not, get InkScape - this is a free-ware which needs - of course - some learning, but can easily be dealt with. Imagine photo-etching as a kind of developing photos: you have to transfer a graphic onto a metal-plate, so that the "white" parts are etched away, and the "black" parts keep remained. By using different films for front and back you can make "seams" from one side (or the other). A completed graphic could look like this one:
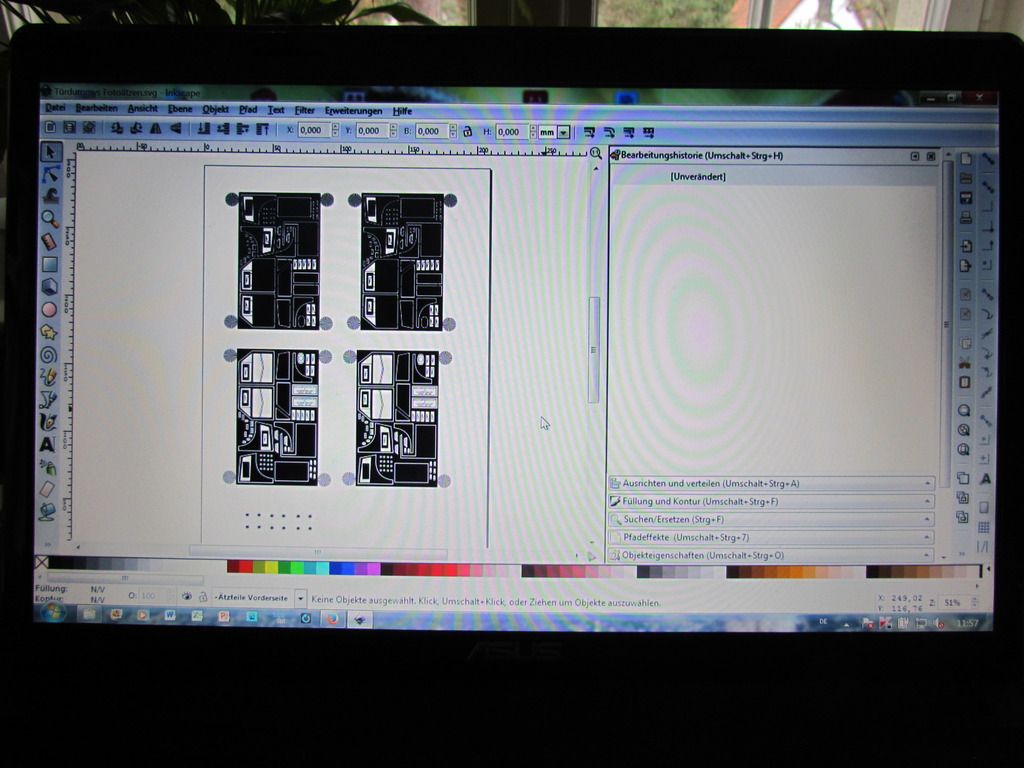
You need two graphics, one for the front, one for the back, which match absolutely exactly to another. Furthermore the printed toner has to face the metal-plate, so the front side graphics have to be mirrored.
For printing, choose an appropriate foil for your printer (different foils for InkJet and LaserJet!). I take simple overhead-foil, this works best (special "photo-foils" do not work in my experience...):
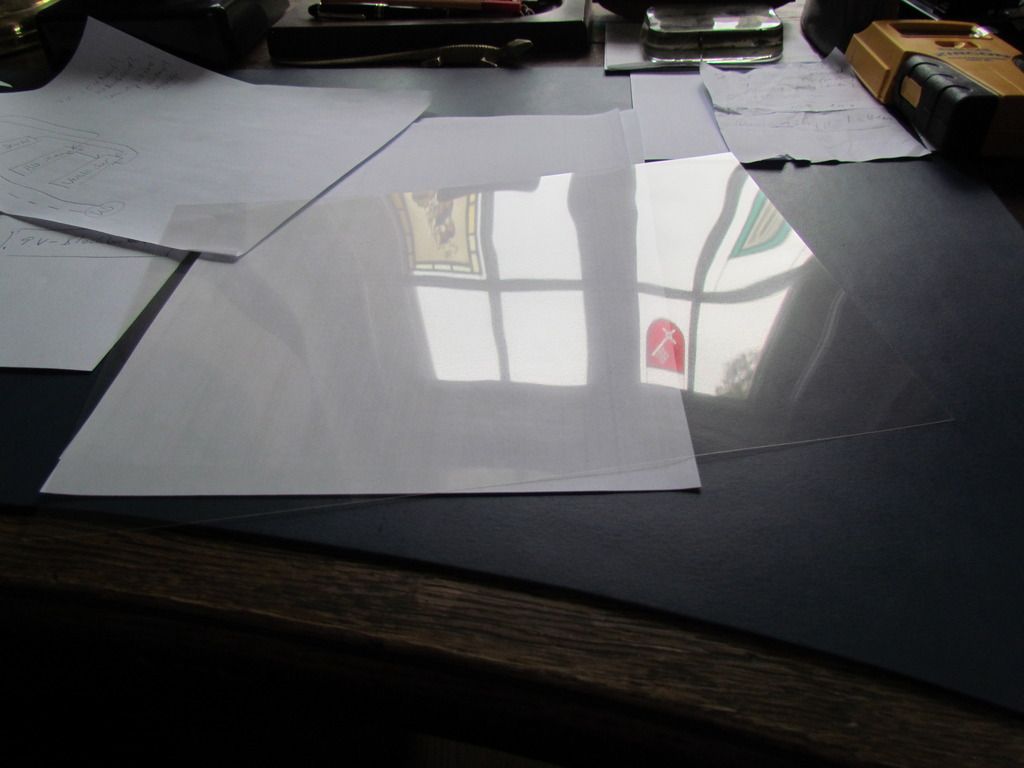
Print the films twice, you need to place the same one above the other, to "thicken" the black toner so that absolutely no light will go through:
Cut roughly into pieces:

2. Aligning the films
Fix a sheet of white paper onto a window (or use a special light-table, if you work in a graphics studio ) and fix one of the films slightly onto (you have to release it later without any distortion!):

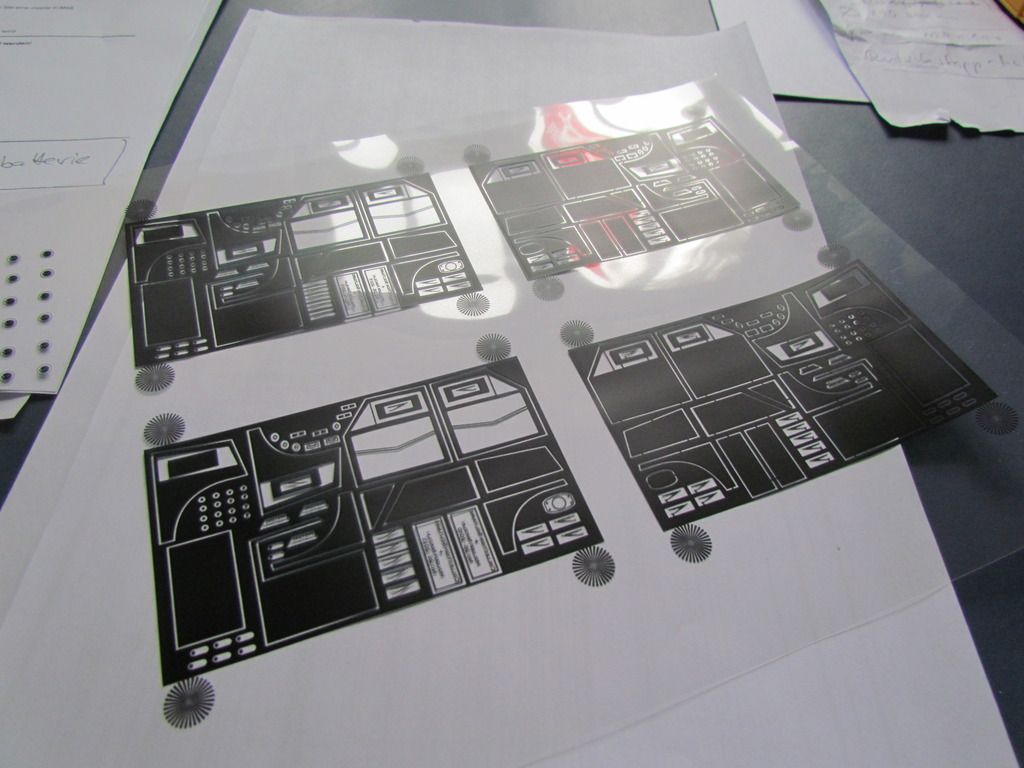
Take the copy (both of them with the printed side to your face) and align it correctly over the first, fix it with adhesive tape (on the lower side), when the so-called "Siemens stars" in the corners do not show any moiré:

Bend the top side towards, apply a thin strip of double-sided adhesive tape and join the two layers on the top edge. Remove the fixation on the lower edge and repeat there, so that both films are joined firmly.
Repeat this with the second graphic, for the other side of the metal-plate.
You now have TWO double films, one for the front and one for the back.
Now repeat the described steps with the two doubled films, so that you get a pocket, consisting of two doubled films, where you can push the metal-plate between. The stars resp. the graphics have to match perfectly!!!

3. Preparing etching
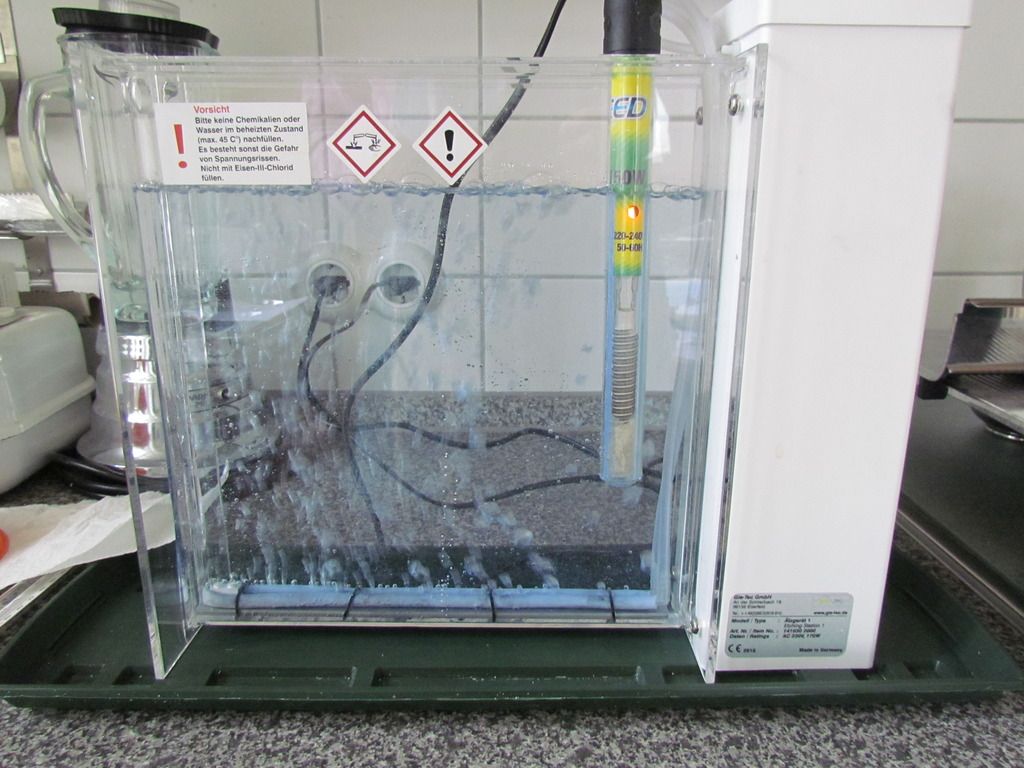
You can etch with only the chemicals and some glass or porcelain dish, but with very fine details this won't work very well. So do yourself a favour and buy a photo-etching device. In Germany this costs about € 150, but it makes your life so much brighter

There's a heating (right-hand side) and you have to fill in the etching solution (mixed seperately, can be used several times, until it's "fed up"):
Turn on heating and "whirlpool function":
Wait until it has reached the right temperature, ca. 55 °C:

(The warmer it is, the faster - and therefore "sharper" - etching is made!)
4. Exposing the metal-plate
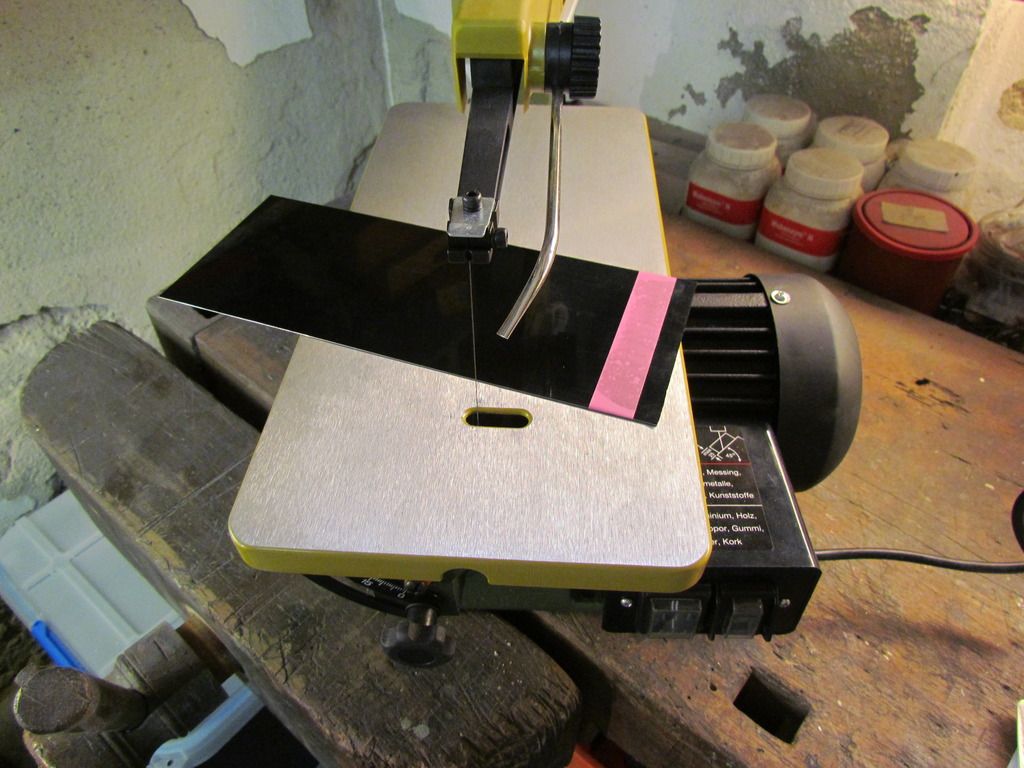
Cut off a matching piece from the special-covered metal (I mostly use 0.2 mm nickel-silver). Use a machine saw, the metal must not be bent!

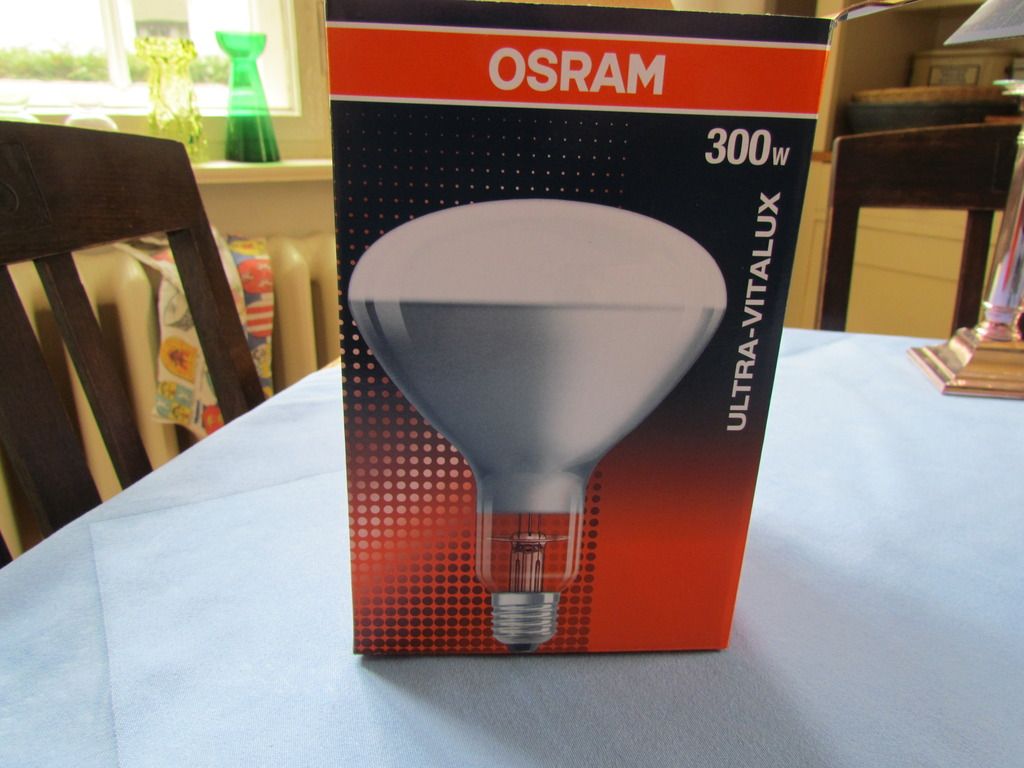
Get a UV-lamp (and be careful: your skin is burnt when staying too long under...):
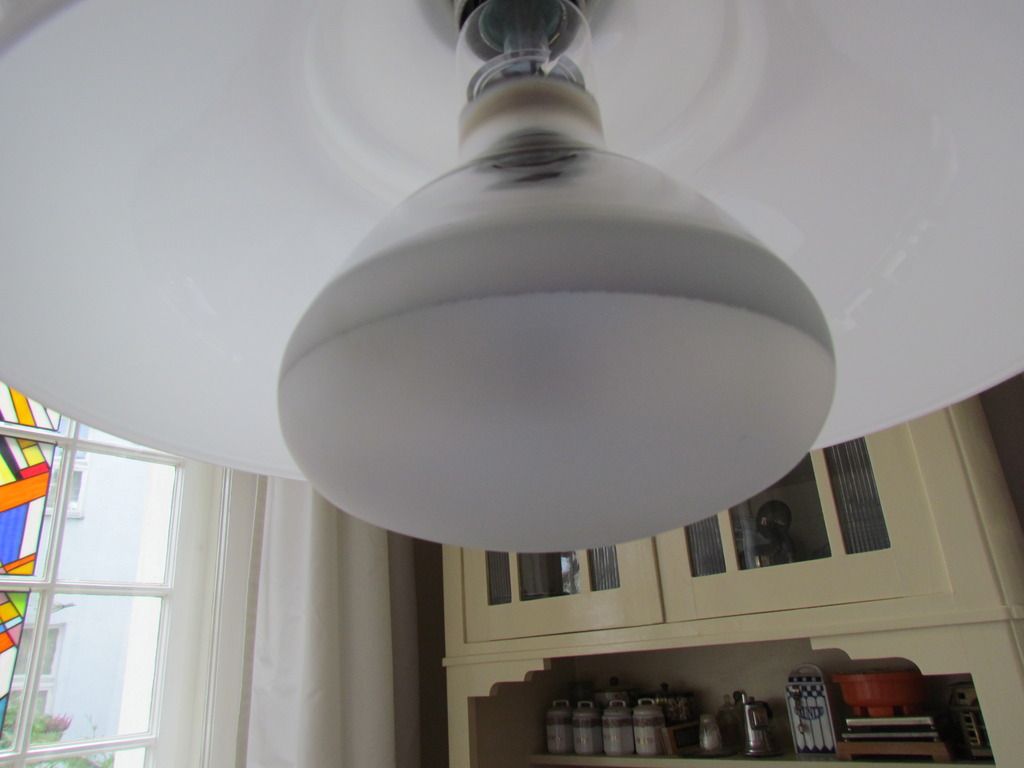
Screw into your kitchen lantern (ore wherever you are allowed to manage all this ):
):
Turn on and wait five minutes until it reaches its full capacity.
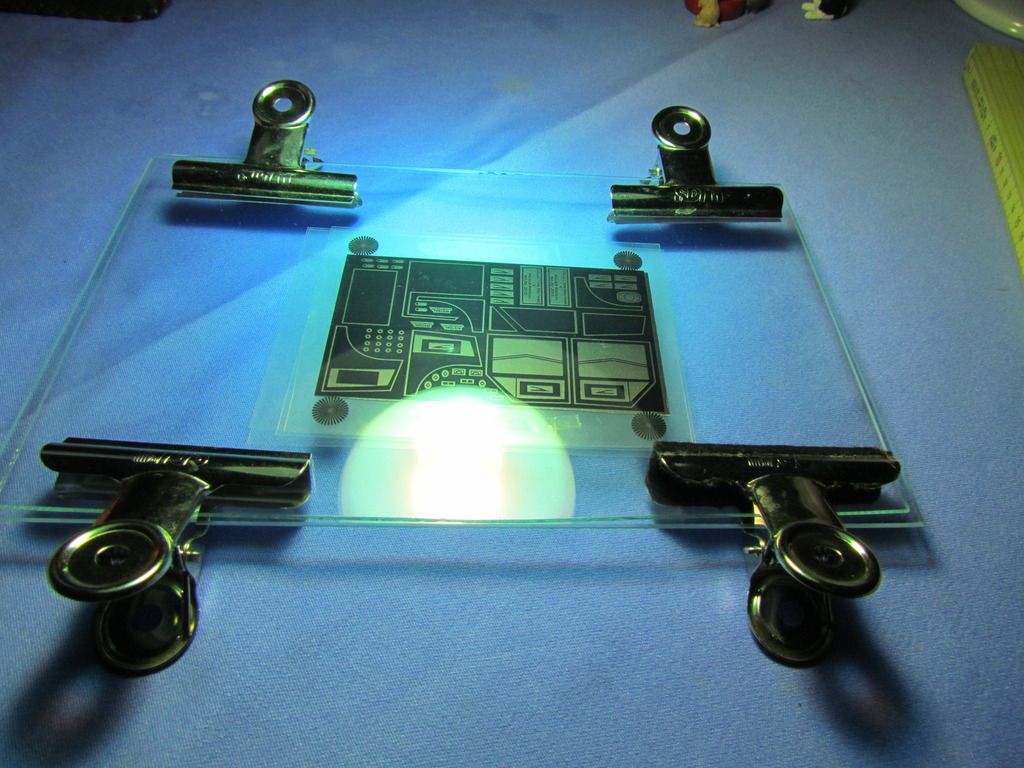
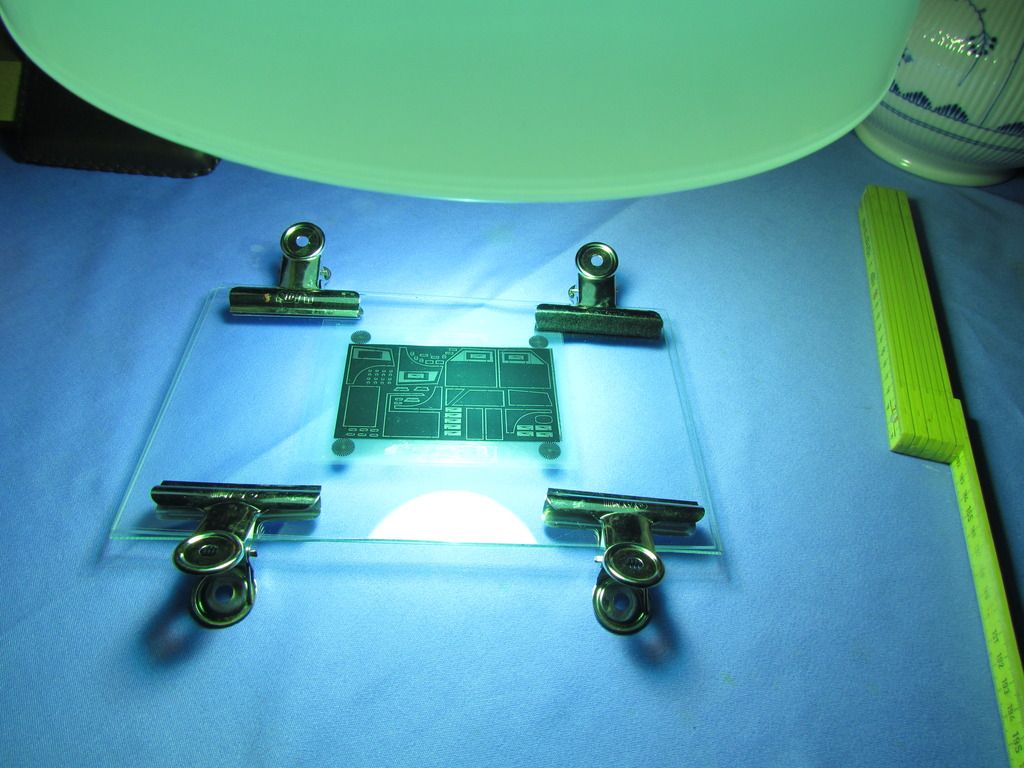
You need a glass tray for exposing, I use a thin glass plate from an old picture frame, cut in two pieces:
Place under the lamp, 15 cm distance:

Peel the covering foil off the metal and push it between the photo films (think of the doubled films!):

Place quickly between the glass plates, put it below the UV-lamp and wait exactly 105 seconds:
Turn around to the other side and repeat.
Take off the metal-plate and quickly put it into the developer:
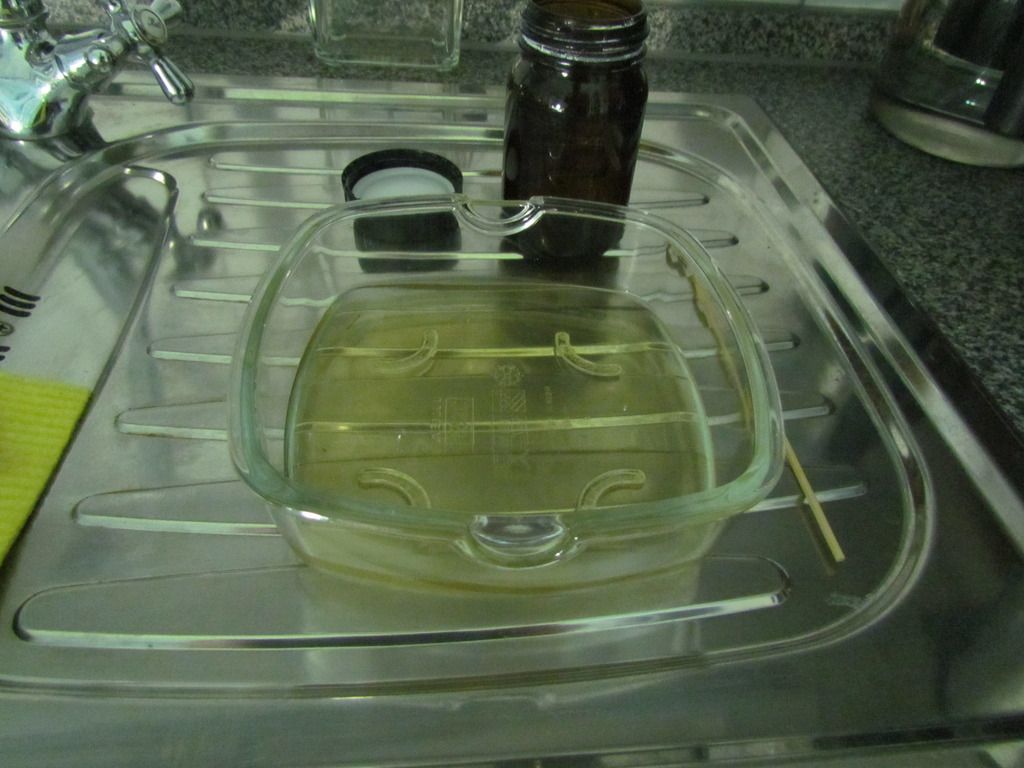
Move it gently (turning around again and again), but be careful that you do not harm the surface! Do so for 120 - 150 seconds, then you can see the (hopefully) sharp edges of the graphics. Take it out, rinse with clear water:
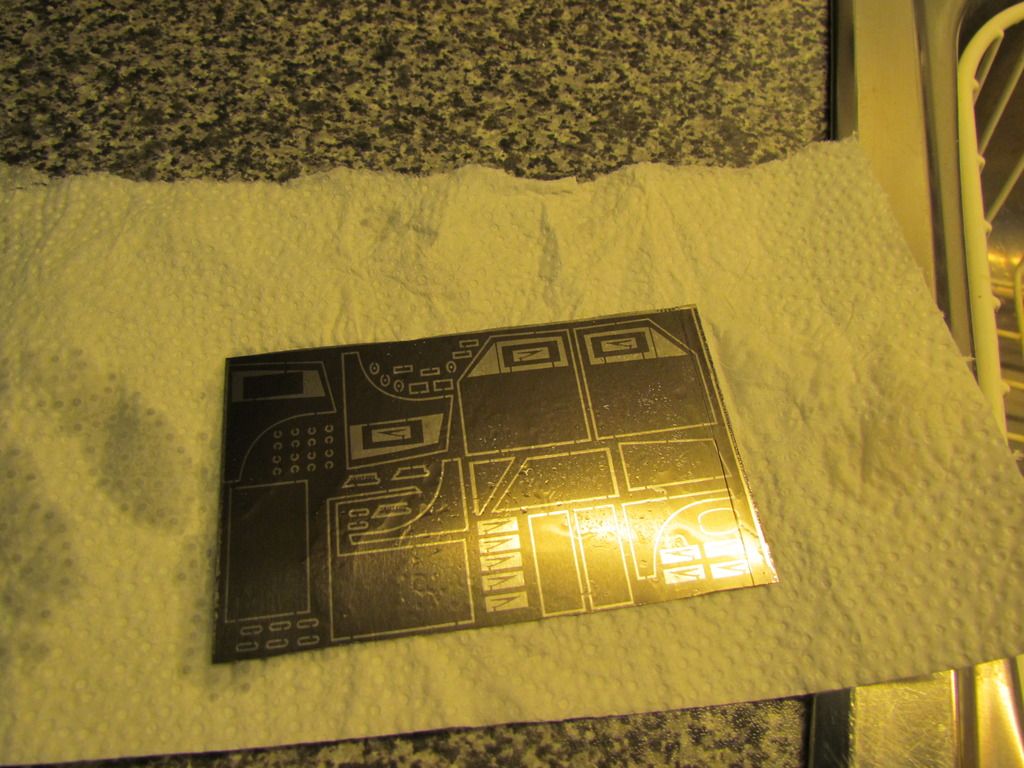
The "black" parts are still covered with the photo-lacquer (bronze), the "white" parts are developed and you can see the bare nickel-silver, which will be etched off.
Thanks for following, tune in again to see the remaining steps!
1. Making the graphics
Of course you can paint all the desired parts with ink and nib, but I recommend an appropriate PC program. If you already own AutoCad, Solid Works or similar, you can skip this point, then you're already a professional! If not, get InkScape - this is a free-ware which needs - of course - some learning, but can easily be dealt with. Imagine photo-etching as a kind of developing photos: you have to transfer a graphic onto a metal-plate, so that the "white" parts are etched away, and the "black" parts keep remained. By using different films for front and back you can make "seams" from one side (or the other). A completed graphic could look like this one:

You need two graphics, one for the front, one for the back, which match absolutely exactly to another. Furthermore the printed toner has to face the metal-plate, so the front side graphics have to be mirrored.
For printing, choose an appropriate foil for your printer (different foils for InkJet and LaserJet!). I take simple overhead-foil, this works best (special "photo-foils" do not work in my experience...):

Print the films twice, you need to place the same one above the other, to "thicken" the black toner so that absolutely no light will go through:

Cut roughly into pieces:

2. Aligning the films
Fix a sheet of white paper onto a window (or use a special light-table, if you work in a graphics studio
 ) and fix one of the films slightly onto (you have to release it later without any distortion!):
Take the copy (both of them with the printed side to your face) and align it correctly over the first, fix it with adhesive tape (on the lower side), when the so-called "Siemens stars" in the corners do not show any moiré:

Bend the top side towards, apply a thin strip of double-sided adhesive tape and join the two layers on the top edge. Remove the fixation on the lower edge and repeat there, so that both films are joined firmly.
Repeat this with the second graphic, for the other side of the metal-plate.
You now have TWO double films, one for the front and one for the back.
Now repeat the described steps with the two doubled films, so that you get a pocket, consisting of two doubled films, where you can push the metal-plate between. The stars resp. the graphics have to match perfectly!!!

3. Preparing etching
You can etch with only the chemicals and some glass or porcelain dish, but with very fine details this won't work very well. So do yourself a favour and buy a photo-etching device. In Germany this costs about € 150, but it makes your life so much brighter


There's a heating (right-hand side) and you have to fill in the etching solution (mixed seperately, can be used several times, until it's "fed up"):
Turn on heating and "whirlpool function":

Wait until it has reached the right temperature, ca. 55 °C:

(The warmer it is, the faster - and therefore "sharper" - etching is made!)
4. Exposing the metal-plate
Cut off a matching piece from the special-covered metal (I mostly use 0.2 mm nickel-silver). Use a machine saw, the metal must not be bent!


Get a UV-lamp (and be careful: your skin is burnt when staying too long under...):

Screw into your kitchen lantern (ore wherever you are allowed to manage all this
 ):
):
Turn on and wait five minutes until it reaches its full capacity.
You need a glass tray for exposing, I use a thin glass plate from an old picture frame, cut in two pieces:
Place under the lamp, 15 cm distance:

Peel the covering foil off the metal and push it between the photo films (think of the doubled films!):

Place quickly between the glass plates, put it below the UV-lamp and wait exactly 105 seconds:


Turn around to the other side and repeat.
Take off the metal-plate and quickly put it into the developer:

Move it gently (turning around again and again), but be careful that you do not harm the surface! Do so for 120 - 150 seconds, then you can see the (hopefully) sharp edges of the graphics. Take it out, rinse with clear water:

The "black" parts are still covered with the photo-lacquer (bronze), the "white" parts are developed and you can see the bare nickel-silver, which will be etched off.
Thanks for following, tune in again to see the remaining steps!
5. Etching
The etching solution has meanwhile reached the ideal temperature of 55 °C. Instruction says "max. 45 °C", but the real craftsman always tries how far he can go... :mrgreen: The point is, that the etching is to be made fast: the longer it takes, the more inaccurate the edges of the parts will be. Normally etching takes about 10 minutes per 0.1mm = 20 minutes for the 0.2mm-plate shown. With a temperature of 58 °C it was made in about 13 minutes! The jacuzzi bubbles improve the etching as the etched metal molecules are blown away permanently.
The holder for the plate is made of Lego bricks, as you will recognize. Of course such thing comes with the etching device, but I find this one much more easier to handle:

By the way: The etching solution does not harm plastics, wood or any organic material - such as your hands, for example. So it doesn't matter if you get some sprinkles on your hand, but better wear old clothes or an apron, especially when working with the developer, because this stuff is really aggressive, also for your skin!
You will see very quickly how the solution burns the metal. If you place a coloured paper behind the device you can see immediately when the material is etched off completely. Move the holder with the plate permanently and gently, this improves the result.

When all lines are etched out, take the metal plate out and rinse with clear water. If you haven't forgot to place small holders on your graphic for all parts, it looks like this (otherwise the parts will rest on the bottom of the etching device :roll: ). The right edge is very untidy due to the metal-plate itself which was taken from the edge of a bigger part where the UV-lacquer was not applied correctly. It is best to peel off 2mm of the protecting foil on all four corners/edges to prove if the lacquer covers evenly the plate you cut out.
Wash off the UV-lacquer with acetone and if you like to have a chrome effect, polish the metal with a rotating iron brush:

Place the plate onto a hard base (I use a marble plate) and cut off the pieces with an (old) hard knife. Do not use a soft base, then the parts will be bent when cutting off! Remainings can be honed off easily as nickel-silver is quite soft and easy to be tooled.

And that - dear friends - is the full truth about photo-etching at home! Industrial manufacturers use a so-called "foam or spraying etching device", but these are not available for home use. With these the metal is not dunked into the solution, but permanently sprayed with a thin foam. This allows etching of lines of less than 0.1mm with an almost unbelievable sharpness. Anyway, with the steps shown here you are able to create dozens and hundreds of useful parts for your model cars. When you are little bit creative, you can even plan 3-dimensional parts if you bend and combine two or more flat parts. Thanks for joining this thread, and please ask your questions, if anything remains unclear!
The etching solution has meanwhile reached the ideal temperature of 55 °C. Instruction says "max. 45 °C", but the real craftsman always tries how far he can go... :mrgreen: The point is, that the etching is to be made fast: the longer it takes, the more inaccurate the edges of the parts will be. Normally etching takes about 10 minutes per 0.1mm = 20 minutes for the 0.2mm-plate shown. With a temperature of 58 °C it was made in about 13 minutes! The jacuzzi bubbles improve the etching as the etched metal molecules are blown away permanently.
The holder for the plate is made of Lego bricks, as you will recognize. Of course such thing comes with the etching device, but I find this one much more easier to handle:

By the way: The etching solution does not harm plastics, wood or any organic material - such as your hands, for example. So it doesn't matter if you get some sprinkles on your hand, but better wear old clothes or an apron, especially when working with the developer, because this stuff is really aggressive, also for your skin!
You will see very quickly how the solution burns the metal. If you place a coloured paper behind the device you can see immediately when the material is etched off completely. Move the holder with the plate permanently and gently, this improves the result.

When all lines are etched out, take the metal plate out and rinse with clear water. If you haven't forgot to place small holders on your graphic for all parts, it looks like this (otherwise the parts will rest on the bottom of the etching device :roll: ). The right edge is very untidy due to the metal-plate itself which was taken from the edge of a bigger part where the UV-lacquer was not applied correctly. It is best to peel off 2mm of the protecting foil on all four corners/edges to prove if the lacquer covers evenly the plate you cut out.

Wash off the UV-lacquer with acetone and if you like to have a chrome effect, polish the metal with a rotating iron brush:

Place the plate onto a hard base (I use a marble plate) and cut off the pieces with an (old) hard knife. Do not use a soft base, then the parts will be bent when cutting off! Remainings can be honed off easily as nickel-silver is quite soft and easy to be tooled.

And that - dear friends - is the full truth about photo-etching at home! Industrial manufacturers use a so-called "foam or spraying etching device", but these are not available for home use. With these the metal is not dunked into the solution, but permanently sprayed with a thin foam. This allows etching of lines of less than 0.1mm with an almost unbelievable sharpness. Anyway, with the steps shown here you are able to create dozens and hundreds of useful parts for your model cars. When you are little bit creative, you can even plan 3-dimensional parts if you bend and combine two or more flat parts. Thanks for joining this thread, and please ask your questions, if anything remains unclear!
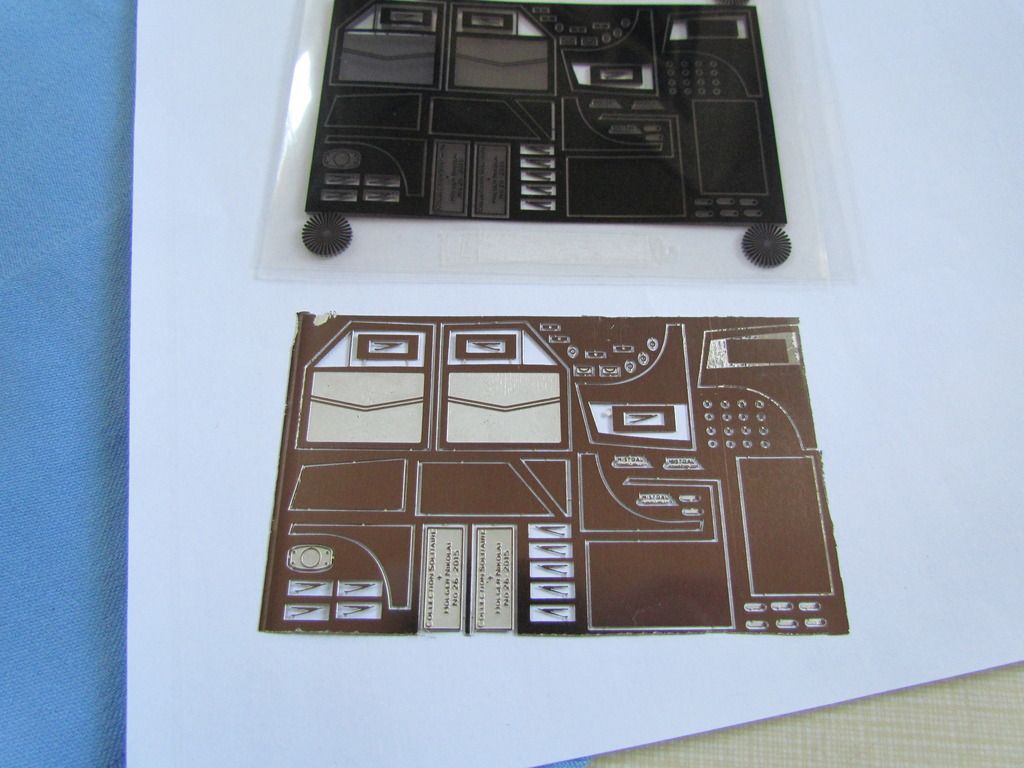
Just to show what you can do with photo-etching, here is an example for a spoke wheel, made only with photo-etched parts:

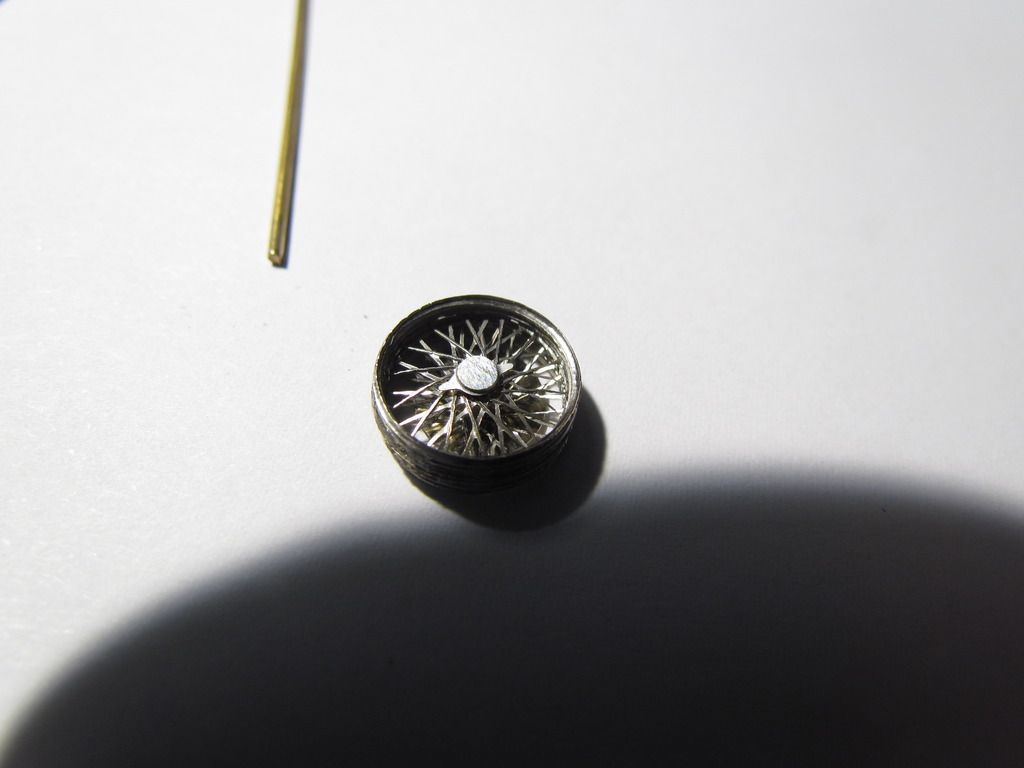
The rim consists of seven layers of rings, 3.7 mm height in total. Outside diameter is 11.5 mm. Wheel hub is made of two brass tubes, one of which fits into the other, inner one is longer than the one which keeps the two spoke layers in distance. This way spoke wheels can be made in any size desired, independent of what manufacturers offer...


The rim consists of seven layers of rings, 3.7 mm height in total. Outside diameter is 11.5 mm. Wheel hub is made of two brass tubes, one of which fits into the other, inner one is longer than the one which keeps the two spoke layers in distance. This way spoke wheels can be made in any size desired, independent of what manufacturers offer...
Superb!
Your skills are wasted Jean.....you should be making counterfeit €100 notes instead  .
.
 .
.model kit engineer...
Jean B, thanks for the tutorial! You have impressive skills and seeing some p/e wipers on a 1/43 Best Ferrari 330 GTC back in 2000 is what made me realize how incredible the results can be with etch work. To this day, my favorite details on Sparks, GLM, NEO etc are the etched trims  Please keep sharing your work
 Please keep sharing your work
 Not sure how I missed this when it was me who requested it but superb! Thanks Jean - you are a very clever model maker!
Jean, that dashboard, for instance. How did you make the lips and contours of the dials? And for the door panels, how did you manage the grooves? That's why I asked about 3D. In my mind you can only make a plain and flat sheet with pe - the process only cuts out the pattern for you.
This is the nickle silver sheet which is covered with UV sensible lacquer ("photo resist") on both sides, this has a brownish hue. Both sides are protected with black adhesive foil to avoid daylight spoiling the sheet:

Then you have to design two black/white (clear) films with the necessary designs, one for each side of the metal sheet. The black parts will stay, the clear parts will be etched off. This is the "front" side:

For the rear side I need in this case no "design", but only plain surfaces. But of course you can also make b/w graphics for the other side, and when making "clear" parts at the same place on front and rear, this part will be etched completely "through", for example for holes and gaps, but also for the surroundings of any part:

These two films are put together as a "pocket", in which the metal sheet is placed and then put under a UV-lamp. The strong UV light goes through the clear parts of the foil and changes the structure of the UV photo resist. Following only these "lightened" parts are washed away in the developing bath (please see above in this thread).

Afterwards the metal sheet is dunked into the etching solution, which now only can etch the "white" parts where the photo resist had been washed off, the "black" parts, where the photo resist was not lightened, cannot react with the etching solution and stay unharmed. This way you get the relieved parts in any design you want. And if you construct the parts clever, you can build real 3D parts like spoke wheels, hood mascots, luggage and so on... Hope that this helped a little...